ford Workshop Repair Guides

Ford Workshop Service and Repair Manuals

General Procedures|Removal and Installation > < Glass, Frames and Mechanisms - Vehicles Built From: 05-1999
Glass, Frames and Mechanisms - Door Window Glass Adjustment Cougar 1999 (08/1998-01/2001)
General Procedures

Special Tool(s)

Door Glass Block Glass

501 - S042

Adjustment

  1. Remove the door trim panel. For additional information, refer to Section  501-05 Interior Trim and Ornamentation.

  1. CAUTION:
    CAUTION:Do not touch the adhesive surface as re - bonding will be impaired.
    Peel back the watershield.

  1. CAUTION:
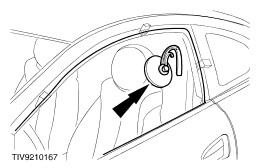
    CAUTION:The door weatherstrip is attached with a small amount of adhesive at the waste line of the B - pillar. To prevent damage to the weatherstrip, start removing the weatherstrip at the B - pillar waste line in an upward and forward direction.
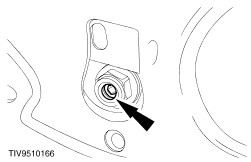
    Remove the door weatherstrip.

  1. Remove the drip rail.

  1. Loosen the two lower rear guide fixings.

  1. Set the rear guide to the nominal position.
    1. Turn the adjustment screw.
    1. Make sure the rear guide lower bracket is located in the middle of the bracket slot.

  1. Check and adjust if necessary the window regulator height stops.
  1. Connect the power window switch and fully close the window.

  1. Install the front spacer special tool 501 - 043 adjacent to the fifth drip rail retainer hole (counted from the rear quarter window).

  1. Install the middle spacer special tool 501 - 044 adjacent to the second drip rail retainer hole (counted from the rear quarter window).

  1. Install the rear spacer special tool 501 - 045 to the center of the quarter glass.

  1. NOTE:
    NOTE:Do not remove the front clamp bolt.
    Loosen the glass front clamp bolt.

  1. Remove the glass rear clamp bolt.
  1. CAUTION:
    CAUTION:To prevent movement of the door glass alignment spacer, carefully close the door.
    Close the door.

  1. Using the suction cup adjust the door glass against the three spacers.

  1. With the glass held in position and with the aid of another technician, tighten the glass front clamp bolt.

  1. Install the glass rear clamp bolt.
  1. Open the door and remove the spacers.

  1. Close the door to the first door latch position and check the distance between the outer glass surface and the roof flange next to the second drip rail retainer hole (counted from the rear quarter window).

  1. Minor adjustment can be made to make the glass flush using the rear guide adjustment screw if necessary.

  1. Tighten the two lower rear guide fixings.
  1. Install the drip rail.
  1. Install the door weatherstrip.

  1. Minor adjustment can be made to the glass height by using the door glass height stops.
  1. Install the door watershield.
  1. Install the door trim panel. For additional information, refer to Section  501-05 Interior Trim and Ornamentation.

General Procedures|Removal and Installation > < Glass, Frames and Mechanisms - Vehicles Built From: 05-1999