| In-vehicle Repair Special Tool(s) | | Universal Flange Holding Wrench 205-072 (15030A) | | | Gauge, Bolt Angle 303-174 (21540) | | | Alignment Plate, Camshaft 303-376 (21162B) | | | Socket, Spark Plug 303-499 (21202) | | | Timing Peg, Crankshaft TDC 303-748 | General Equipment Materials Name Specification Cable ties Lubricant (spark plug threads - Never Seeze) ESE-M1244-A Silicone grease ESE-M1C171-AA Removal All Vehicles | | -
Disconnect the battery ground lead.
For additional information, refer to: Battery Disconnect (414-01 Battery, Mounting and Cables, General Procedures).
| | | -
Loosen the bolts on the coolant pump pulley. | | | -
Remove the accessory drive belt. For additional information, refer to: (303-05 Accessory Drive) Accessory Drive Belt (Removal and Installation), Accessory Drive Belt - Vehicles Built Up To: 03/2002, Vehicles Without: Accessory Drive Belt Tensioner (Removal and Installation), Accessory Drive Belt - Vehicles Built From: 03/2002, Vehicles Without: Accessory Drive Belt Tensioner (Removal and Installation). | | | -
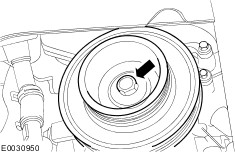
Remove the crankshaft pulley/vibration damper. | | | -
Remove the coolant pump pulley and the drive belt idler pulley. | | | -
Remove the bolts from the timing belt cover. - Timing belt upper cover
- Timing belt lower cover
| | | -
Remove the valve cover.
For additional information, refer to: Valve Cover (303-01A Engine - 1.4L/1.6L, In-vehicle Repair).
| | | -
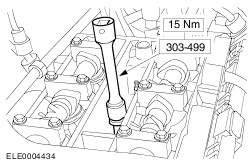
Remove the spark plugs using the special tool. | | | -
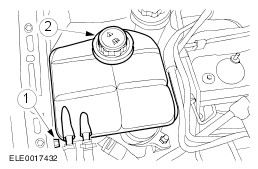
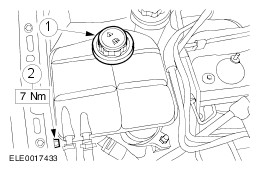
Detach the coolant expansion tank. - Remove the bolt.
- Unclip the coolant expansion tank and lay it to one side.
| | | -
Unclip the power steering reservoir and lay it to one side. | | | -
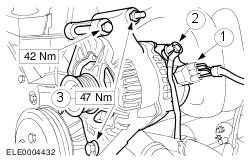
Remove the generator and lay it to one side. - Disconnect the plug.
- Disconnect the positive cable.
- Detach the generator.
| | | -
Place the trolley jack with a wooden block under the oil pan and raise it slightly until the front engine mounting is free from strain. | | | -
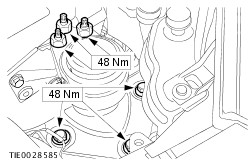
Remove the engine mounting. | | | -
Remove the timing belt upper cover. | | | -
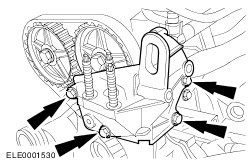
Remove the front engine mounting bracket (shown with engine removed). | Vehicles with eccentric cam timing belt tensioner | | -
Slacken and remove the timing belt (shown with engine removed). | Vehicles with slotted bracket timing belt tensioner | | -
Slacken and remove the timing belt (shown with engine removed). | Vehicles built 09/2003 onwards | | -
Remove the timing belt. - Tension the timing belt tensioner by pulling the timing belt and lock it with the special tool.
| | | -
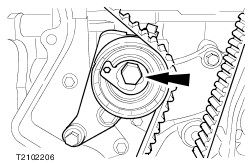
Remove the timing belt tensioner. | Installation All Vehicles | | -
Set the crankshaft to 20 degrees before TDC. | | | -
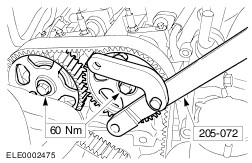
CAUTION:Use the special tool to stop them from turning. Loosen the bolts until the camshaft timing pulleys can be turned on the camshafts. - Discard the retaining bolts.
| | | -
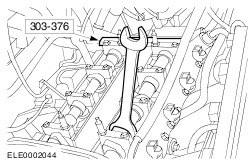
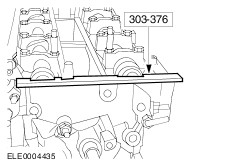
Turn the camshafts to TDC on cylinder number 1 and insert the special tool. - Turn the camshafts by the hexagon using a 21 mm open-ended spanner until the special tool can be inserted.
| | | -
NOTE:Install a new timing belt. NOTE:Install the timing belt, beginning with the crankshaft timing belt pulley working counterclockwise. Install the timing belt. | | | -
Attach the lower timing belt cover (shown from below). | | | -
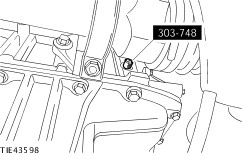
NOTE:If it is not possible to insert the special tool, turn back the crankshaft counter-clockwise by approx. 20 degrees. Turn the crankshaft to TDC on cylinder number 1. - Remove the blanking plug and screw in the special tool.
- Carefully turn the crankshaft in a clockwise direction until the crank web touches the special tool.
| | | -
NOTE:Install a new crankshaft pulley retaining bolt. Install the crankshaft pulley. - Tighten the crankshaft pulley retaining bolt in two stages.
| Vehicles with eccentric cam timing belt tensioner | | -
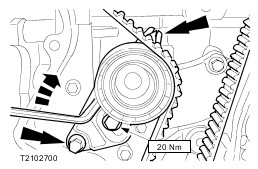
NOTE:Install a new timing belt. NOTE:Do not move the eccentric during tightening. Hold with an Allen key. Tension the timing belt (shown with engine removed). - Using a 6 mm Allen key, turn the eccentric counter-clockwise until the pointer is exactly in line with the centre of the rectangular hole.
| Vehicles with slotted bracket timing belt tensioner | | -
NOTE:Install a new timing belt. Tension the timing belt (shown with engine removed). - Use an 8 mm Allen key to tension until the pointer is exactly in line with the center of the rectangular hole.
| Vehicles built 09/2003 onwards | | -
Install the timing belt tensioner. | All vehicles | | -
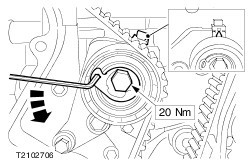
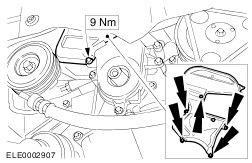
CAUTION:Do not tighten the camshaft timing pulleys against Special Tool 303-376. NOTE:Do not turn the crankshaft and the camshaft. NOTE:Install new camshaft pulley retaining bolts. Tighten the bolts of the camshaft timing pulleys. | | | -
Remove Special Tool 303-376. | | | -
Unscrew the special tool (shown from below). | | | -
Check the valve timing. - Turn the crankshaft two turns clockwise and turn cylinder number 1 to TDC.
- Carefully turn the crankshaft in a clockwise direction until the crank web touches Special Tool 303-748.
| | | -
Check the valve timing by inserting the special tool. | | | -
NOTE:Only if Special Tool 303-376 cannot be inserted. NOTE:Counterhold using the special tool. NOTE:The crankshaft must remain at TDC on cylinder number 1. Correct the valve timing. - Loosen the bolt of the affected camshaft.
- Turn the camshaft by the hexagon until Special Tool 303-376 can be inserted.
- Tighten the camshaft timing pulley.
- Check the valve timing again in accordance with the previous steps.
| | | -
Install the spark plugs using the special tool. | | | -
Install the front engine mounting bracket. | | | -
Move the timing belt upper cover into position. | | | -
Install the engine mounting. | | | -
Install the generator. - Attach the connector.
- Install the positive lead.
- Install the generator.
| | | -
Raise the vehicle.
For additional information, refer to: Lifting (100-02 Jacking and Lifting, Description and Operation).
| | | -
Unscrew Special Tool 303-748 and screw in the blanking plug. | | | -
Install the bolts of the upper timing belt covers. | | | -
Install the coolant pump pulley and the drive belt idler pulley. | | | -
Install the accessory drive belt. For additional information, refer to: (303-05 Accessory Drive) Accessory Drive Belt (Removal and Installation), Accessory Drive Belt - Vehicles Built Up To: 03/2002, Vehicles Without: Accessory Drive Belt Tensioner (Removal and Installation), Accessory Drive Belt - Vehicles Built From: 03/2002, Vehicles Without: Accessory Drive Belt Tensioner (Removal and Installation). | | | -
Clip on the power steering reservoir. | | | -
Attach the coolant expansion tank. - Clip in the expansion tank.
- Tighten the bolt.
| | | -
Install the valve cover.
For additional information, refer to: Valve Cover (303-01A Engine - 1.4L/1.6L, In-vehicle Repair).
| | | -
Standard finishing operations. - Connect the battery negative lead.
For additional information, refer to: Battery Disconnect (414-01 Battery, Mounting and Cables, General Procedures).
| |