| Installation Special Tool(s) | | Lifting Bracket, Engine 303-122 (21-068A) | | | Alignment, Powertrain 502-003 (21-172) | General Equipment Assembly stand GV2166 Jib crane Retaining strap Materials Name Specification High-temperature grease ESDM-1C220-A Brake fluid ESDM-6C57-A Coolant ESDM-97B49-A Installation All Vehicles | | -
Lift engine and transmission off assembly table using jib crane. | | | -
Position engine and transmission in the engine compartment using jib crane. | | | -
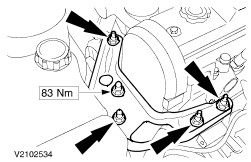
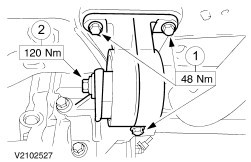
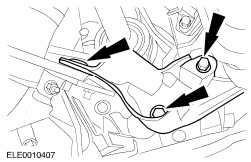
CAUTION:Use new self-locking nuts. Do not distort or twist the engine mounting. Install front engine mounting. - Tighten the new nuts on the front engine mounting.
| | | -
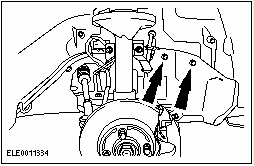
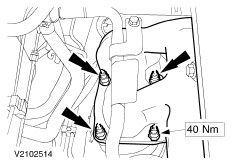
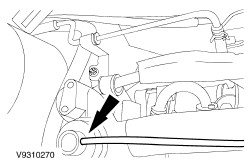
CAUTION:Use new self-locking nuts. Do not distort or twist the engine mounting. Install the rear engine mounting. - Fit new nuts on the rear engine mounting.
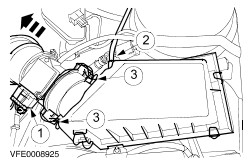
- Tighten the air cleaner bracket.
| | | -
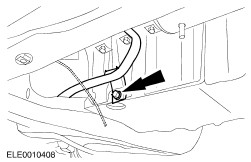
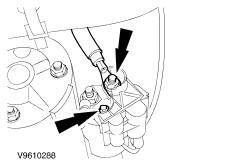
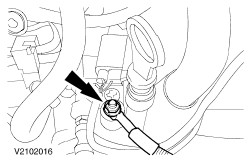
Connect the hydraulic pipe to the clutch slave cylinder. - Clip the hydraulic pipe into the bracket.
| | | -
Detach engine and transmission from the jib crane. | | | -
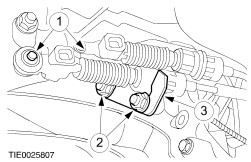
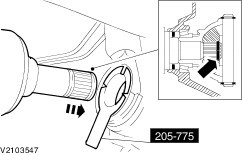
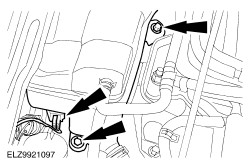
NOTE:The adjustment mechanisms must be released by pressing them in. NOTE:The abutment brackets tension themselves automatically after releasing them. Attach the gearshift cables to the transmission and adjust them. - Attach the cables to the lever.
- Insert the cables to the lever.
- Lock the abutment bracket by turning it clockwise.
| | | -
Fit the right-hand engine roll restrictor bracket on the transmission. | | | -
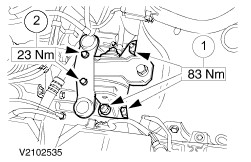
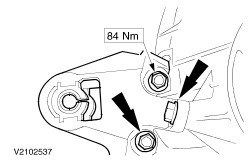
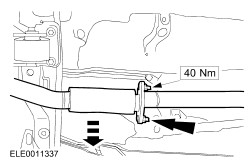
CAUTION:Do not skew the engine roll restrictor. Fit the right-hand engine roll restrictor and insert the centre bolt. - Tighten the bolts.
- Tighten the center bolt.
| | | -
Fit the left-hand engine roll restrictor bracket on the transmission. | | | -
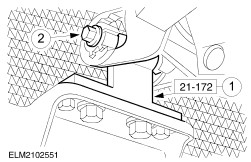
Align the powertrain. - Install the special tool.
- Tighten the bolt finger tight.
| | | -
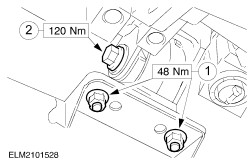
CAUTION:Do not skew the engine roll restrictor. Fit the left-hand engine roll restrictor. - Tighten the two bolts.
- Tighten the center bolt.
| | | -
CAUTION:The inner tripod joint must not be bent more than 18 degrees, the outer joint not more than 45 degrees. Install the left-hand front driveshaft. | | | -
CAUTION:The inner tripod joint must not be bent more than 18 degrees, the outer joint not more than 45 degrees. NOTE:The lower bolt also holds the bracket for the refrigerant line in place. Insert the right-hand front driveshaft into the transmission and attach the center bearing to the bracket. | | | -
Fit the coolant line bracket. | | | -
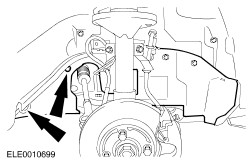
Fit the left-hand transverse link. - Fit the transverse link on the spindle carrier.
- Fit the track rod end.
- Fit the stabiliser bar connecting link.
| | | -
Fit the right-hand transverse link on the spindle carrier (left-hand side shown). | Vehicles with air conditioning | | -
Fit the air-conditioning compressor bracket. | | | -
Fit the crankshaft pulley/vibration damper. | | | -
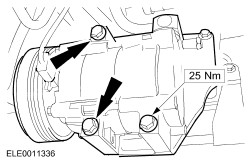
Attach the air conditioning compressor to its bracket. | | | -
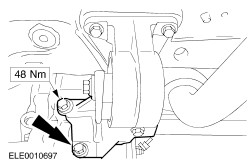
Install the air-conditioning compressor drive belt. - Fit the drive belt.
- Tighten the tensioning bolt.
| All vehicles | | -
Fit the rear left wheel housing cover (right-hand side shown). | | | -
Fit the front right wheel housing cover. | | | -
Connect the starter motor. | | | -
Install the catalytic converter bracket. | | | -
Install the catalytic converter. | | | -
Fit the catalytic converter on the exhaust manifold. | | | -
Fit the heater coolant hoses. | | | -
Fit the power steering line bracket on the alternator. | | | -
Attach the pipes for the power steering pump. | | | -
Fit the ground lead on the transmission. | | | -
Connect the main engine wiring harness connector. - Clip the VSS cable and the clutch slave cylinder hydraulic line into the selector cable bracket.
- Secure the main engine wiring harness using cable tie.
| | | -
Fit the glow plug power supply. | | | -
Attach the EGR valve hose. | | | -
Fit the accelerator cable and cold starting system cable. - Attach the cold starting system cable.
- Fit the accelerator cable in the bracket.
- Push on the clip.
- Attach the accelerator cable.
| | | -
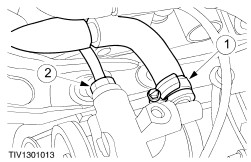
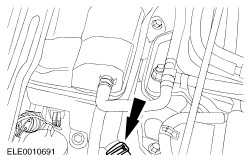
Connect the pipes. - Connect the fuel line.
- Attach the coolant hose to the thermostat housing.
- Connect the vacuum pipe to the vacuum pump.
| | | -
Attach the coolant hose to the coolant pump. | | | -
Install the coolant expansion tank. | | | -
Attach the coolant hoses to the coolant expansion tank. | | | -
Install the intercooler. - Clip in the vacuum line.
- Connect the hose.
- Tighten two bolts each on the left and right-hand side.
| | | -
Attach the coolant hose to the radiator. | | | -
Fit the lower radiator cover. - Hook the radiator cover in place.
- Tighten the bolts.
| | | -
Remove the support wrap from the flexible pipe. | | | -
Attach the front wheels and lower the vehicle. | | | -
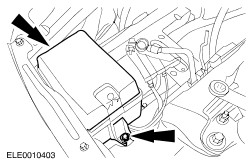
Install the battery tray. | | | -
Clip the cable into the battery tray. | | | -
Fit the air cleaner. - Fit the connector on the MAF.
- Fit the vacuum hose.
- Tighten the retaining clips.
| | | -
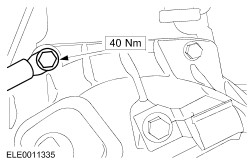
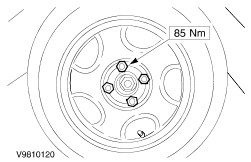
Tighten the suspension strut nut on the right and left-hand side. | | | -
Tighten the suspension strut nut on the right and left-hand side. | | | -
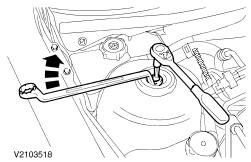
Detach the help tool from the hood. | | | -
Standard finishing operations. - Check the cooling system for leaks.
- Connect the battery ground lead.
- Check the routing of the hoses and wiring and secure them with cable ties where necessary.
- Reprogram the pre-set radio stations.
- Carry out a road test to enable the PCM (EEC V) to collect data.
- Check the fluid levels and correct as necessary.
| | | -
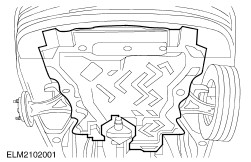
Fit the engine undershield. | |