
CAMSHAFT DRIVE BELT (page 2 of 2)
- Make
- Land Rover
- Model
- Defender 300Tdi Defender
ENGINE
9
REPAIR
NOTE: If the camshaft gear is to be
removed during these operations its
retaining bolt should be slackened before
the timing belt is removed.
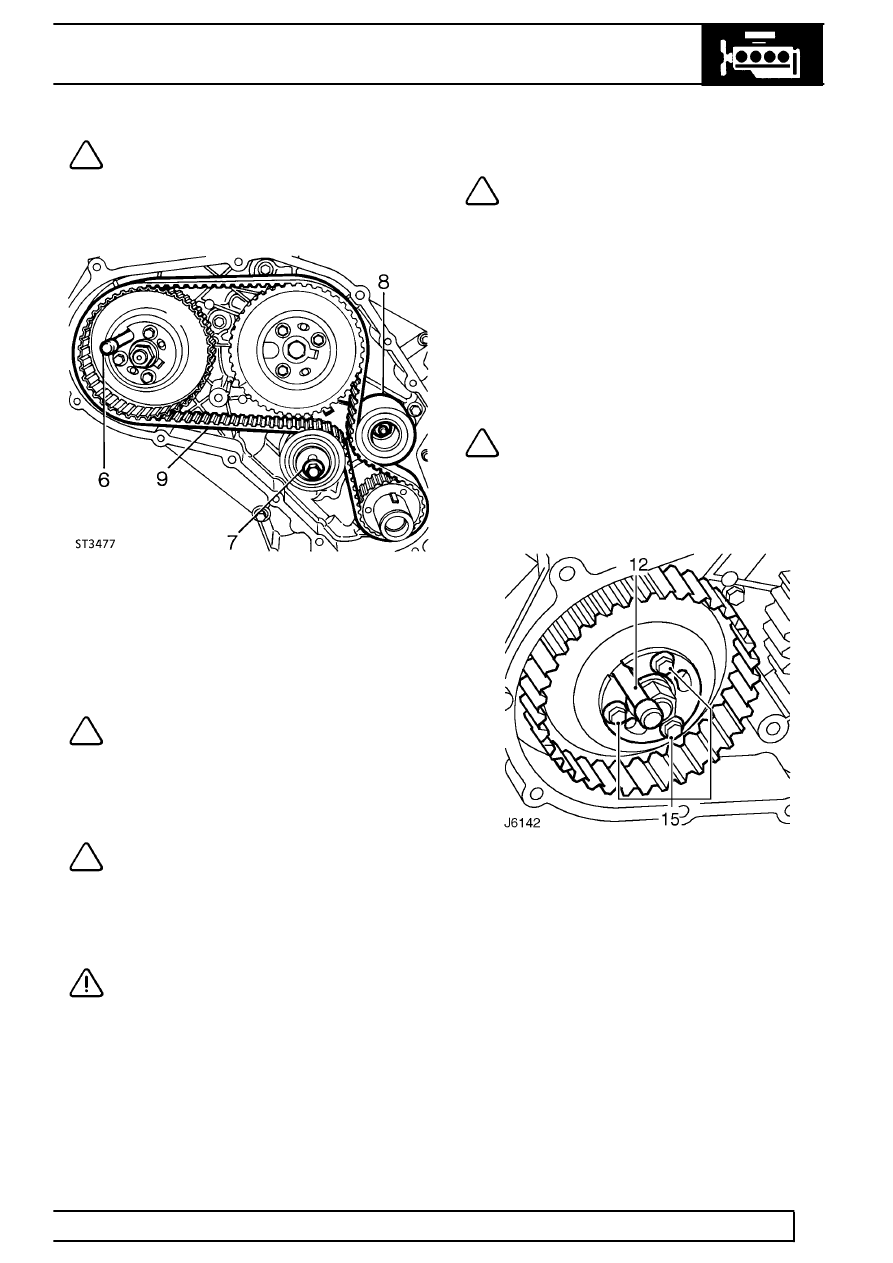
7. Slacken belt tensioner bolt.
8. Remove idler pulley.
9. Remove timing belt.
NOTE: If excessive timing belt debris is
evident in the front cover, this is probably
due to the misalignment of the front timing
cover caused by incorrect assembly of the fuel
injection pump bracket.
See FUEL SYSTEM,
Repair, Fuel Injection pump
NOTE: During use, a belt develops a wear
pattern relative to its running direction, if
the original belt is to be re-used it must be
refitted so that it rotates in the original direction.
Mark belt direction of rotation, using soft chalk, to
ensure correct refitment.
CAUTION: The belt must be stored on its
edge on a clean surface and in such a
manner that bends are not less than 50
mm (2.0in.) radius. Do not bend belts at an acute
angle, otherwise premature failure could result.
Belt tensioner
NOTE: The belt tensioner need only be
removed if it is being replaced or for
access purposes to remove front cover.
10. Remove securing bolt and withdraw tensioner
complete with spacer.
Refit
11. If necessary, fit belt tensioner and spacer.
Tighten fixing bolt to
45 Nm (33lbf/ft).
Timing belt fitting and tensioning
NOTE: It is important that belt tensioning
is carried out carefully and accurately. The
following procedure involves tensioning
the belt twice to ensure that it is equally tensioned
between each gear. New and original belts are
tensioned to different figures.
12. Ensure timing marks are correctly aligned, pin
from special tool LRT-12-045 is correctly
inserted in injection pump gear and timing tool
LRT-12-044 is fitted to flywheel housing with pin
located in flywheel slot.
13. Fit belt, observing rotational marks made during
removal. Feed belt over gears keeping it tight on
drive side.
14. Fit idler pulley.
15. Slacken injection pump gear retaining bolts.
16. Adjust belt to correctly sit in gears.
Parts & tools for this job For Land Rover Defender
- PARTTiming belt kitSearch: Land Rover Defender timing belt kit
- TOOLEngine timing tool setSearch: Land Rover engine timing tool set
- TOOLTorque wrenchSearch: 3/8 inch torque wrench
Links open Amazon search results in a new tab. As an Amazon Associate I earn from qualifying purchases.