
Lower arm - front (page 2 of 2)
- Make
- Land Rover
- Model
- Freelander Workshop Manual
- Year
- 1998–2000
- Section
- Repairs
Front suspensionLower arm - front · page 2 of 2
- Remove hub assembly.
- Remove 2 bolts from lower arm rear mounting.
- Remove bolt from lower arm front bush housing.
- Remove lower arm assembly.
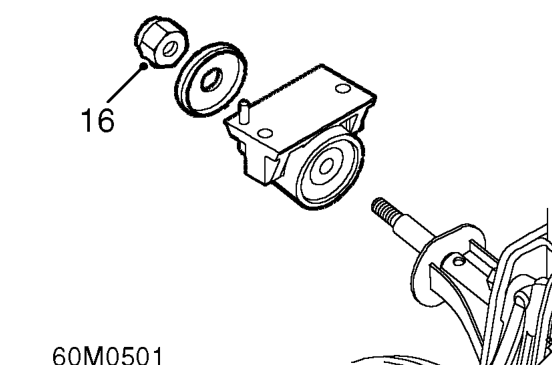
CAUTION: Note orientation of snubber washer.
- Remove nut from rear mounting, remove snubber washer and remove rear bush housing.
Refit
CAUTION: Ensure correct orientation of snubber washer. Ensure that ’OUT’ is visible on snubber washer when fitted.
- Fit rear bush housing and snubber washer to lower arm but do not tighten nut at this stage.
- Position lower arm, secure but do not tighten bolts at this stage.
- Fit hub assembly to lower arm ball joint and tighten nut to 65 Nm.
- Clean drive shaft mating faces and position drive shaft in hub.
- Fit but do not tighten NEW hub nut at this stage.
- Align hub to damper and tighten bolts to 205 Nm.
- Fit brake caliper and tighten bolts to 83 Nm.
- Clean ABS sensor, apply anti-seize grease and fit ABS speed sensor to hub.
- Position ABS harness and brake hose in bracket and secure hose with ’C’ clip.
CAUTION: Nuts and bolts must be tightened with the weight of the vehicle on the suspension.
- Fit road wheel(s) and tighten nuts to correct torque. See INFORMATION, Torque wrench settings.
- Remove stand(s) and lower vehicle.
- Tighten lower arm front bush bolt to 190 Nm.
- Tighten 2 bolts for lower arm rear bush housing to 105 Nm.
- Tighten rear mounting nut to 140 Nm.
- Fit underbelly panel. See BODY, Repairs.
- Tighten front hub nut to 400 Nm.
- Stake front hub nut.
Parts & tools for this job For 1998 Land Rover Freelander
- TOOLCoil spring compressorSearch: coil spring compressor
- TOOLBall joint separatorSearch: ball joint separator
- PARTFront shock absorbersSearch: Land Rover Freelander 1998 front shock absorbers
Links open Amazon search results in a new tab. As an Amazon Associate I earn from qualifying purchases.