seat Workshop Repair Guides

SEAT Workshop Service and Repair Manuals

Gearbox and engine tightening torques and motes to bearing the engine assembly > < Removing gearbox
Installing gearbox
Installing gearbox
Consult the equivalence table for tools and equipment according to applicability among Seat / VW / Audi / Skoda → Chapter.
Special tools and workshop equipment required
   
t  Torque wrench kit -SAT 8010-, see equivalent → Anchor
Installation is carried out in reverse order. However, the following important steps must be observed:
  Note
t  Always renew self locking nuts and bolts
t  Renew O-rings, seals, gaskets and bolts which are tightened by turning through a specified angle.
t  Secure all hose connections with the correct type of hose clips (same as original equipment) → Electronic parts catalogue.
t  All cable ties which were opened or cut during removal must be renewed at the same points.
t  Clean the cogs of the input shaft and the teeth of the speed damper, eliminate corrosion and apply a very fine layer of lubricating grease to the cogs (assignment → Electronic spare Spare parts catalogue). It is essential to remove excess grease.
–  If no dowel sleeves for centralising engine/gearbox are in the cylinder block, install dowel sleeves.
  L00-10226
–  There are brackets on the front side of the gearbox that have been removed with certain versions. These brackets must be mounted on the new gearbox.
  N34-10978
–  If this has not already been done: renew the needle bearing of the crankshaft → Rep. gr.13.
  Note
When the needle bearing on the crankshaft is damaged, the gears cannot be switched properly any more as the clutch supports this.
  N34-10979
–  Ensure that intermediate plate is connected to sealing flange -arrow A- and pushed onto dowel sleeves -arrow B-.
–  Insert the selector lever control cable as far as possible into the control cable.
  Caution
Risk of damage to selector lever cable.
t  Carefully guide selector lever cable into cable support bracket when lifting gearbox.
t  Do not bend or kink the selector lever cable.
It must be possible to position the engine and gearbox by hand so that the connecting flanges of both are contacted fully.
–  Align the bearing so that the engine and gearbox are positioned.
–  When necessary, turn the crankshaft a little.
  A13-10521
–  Take great care with both breathing flaps, especially after fitting the starter.
  N30-10157
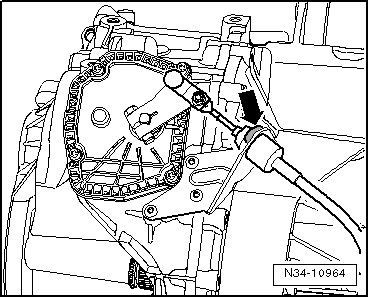
–  The circlip of the selector lever cable must be replaced.
A lock washer, which was removed, never insert again. It could be damaged if it no longer has the necessary inner tension.
–  Always adjust the selector lever cable → Chapter.
Engines 1.4 l - 110 kW TSI and 1.4 l - 132 kW TSI
–  Install the front section (catalytic converter) of the exhaust system →  4 Cyl.Injection engine (1.4 l, 4 direct-injection valves, turbo and rotary piston compressor); Rep. gr.26
Engine 1.6 l - 77 kW SRE
–  Install the front section of the exhaust system →  4 Cyl.Injection engine(1.6 l. 4V, Chain transfer); Rep. gr. 26
All vehicles (continued):
–  Fit the front subframe → Front wheels suspension; Rep. gr. 40 .
–  Fit the articulated shaft to the flange shaft of the gearbox → Running gear, shafts, steering; Rep. gr. 40 .
Engine TSI, 1.4 l - 110 and 132 kW
–  Install complete air cleaner housing → Rep. gr.24 .
Engine SRE, 1.6 l - 77 kW
–  Fit the first intake manifold of the intake system.
All vehicles (continued):
–  Connecting the Vehicle diagnostic, testing and information system -VAS 505X-
–  Perform the complete basic setting → Chapter.
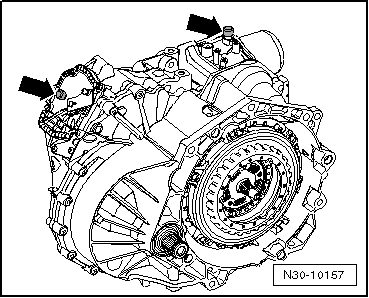
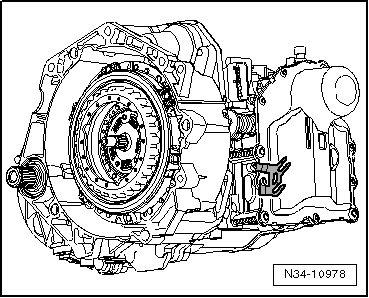
Gearbox assembly mounting tightening torques → Chapter
  N34-10964

Gearbox and engine tightening torques and motes to bearing the engine assembly > < Removing gearbox