SEAT Workshop Service and Repair Manuals
HOME
FEATURES
MENU
INDEX
ABOUT US
Distinctive characteristics of the sealing flanges and the installation equipment T10017 y T10134 >
< Flywheel: Removing and installing
Leon Mk1
Power unit
4 Cylinder (1.4 l., 4 valve) injection engine
Enginecrankshaft group, pistons
Cylinder block, sealing flange and engine flywheel: removing and installing
Drive plate: Removing and installing
Drive plate: removing and installing
Drive plate: removing and installing
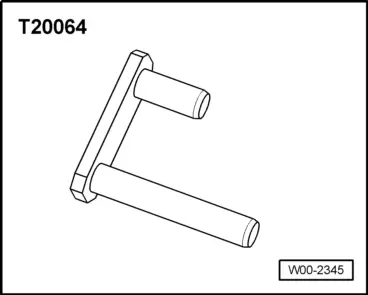
Special tools and workshop equipment required
t
Counterhold -T20064-
t
Depth gauge
Removing
–
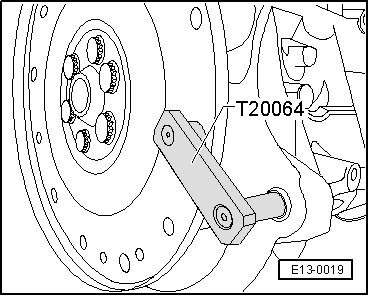
Attach the counterhold -T20064- to the drive plate.
–
Loosen the bolts holding the drive plate.
Fitting
–
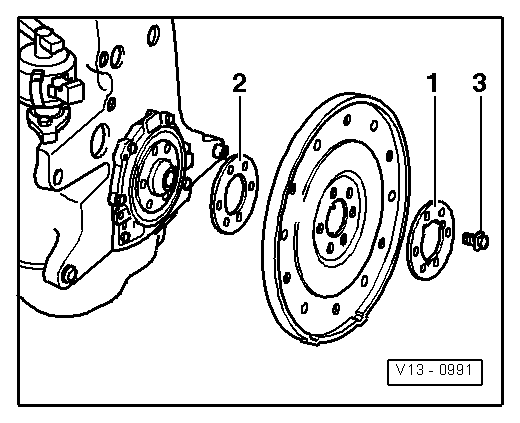
Fix the drive plate using the flat washer with recesses
-1-
.
–
Insert new bolts
-3-
and tighten to a torque of 30 Nm.
–
Check dimension
-a-
in 3 points and calculate the average.
t
Specification: 19,7 ... 21.3 mm.
Note
It is measured across the hole of the drive plate to the bored surface of the cylinder block.
If the specifications are not met:
–
Remove the drive plate again and use the compensation washer
-2-
. Tighten the bolts again
-3-
to a torque of 30 Nm.
–
Tighten the bolts
-3-
to a torque of 60 Nm and retighten 90° (
1
/
4
turn) (the retightening may be made in stages).
Power unit
4 Cylinder (1.4 l., 4 valve) injection engine
Enginecrankshaft group, pistons
Cylinder block, sealing flange and engine flywheel: removing and installing
Drive plate: Removing and installing
Distinctive characteristics of the sealing flanges and the installation equipment T10017 y T10134 >
< Flywheel: Removing and installing
 Note
Note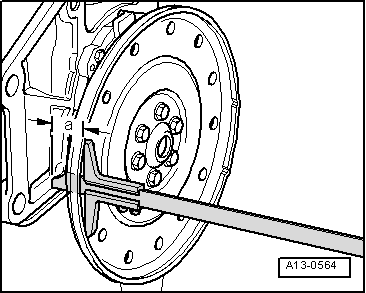
 Note
Note