skoda Workshop Repair Guides

Skoda Workshop Service and Repair Manuals

Tightening torques > < Removing the gearbox
Installing the gearbox
Installation is performed in the reverse order, pay attention to the following points:
  Note
t  When performing installation work replace the self-locking nuts and screws → Electronic Catalogue of Original Parts.
t  Replace screws which have been tightened to a torquing angle, as well as gasket rings and gaskets → Electronic Catalogue of Original Parts.
t  Secure all hose connections with hose clamps which comply with the series design → Electronic Catalogue of Original Parts.
t  All cable straps which are detached or cut open when removing, should be fitted on again in the same place when installing.
t  The lock washer of the selector lever control cable must always be replaced → Electronic Catalogue of Original Parts.
   
t  Replace the needle bearing -arrow- in the crankshaft → Engine; Rep. gr.13.
t  Remove the right flange shaft before installing the gearbox → Chapter.
t  Check whether the dowel sleeves for centering the gearbox are present in the cylinder block, insert if necessary.
t  If the gearbox is inserted, ensure the intermediate plate between the engine and gearbox is correctly installed.
  N34-11460
–  Carefully raise gearbox with the engine/gearbox jack -V.A.G 1383 A- and put in its installation position with the gearbox mount -3282-.
  Note
Observe all lines and coolant hoses when raising the gearbox.
–  Adjust the gearbox mount -3282- via the spindles in such a way that the engine and the gearbox are »aligned«.
The engine and the gearbox must be guided together by hand until the engine flange and the gearbox flange touch each other all around!
–  Screw the gearbox onto the engine, while doing so turn the crankshaft if necessary.
Tightening torques → Chapter.
  A34-10310
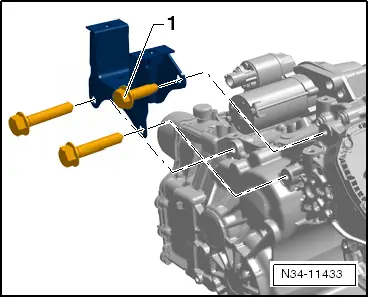
–  Install the console at the gearbox with the fixing screws -1-.
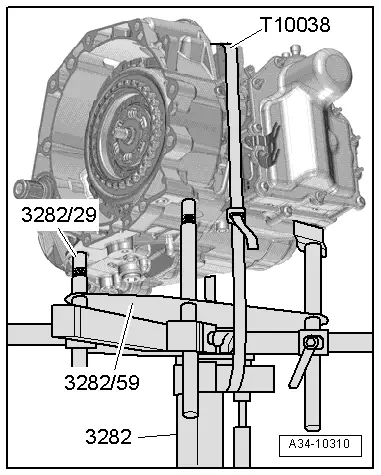
–  Raise the engine/gearbox assembly via the spindles, align in the installed position and install free of stress at the engine mount and the gearbox mount.
–  Install the right flange shaft after installing the gearbox → Chapter.
–  Install the starter motor → Electrical System; Rep. gr.27.
–  Install flange shaft on gearbox → Chassis; Rep. gr.40.
–  Install the assembly carrier → Chassis; Rep. gr.40.
–  Attach the steering gear to the assembly carrier and install the engine pump aggregate with bracket on the frame side rail → Chassis; Rep. gr.48.
–  Install catalytic converter with exhaust pipe → Engine; Rep. gr.26.
–  Install fan shroud with fans → Engine; Rep. gr.19.
  N34-11433
–  Carefully press the selector lever control cable -2- onto the gearshift lever and secure in the cable support with a new lock washer -1-.
–  Install the battery tray and battery → Electrical System; Rep. gr.27.
–  Inspect setting of selector lever control cable and adjust → Chapter.
–  Install air filter → Engine; Rep. gr.24.
–  Install the front left wheelhouse liner → Body Work; Rep. gr.66.
–  Install the noise insulation → Body Work; Rep. gr.50.
–  Install front wheel → Chassis; Rep. gr.44.
Perform the basic setting after the gearbox has been fitted with the → Vehicle diagnostic tester.
  A34-10409

Tightening torques > < Removing the gearbox