skoda Workshop Repair Guides

Skoda Workshop Service and Repair Manuals

Removing and installing the oil filter > < Components at wiring loom of 8-pin plug
Removing and installing oil pan
Special tools and workshop equipment required
t  Catch pan, e.g. -VAS 6208-
t  Protective goggles
  Note
General repair information → Chapter.
Removing
–  Remove the sound dampening system → Body Work; Rep. gr.50.
–  Position drip tray, e.g. -VAS 6208- under the gearbox.
  WARNING
Wear safety goggles.
   
–  Unscrew the ATF inspection plug -A-.
–  Release the overflow tube -C- (5 mm Allen key) and drain remaining ATF.
  S37-0209
–  Loosen the 8 screws of the oil pan -arrows- crosswise.
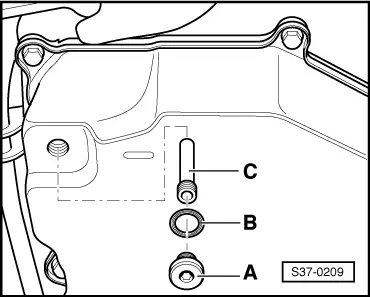
  WARNING
There is still ATF in the oil pan, because not all of it could be drained via the opening -A-.
–  Remove oil pan together with the oil pan gasket.
Install
Installation is performed in the reverse order, pay attention to the following points:
–  Clean the two magnets Pos. 7 in the oil pan beads → Chapter. Take care that the full surface of the magnets rests against the oil pan.
  Note
The magnets must be absolutely fitted on the provided points in the oil pan.
–  Clean gaskets and sealing surfaces and eliminate residues of oil.
–  Pay attention to correct fitting of oil pan gasket.
–  When positioning the oil pan no cables must be trapped.
–  Screw in the 8 screws of the oil pan -arrows- crosswise.
–  Replace gasket ring of ATF drain plug → Electronic Catalogue of Original Parts.
  S38-0039
–  Install overflow tube -C- (with 5 mm Allen key).
–  Top up with ATF and inspect ATF level → Chapter.
l  Gasket ring -B- of ATF inspection plug must be replaced after the ATF level inspection → Electronic Catalogue of Original Parts.
  S37-0209
Tightening torque
ComponentNm
Overflow in oil pan → Chapter
ATF inspection plug to oil pan → Chapter
Oil pan to gearbox housing 1) → Chapter

1) Tighten crosswise in stages.
   

Removing and installing the oil filter > < Components at wiring loom of 8-pin plug