skoda Workshop Repair Guides

Skoda Workshop Service and Repair Manuals

Removing and installing the cylinder head > < Removing and installing camshaft
Install cylinder head cover
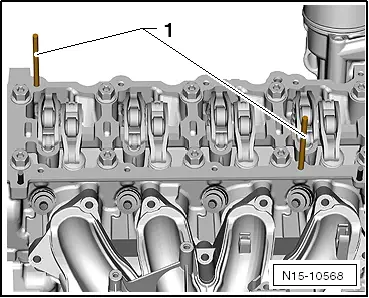
  Caution
Before installing the cylinder head cover, screw in the pin screws (M 6 x 70) at the cylinder head.
The pin screws guide the cylinder head cover and prevent the roller rocker arms sliding off from the balancing elements.
Precondition
l  The pistons must not be positioned at top dead centre.
  WARNING
Wear protective gloves when working with sealant and grease remover!
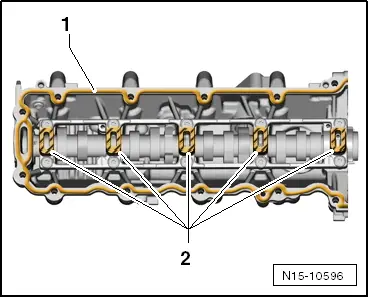
–  Remove residual sealant from the sealing surfaces at the cylinder head cover and at the cylinder head with chemical sealant remover.
–  Degrease the sealing surfaces.
   
–  Screw in two pin screws (M 6 x 70) -1- into the cylinder head before fitting on the cylinder head cover.
  Caution
The cylinder head cover is sealed with 2 different sealants!
  Note
The sealant must not be applied too thickly, as otherwise excess sealant may penetrate into the oil bores and possibly cause engine damage.
  N15-10568
–  Apply sealant -D 189 500 A1 - on the sealing surface -1-.
   The sealant bead must be 2…3 mm thick and must run past the area around the bolt holes on the inside.
–  Apply a thin layer of sealant -D 154 103 A1 - evenly to the gridded sealing surfaces -2-.
–  Check if the roller rocker arms rest on the balancing elements.
–  Carefully fit the cylinder head cover over the pin screws and position the dowel pins onto the cylinder head.
  N15-10596
–  Tighten the new fixing screws of the cylinder head cover in the specified order -1- to -12-.
Tightening torque: 8 Nm + torque a further 90° (1/4 turn).
  Caution
The sealant for the cylinder head cover must absolutely be removed in the area of the -arrows-.
In order to avoid leakage, the sealant for the cylinder head cover and the sealant for the timing case must not mix.
  M15-10006
–  Remove excess sealant in the area of the -arrows-.
–  Turn crankshaft up to the stop in direction of rotation of engine.
  N15-10571
–  Lift up the timing chain with the assembly device -T10118-.
  N15-10554
–  Check the correct position of the timing chain -1- on the crankshaft gear from below.
  N15-10557
–  Place the timing chain -1- onto the chain sprocket -2-.
  Note
t  The timing chain must rest in the area of the sliding rail -3- and be slightly tensioned.
t  The timing chain must run through the middle of the sliding rail -3-.
–  Install fixing screw for camshaft sprocket and tighten by hand.
  N15-10555
–  Tighten chain tensioner to 60 Nm.
  N15-10550
–  Hold the camshaft sprocket with the counterholder -T10172- and tighten the fixing screw -1- of the camshaft sprocket to 50 Nm.
  Note
The fixing screw is only turned a further 90° (1/4 turn) after checking the timing at the end of the work procedure.
–  Remove the fixing bolt -T10414 - from the camshaft.
–  Release the fixing screw -T10340- from the cylinder block.
–  Turn the crankshaft in direction of rotation of engine by 2 turns.
–  Turn the fixing screw -T10340- up to the stop in the cylinder block.
–  Turn crankshaft up to the stop in direction of rotation of engine.
The timing is O.K., if the fixing bolt -T10414- can be inserted in the camshaft.
If the timing is not O.K.:
–  Repeat the setting of the timing → Chapter.
If timing is o.k.:
  N15-10551
–  Hold the camshaft sprocket with the counterholder -T10172- and torque the fixing screw -1- a further 90° (1/4 turn).
–  Remove fixing bolt -T10414- and fixing screw -T10340-.
–  Install top timing case → Chapter.
–  Install exhaust turbocharger → Chapter.
–  Installing the oil pan → Chapter.
–  Install crankshaft belt pulley → Chapter.
–  Install high pressure pump → Chapter.
Further installation occurs in a similar way in reverse order to removal.
  N15-10551

Removing and installing the cylinder head > < Removing and installing camshaft