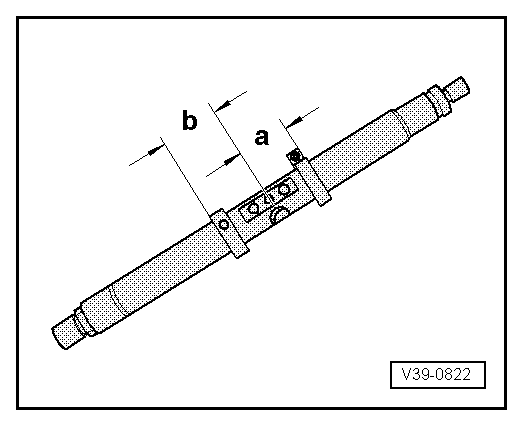
skoda Workshop Repair Guides

Skoda Workshop Service and Repair Manuals

Setting the crown wheel > < Correct working sequence when re-setting the drive train
Setting the secondary shaft
Special tools and workshop equipment required
t  Gearbox mount -MP3-501-
t  Assembly stand -MP9-101-
t  Universal measuring device -VW 385-
t  Straightedge -T40100-
t  Digital depth gauge (e.g. digital depth gauge -VAS 6320-)
t  Dial gauge
Determining dimension “a” (height of secondary shaft head)
l  The double angular ball bearing is removed from the secondary shaft.
   
–  Position the secondary shaft onto the straightedge -T40100-.
–  Then measure from the reverse side of the secondary shaft head -arrow- to the straightedge -T40100-.
l  This dimension must be either 39.0 or 39.5 mm. In the example 39.50.
Determine dimension “E”
   E = A1 - a
  A39-10111
Example: 
 Dimension “A1” recorded on the crown wheel98.85 mm
-Dimension “a” height of secondary shaft head39.50 mm
=Dimension “E” length of the master setting -VW 385/30-59.35 mm

Determine thickness of temporary adjusting washer “S3” and “S4
l  Differential removed.
l  The double angular ball bearing is pressed onto the secondary shaft.
  Note
As part of the measuring procedure, the previous (removed) temporary adjusting washer “S3”, in the example 1.00 mm, is inserted. On the following pages, this will be referred to as “S3*”. After setting the dimension “E”, temporary washer “S3*” is replaced by permanent washer “S3”.
–  Attach gearbox housing to gearbox mount -MP3-501-, while doing so the gearbox housing must be standing vertically.
–  Put the previous adjusting washer “S3”, in the example 1.00 mm, into the gearbox housing.
   
–  Coat the outer rings -3- and -4- of double angular ball bearing with gearbox oil.
–  Carefully move the secondary shaft -1- with the double angular ball bearing by hand into the gearbox housing -2-, while doing so press onto the top outer ring -3-.
  Note
If necessary first heat the gearbox housing with a hot-air blower in the area of the bearing pedestal.
When inserting, the outer rings -3- and -4- must not tilt, they must remain together. Otherwise the seal -6- is damaged by the secondary shaft head -5-.
If the seal of the double angular ball bearing is damaged, the bearing must be replaced.
Determine the temporary adjusting washer “S4” as follows:
  A34-10237
–  Measure from outer ring/double angular ball bearing -1- to the screw-on surface -2- for the retaining plate with a digital depth gauge (e.g. digital depth gauge -VAS 6320-)
In the example the clearance -a- = 1.14 mm. Determine the temporary adjusting washer “S4” according to the table → Anchor.
  Note
As part of the measuring procedure, a temporary 0.95 mm adjusting washer “S4” is inserted. On the following pages, this will be referred to as “S4*”. After setting the dimension “E”, temporary washer “S4*” is replaced by permanent washer “S4”.
  A39-10088
–  Position temporary adjusting washer “S4*” (in the example 0.95 mm) and retaining plate -A-; they only fit in one position.
–  Clean the thread of the previous screws -arrows- with a wire brush. Then tighten up the M7 bolts crosswise using a torque of 30 Nm.
Adjust dimension “E”
  Note
The measurement “E” is required for determining the final washer thickness “S3” and “S4” for this drive chain on the master setting -VW 385/30-.
  A34-10236
–  Set the adjusting ring of the universal measuring rod -VW 385/1 - to the following values:
t  Dimension -a- = 45 mm
t  Dimension -b- = 60 mm
  V39-0822
–  Complete universal measuring rod -VW 385/1- as shown in the fig.:
t  Dial gauge extension -VW 385/15-, 9.3 mm long
–  Set master setting -VW 385/30- to the dimension “E” in the example = 59.35 mm and position onto the universal measuring rod -VW 385/1-.
–  Set dial gauge (3 mm measuring range) to “0” with a 2 mm bias.
  A39-10110
–  Position gauge block plate -VW 385/33- onto the secondary shaft head.
  Note
Ensure exact fitting and oil-free support of the gauge block plate -VW 385/33-.
  A39-10030
–  Remove master setting -VW 385/30- and insert universal measuring rod into the gearbox housing.
t  A dial gauge extension -A- = 9.3 mm long must be screwed in.
t  The dial gauge should point towards the final drive cover.
l  The O-ring is inserted into the final drive cover.
–  Place the final drive cover and tighten the 4 bolts crosswise to 24 Nm.
–  With the movable adjusting ring, move the 2nd locating disc -VW 385/36- outwards until the universal measuring rod can still just be turned by hand.
  A39-10082
–  Turn the universal measuring rod till the dial gauge indicator on the gauge block plate -VW 385/33- points towards the secondary shaft head and is at maximum deflection (reversing point).
t  Measurement in following example: = 0.10 mm (red number range)
  Note
After removing the universal measuring rod, check again whether the dial gauge with the master setting -VW 385/30- mounted is at “0” with the 2 mm bias.
Determining the thickness of adjusting washer “S3
t  If it is in the red number range (anti-clockwise), measured value must be subtracted.
t  If it is in the black number range, measured value must be added.
Formula:
“S3” = “S3*” + “measured value” (“measured value” in the black number range)
“S3” = “S3*” + “measured value” (“measured value” in the red number range)
  V39-1716
Example: 
 Inserted washer “S3*”1.00 mm
-determined measured value (red number range)0.10 mm
=Thickness of adjusting washer “S30.90 mm

–  Determine the adjusting washer (s) according to the table. Part numbers → Electronic Catalogue of Original Parts.
Available adjusting washers for “S3
   
Adjusting washer thickness (mm)
0,550,750,95
0,600,801,00
0,650,851,05
0,700,90 

Each random thickness can be determined by the tolerances of the adjusting washers, if necessary insert 2 washers.
–  Remove the temporary adjusting washers “S3*” and “S4*”.
–  Insert the determined adjusting washer “S3”, in the example 0,90 mm, into the gearbox housing.
Determining the thickness of adjusting washer “S4
l  Determined adjusting washer “S3” is installed in the gearbox housing.
   
–  Coat the outer rings -3- and -4- of double angular ball bearing with gearbox oil.
–  Carefully move the secondary shaft -1- with the double angular ball bearing by hand into the gearbox housing -2-, while doing so press onto the top outer ring -3-.
  Note
If necessary first heat the gearbox housing with a hot-air blower in the area of the bearing pedestal.
When inserting, the outer rings -3- and -4- must not tilt, they must remain together. Otherwise the seal -6- is damaged by the secondary shaft head -5-.
If the seal of the double angular ball bearing is damaged, the bearing must be replaced.
Determine the adjusting washer “S4” as follows:
  A34-10237
–  Measure from outer ring/double angular ball bearing -1- to the screw-on surface -2- for the retaining plate with a digital depth gauge (e.g. digital depth gauge -VAS 6320-)
In the example the clearance -a- = 1,04 mm. Determine the adjusting washer “S4” according to the table → Anchor.
Available adjusting washers for “S4
  A39-10088
GapAdjusting washer “S4
Measured value (mm)Thickness (mm)
0,67 … 0,71
0,72 … 0,76
0,77 … 0,81
0,50
0,55
0,60
0,82 … 0,86
0,87 … 0,91
0,92 … 0,96
0,65
0,70
0,75
0,97 … 1,01
1,02 … 1,06
1,07 … 1,11
0,80
0,85
0,90
1,12 … 1,16
1,17 …1,21
1,22 … 1,26
0,95
1,00
1,05
1,27 … 1,31
1,32 … 1,36
1,37 … 1,41
1,10
1,15
1,20
1,42 … 1,46
1,47 … 1,51
1,52 … 1,56
1,25
1,30
1,35
1,57 … 1,611,40

Each random thickness can be determined by the tolerances of the adjusting washers, if necessary insert 2 washers.
  Note
Assign the adjusting washers via the → Electronic Catalogue of Original Parts.
   
–  Position determined adjusting washer “S4” (in the example 0.85 mm) and retaining plate -A-; they only fit in one position.
–  Then tighten the screws -arrows- crosswise to 30 Nm.
Control measurement, checking the dimension “E”
–  Mount secondary shaft with measured adjusting washers “S3” and “S4”.
  A34-10236
–  Insert universal measuring rod and control measurement.
–  Read off dial gauge anti-clockwise (red number range).
t  For correctly selected adjusting washers, the dimension “a” must be shown with a tolerance of ± 0.04 mm.
  Note
After removing the universal measuring rod, check again whether the dial gauge with the master setting -VW 385/30- mounted is at “0” with the 2 mm bias.
  V39-1716

Setting the crown wheel > < Correct working sequence when re-setting the drive train