Engine and Engine AggregatesTiming, Adjust
 Important! Important! Remove Tool KM-661-1 and set aside carefully - ensure that Dial Gauge MKM-571-B is not displaced. Remove all locking tools.
 Adjust Adjust Turn the crankshaft in the direction of engine rotation to approx. 90 ° (dimension I) before "1st Cylinder TDC" using the fastening bolt (1) for the toothed belt drive pulley.
 Inspect Inspect 1st cylinder exhaust cam (2) must point vertically upwards. | 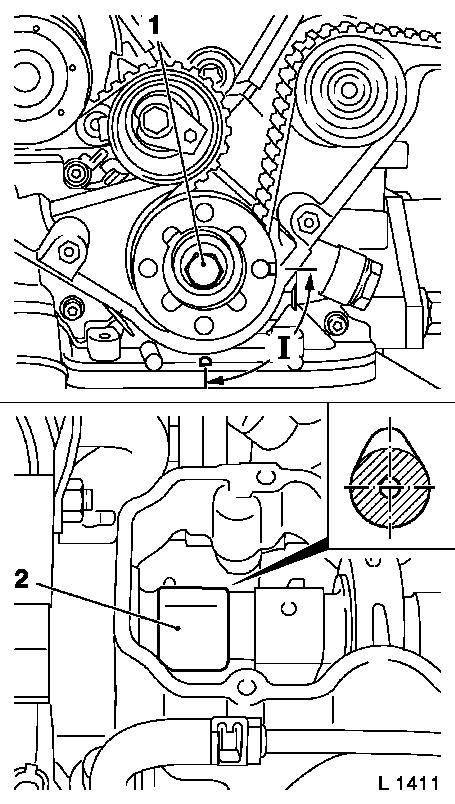
|
 Remove, Disconnect Remove, Disconnect Release injection pump pulley fastening bolts (3) and hand tighten - it must still be possible to turn injection pump pulley on injection pump flange. Release fastening bolt (5) for toothed belt tension roller and turn adjusting eccentric (6) in direction of arrow (clockwise) until pointer (4) is positioned just before left stop. Detach tooth belt (1) from camshaft pulley and injection pump pulley. Remove fastening bolt (2) for camshaft pulley - counterhold with open-ended spanner at camshaft hex. Install new camshaft pulley fastening bolt and hand tighten - camshaft pulley on camshaft must still be rotatable. Observe installation position of washer. | 
|
Important! Carefully position Tool KM-661-1 (2). The right positioning pins must be seated in the bores of the camshaft housing - ensure that Dial Gauge MKM-571-B (1) is not altered. Base (3) rests on inlet cam of the 1st cylinder. | 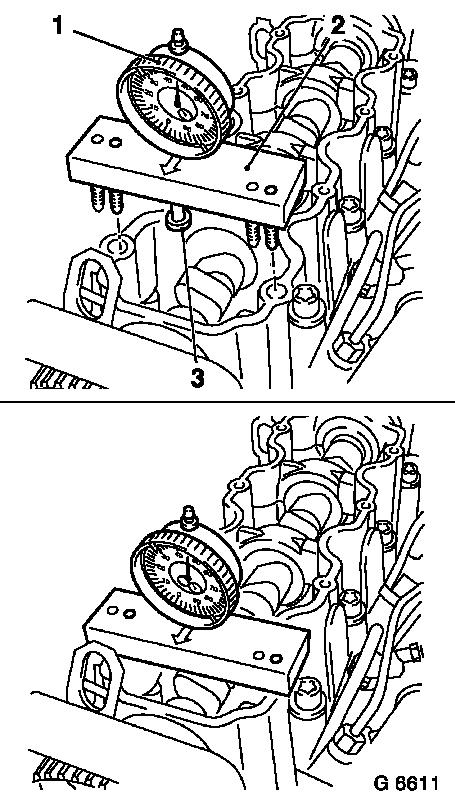
|
 Install, Connect Install, Connect Install Holder KM-661-2 (3) over 4th cylinder.
Adjust Rough adjustment: Carefully turn camshaft with open-ended spanner (1) at hex of camshaft in direction of arrow until elevation of approx. 0.80 mm (indicator on Gauge MKM-571-B) is attained. Fine adjustment: Adjust elevation of 0.60 to 0.64 mm (indicator of Gauge MKM-571-B) with adjustment screw (2) at Holder KM-661-2.
Important! Elevation of 0.60 to 0.64 mm is not a nominal value.
Adjust Turn crankshaft and injection pump pulley in direction of engine rotation to "1st Cylinder TDC" - see operation "1st Cylinder TDC, Adjust". | 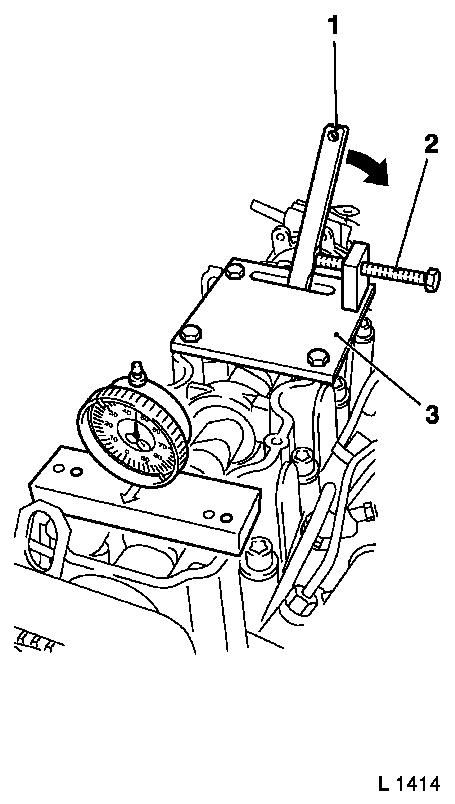
|
Install, Connect Position toothed belt on camshaft pulley and injection pump pulley. Ensure that notch on injection pump pulley aligns with mark on rear toothed belt cover.
Adjust Tension toothed belt: Turn adjusting eccentric (1) in direction of arrow (anti-clockwise) until pointer is located just before right stop - tighten fastening bolt (2).
Install, Connect Tighten camshaft pulley on camshaft. The tightening torque of 75 Nm + 60 ° + 5 ° must be observed as this has an impact on the camshaft elevation. Tighten fuel injection pump pulley - tightening torque 25 Nm.
Remove, Disconnect Remove Tool KM-661-1 and carefully set aside - ensure that Dial Gauge MKM-571-B is not displaced. Remove or detach all retaining and adjusting tools. | 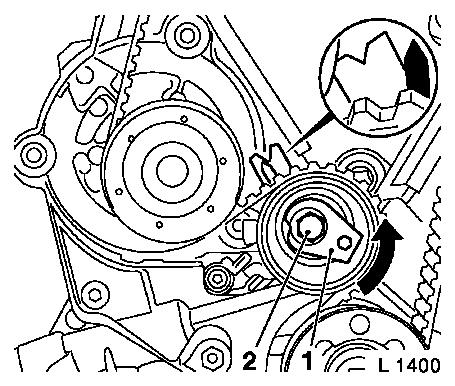
|
Adjust New Toothed Belt, Adjust: At fastening bolt of toothed belt drive pulley, turn crankshaft two turns (720 ° ) in engine rotational direction to TDC - mark (1) on toothed belt drive pulley must align with mark (2) on the oil pump. Release fastening bolt (6) slightly and turn adjuster eccentric (5) in direction of arrow (clockwise) until pointer (3) on toothed belt tension roller aligns with the notch mark (4). Tighten fastening bolt (6) of toothed belt tension roller - tightening torque 25 Nm/ 18.5 lbf. ft.
Inspect At fastening bolt of toothed belt drive pulley, turn crankshaft two turns (720 ° ) in engine rotational direction to TDC - mark (1) on toothed belt drive pulley must align with mark (2) on the oil pump. Check adjustment of toothed belt tension roller. If the pointer (3) does not align with the notch mark (4), repeat the adjustment procedure. | 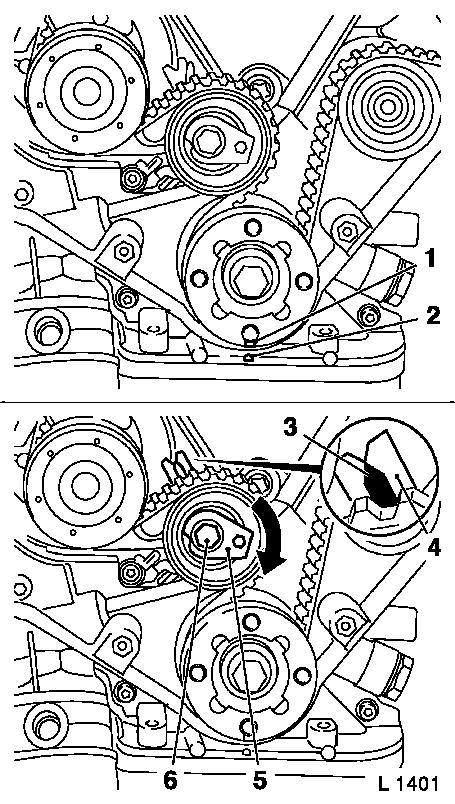
|
Adjust Run-in Toothed Belt, Adjust: At fastening bolt of toothed belt drive pulley, turn crankshaft two turns (720 ° ) in engine rotational direction to TDC - mark (1) on toothed belt drive pulley must align with mark (2) on the oil pump. Release fastening bolt (6) slightly and turn adjuster eccentric (5) in direction of arrow (clockwise) until pointer (3) on toothed belt tension roller is approx. 4 mm/0.16 in to the left of the notch mark (4). Tighten fastening bolt (6) of toothed belt tension roller - tightening torque 25 Nm/18.5 lbf. ft.
Inspect At fastening bolt of toothed belt drive pulley, turn crankshaft two turns (720 ° ) in engine rotational direction to TDC - mark (1) on toothed belt drive pulley must align with mark (2) on the oil pump. Check adjustment of toothed belt tension roller. If the pointer (3) is not approx. 4 mm to the left of the notch marks (4), repeat the adjustment procedure. | 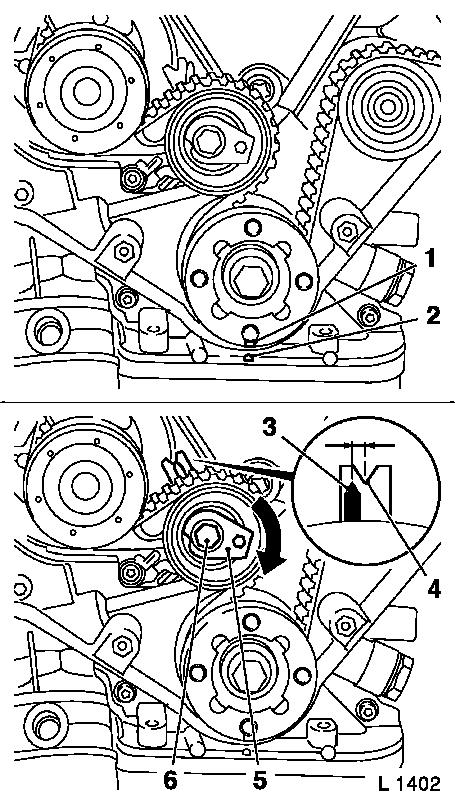
|
Adjust Turn crankshaft in direction of engine rotation to "1st Cylinder TDC" - see operation "1st Cylinder TDC, Adjust".
Important! Carefully position Tool KM-661-1 (2). The right positioning pins must be seated in the bores of the camshaft housing - ensure that Dial Gauge MKM-571-B (1) is not altered. Base (3) rests on inlet cam of the 1st cylinder.
 Measure Measure Read off value on Dial Gauge MKM-571-B. Nominal value: 0.55 mm ± 0.03 mm. If the measured result does not match the nominal value, repeat adjustment. |
|
Important! After adjustment of timing, the start of feed of the fuel injection pump must be checked and if necessary corrected - see operation "Feed Start, Check and Adjust".
Remove, Disconnect Remove all retaining and adjusting tools.
Install, Connect Attach camshaft housing cover to camshaft housing - tightening torque 8 Nm/6 lbf. ft. Attach engine vent hose to camshaft housing cover. Attach lower part of front toothed belt cover to rear toothed belt cover - tightening torque 4 Nm/ 3 lbf. ft. For vehicles with air conditioning: Adjust power steering pump V-belt tension - see operation "V-belt for Power Steering Pump, Replace (X 17 DTL, RHD/India Version)" in group "M". Attach crankshaft pulley to toothed belt drive pulley - counterhold on fastening bolt of toothed belt drive pulley - tightening torque 20 Nm/ 15 lbf. ft. Attach upper part of front toothed belt cover to rear toothed belt cover - tightening torque 4 Nm/ 3 lbf. ft. Install alternator V-belt - see operation "V-belt - Alternator, Remove and Install".
|
|
| Related Literature Units |
|---|
| - | | | - | | | - | | | - | |
|
09 Engine
