
Cylinder Leakage Test
- Make
- Vauxhall
- Model
- Astra J
- Section
- Engine mechanics - 1.3L Diesel › Other Information › Cylinder Leakage Test
EngineCylinder Leakage Test
Cylinder Leakage TestSpecial Tools
For equivalent regional tools, refer to Special Tools . Removal Procedure
|
| 1. | Remove fuel injection fuel feed pipe. Refer to Fuel Injection Fuel Feed Pipe Removal - Fuel Rail to Fuel Injector . |
| 2. | Remove fuel injector. Refer to Fuel Injector Removal . |
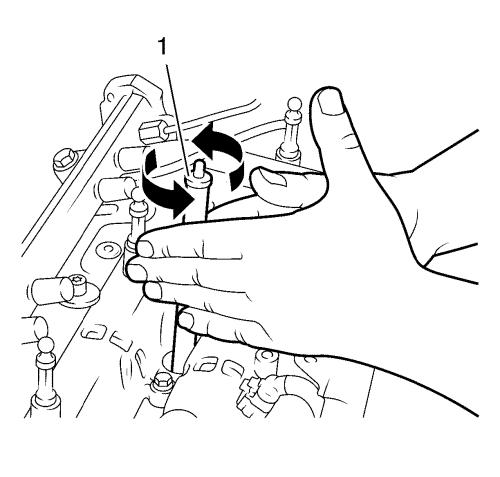
| 3. | Clean the injector sealing surfaces in the cylinder head using EN-47632 cleaning tool (1) in following procedure: |
| 3.1 | Take the brush side to loosen the dirt. |
| 3.2 | Take the sponge side to remove the dirt. |
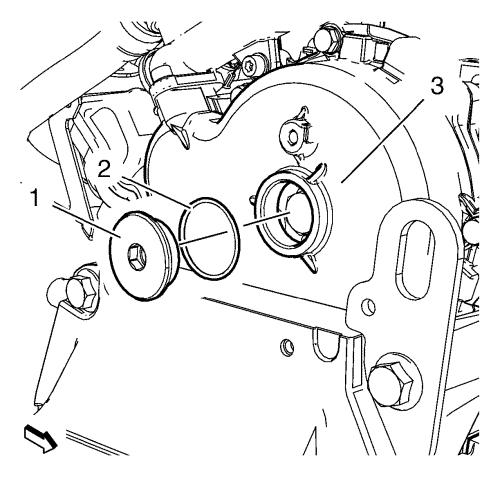
| 4. | Remove oil pump housing plug (1) from oil pump housing (3). |
| 5. | Remove oil pump housing plug seal (2). |
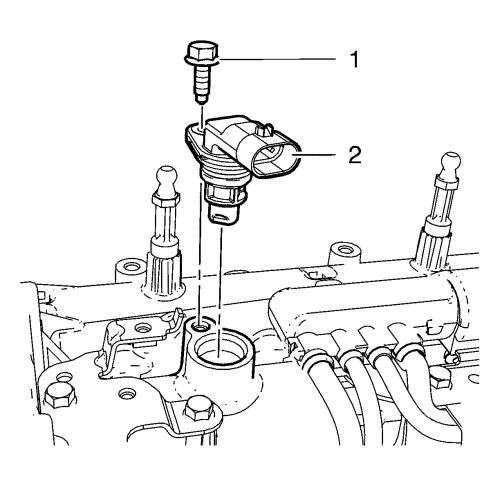
| 6. | Remove camshaft position sensor bolt (1). |
| 7. | Remove camshaft position sensor (2). |
Note: Second technician required. |
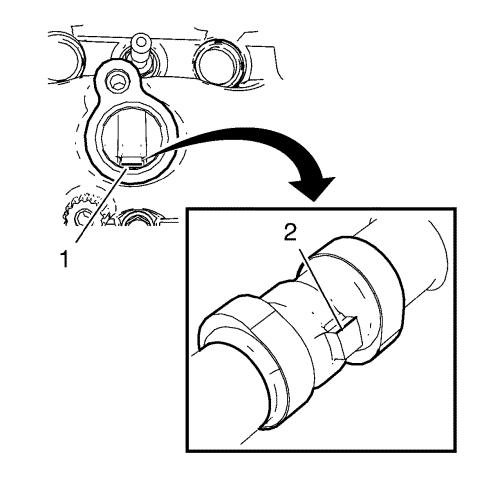
| 8. | Set cylinder 1 to TDC of combustion stroke. |
| Turn crankshaft in direction of engine rotation by the crankshaft sprocket bolt until the rear edge of the elevation for the camshaft sensor (2) is aligned with the front edge of the installation aperture for the camshaft sensor (1). |
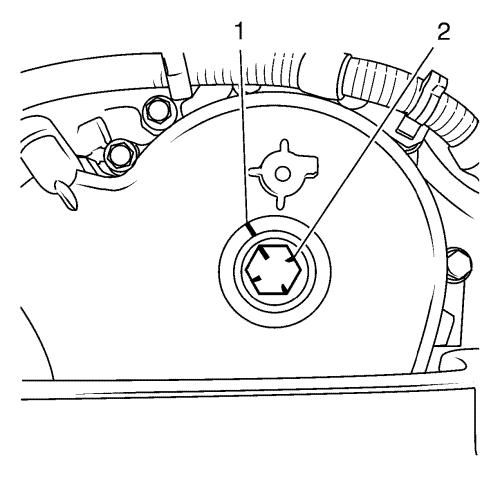
Note: The marking is necessary to adjust the TDC of the individual cylinders. |
| 9. | Make a marking on the oil pump housing (1) and 4 check marks on the camshaft sprocket bolt (2). |
| 10. | Install camshaft position sensor (2). |
Caution: Refer to Fastener Caution . |
| 11. | Install camshaft position sensor bolt (1) and tighten to 9 N·m (80 lb in) . |
| 12. | Remove engine coolant surge tank cup. |
| 13. | Remove oil level indicator. |
Test Procedure Cylinder 1
| 1. | Calibrate pressure loss meter. |
| 2. | Engage 4th gear and put the handbrakes on. |
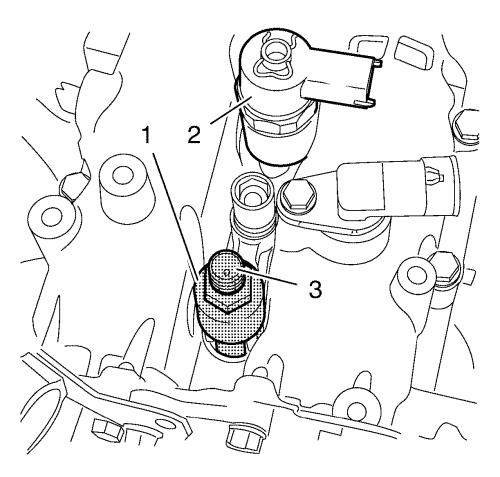
Note: EN-46791 adapter can only be installed in pairs along with the fuel injector, cylinder 1 and 2 or cylinder 3 and 4. |
| 3. | Install the pressure loss tester with EN-46791 adapter (1) with fuel injector (2) and fuel injector bracket in cylinder 1 with NEW fuel injector gasket. |
| 4. | Install the fuel injector spherical washer. |
| 5. | Install the fuel injector conical washer. |
| 6. | Install fuel injector bracket nut and tighten to 20 N·m (15 lb ft) . |
| 7. | Install EN-46783 thread adapter (3) to EN-46791 adapter (1). |
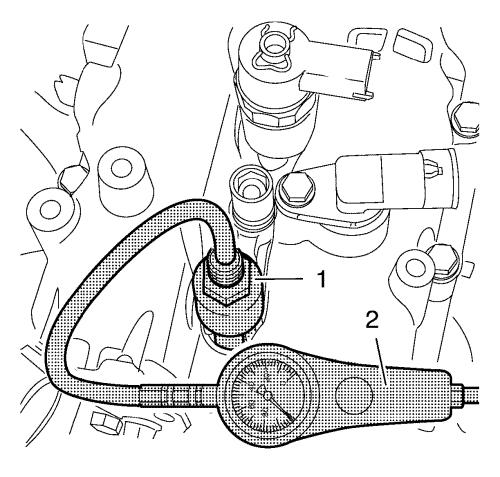
| 8. | Install pressure loss tester (2) to EN-46783 thread adapter (1). |
| 9. | Pressurize cylinder 1. |
| 10. | Check pressure loss in cylinder 1. |
| • | Max. pressure difference between the individual cylinders 10% approx. |
| • | The pressure loss per cylinder should not exceed 25%. |
| • | Check escaping air to localize the damage on: |
| - | Intake ducts |
| - | Exhaust system |
| - | Oil dipstick guide tube |
| - | Oil filler port |
| 11. | Remove the fuel injector bracket nut cylinder 1 and 2. |
| 12. | Remove the fuel injector conical washer. |
| 13. | Remove the fuel injector spherical washer. |
| 14. | Remove the fuel injector cylinder 2 and pressure loss tester with EN-46791 adapter from cylinder 1. |
Test Procedure Cylinder 3
Note: EN-46791 adapter can only be installed in pairs along with the fuel injector, cylinder 1 and 2 or cylinder 3 and 4. |
| 1. | Install the pressure loss tester with EN-46791 adapter with fuel injector and fuel injector bracket in cylinder 3 with NEW fuel injector gasket. |
| 2. | Install the fuel injector spherical washer. |
| 3. | Install the fuel injector conical washer. |
| 4. | Install the fuel injector bracket nut and tighten to 20 N·m (15 lb ft) . |
| 5. | Put the vehicle in neutral. |
| 6. | Turn the engine 180° by crankshaft. |
| Note: Note the alignment
marking on camshaft sprocket bolt. |
| 6.1 | Turn the crankshaft in the direction of the engine rotation by the bolt on the torsional vibration damper flange |
| 6.2 | Engage the 4th gear. |
| 7. | Pressurize the cylinder 3. |
| 8. | Check the pressure loss in cylinder 3. |
| • | Max. pressure difference between the individual cylinders 10% approx. |
| • | The pressure loss per cylinder should not exceed 25%. |
| • | Check escaping air to localize the damage on: |
| - | Intake ducts |
| - | Exhaust system |
| - | Oil dipstick guide tube |
| - | Oil filler port |
| 9. | Remove the fuel injector bracket nut cylinder 3 and 4. |
| 10. | Remove the fuel injector conical washer. |
| 11. | Remove the fuel injector spherical washer. |
| 12. | Remove the fuel injector cylinder 4 and pressure loss tester with EN-46791 adapter from cylinder 3. |
Test Procedure Cylinder 4
Note: EN-46791 adapter can only be installed in pairs along with the fuel injector, cylinder 1 and 2 or cylinder 3 and 4. |
| 1. | Install the pressure loss tester with EN-46791 adapter with fuel injector and fuel injector bracket in cylinder 4 with NEW fuel injector gasket. |
| 2. | Install the fuel injector spherical washer. |
| 3. | Install the fuel injector conical washer. |
| 4. | Install fuel injector bracket nut and tighten to 20 N·m (15 lb ft) . |
| 5. | Put the vehicle in neutral. |
| 6. | Turn the engine 180° by crankshaft. |
| Note: Note alignment
marking on camshaft sprocket bolt. |
| • | Turn crankshaft in the direction of the engine rotation by the bolt on the torsional vibration damper flange |
| • | Engage 4th gear |
| 7. | Pressurize cylinder 4. |
| 8. | Check pressure loss in cylinder 4: |
| • | Max. pressure difference between the individual cylinders 10% approx. |
| • | The pressure loss per cylinder should not exceed 25%. |
| • | Check escaping air to localize the damage on: |
| - | Intake ducts |
| - | Exhaust system |
| - | Oil dipstick guide tube |
| - | Oil filler port |
| 9. | Remove the fuel injector bracket nut cylinder 3 and 4. |
| 10. | Remove the fuel injector conical washer. |
| 11. | Remove the fuel injector spherical washer. |
| 12. | Remove the fuel injector cylinder 3 and pressure loss tester with EN-46791 adapter from cylinder 4. |
Test Procedure Cylinder 2
Note: EN-46791 adapter can only be installed in pairs along with the fuel injector, cylinder 1 and 2 or cylinder 3 and 4. |
| 1. | Install the pressure loss tester with EN-46791 adapter with fuel injector and fuel injector bracket in cylinder 2 with NEW fuel injector gasket. |
| 2. | Install the fuel injector spherical washer. |
| 3. | Install the fuel injector conical washer. |
| 4. | Install the fuel injector bracket nut and tighten to 20 N·m (15 lb ft) . |
| 5. | Put the vehicle in neutral. |
| 6. | Turn the engine 180° by crankshaft. |
| Note: Note alignment
marking on camshaft sprocket bolt. |
| 6.1 | Turn the crankshaft in the direction of the engine rotation by the bolt on the torsional vibration damper flange |
| 6.2 | Engage the 4th gear. |
| 7. | Pressurize cylinder 2. |
| 8. | Check pressure loss in cylinder 2. |
| • | Max. pressure difference between the individual cylinders 10% approx. |
| • | The pressure loss per cylinder should not exceed 25%. |
| • | Check escaping air to localize the damage on: |
| - | Intake ducts |
| - | Exhaust system |
| - | Oil dipstick guide tube |
| - | Oil filler port |
| 9. | Remove the fuel injector bracket nut cylinder 1 and 2. |
| 10. | Remove the fuel injector conical washer. |
| 11. | Remove the fuel injector spherical washer. |
| 12. | Remove the fuel injector cylinder 1 and pressure loss tester with EN-46791 adapter from cylinder 2. |
Installation Procedure
| 1. | Install the oil level indicator. |
| 2. | Install the engine coolant surge tank cup. |
| 3. | Install oil pump housing plug seal (2). |
| 4. | Install the oil pump housing plug (1) from oil pump housing (3) and tighten with 22 N·m (16 lb ft) . |
| 5. | Install the fuel Injector. Refer to Fuel Injector Installation . |
| 6. | Install the fuel Injection fuel feed pipe. Refer to Fuel Injection Fuel Feed Pipe Installation - Fuel Rail to Fuel Injector . |
Parts & tools for this job For Vauxhall Astra
- PARTGlow plugsSearch: Vauxhall Astra glow plugs
- TOOLGlow plug socketSearch: glow plug socket
- TOOLDiesel compression testerSearch: diesel compression tester
Links open Amazon search results in a new tab. As an Amazon Associate I earn from qualifying purchases.