
Steering Gear Replacement - Hydraulic Power Steering (Power Steering System)
- Make
- Vauxhall
- Model
- Astra J
- Section
- Power Steering System › Repair Instructions › Steering Gear Replacement - Hydraulic Power Steering
‹ Prev Steering Linkage Inner Tie Rod Replacement - Electronic Power SteeringNext › Steering Gear Bushing Replacement
SteeringSteering Gear Replacement - Hydraulic Power Steering
Steering Gear Replacement (Hydraulic Power Steering)Special ToolsEN 45059 Torque Angle Sensor KitFor equivalent regional tools, refer to Special Tools . Removal Procedure
|
| 1. | Turn the front wheels to the straight forward position and secure the steering wheel from moving. |
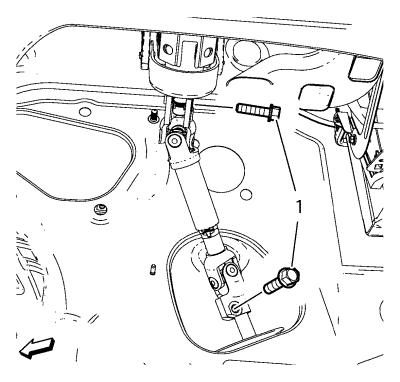
| 2. | Remove the lower steering intermediate shaft bolt (1). |
| 3. | Remove the steering intermediate shaft from the steering gear. |
| 4. | Raise and support the vehicle. Refer to Lifting and Jacking the Vehicle . |
| 5. | Remove the tire and wheel assemblies. Refer to Tire and Wheel Removal and Installation . |
| 6. | Remove the exhaust front pipe. Refer to Exhaust Front Pipe Replacement . |
| 7. | Remove the front compartment splash shield. Refer to Front Compartment Splash Shield Replacement . |
| 8. | Remove the front compartment insulator, if equipped. Refer to Front Compartment Insulator Replacement . |
| 9. | Remove the steering linkage inner tie rod. Refer to Steering Linkage Inner Tie Rod Replacement . |
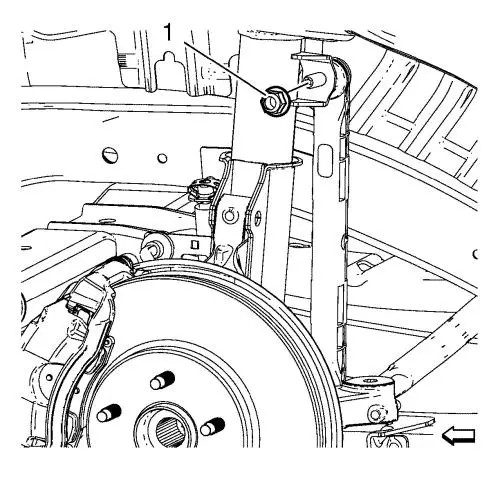
| 10. | Remove and discard the stabilizer link shaft nut (1) from the strut. |
| 11. | Remove the stabilizer link shaft from the strut. |
| 12. | Place a large container under the vehicle in order to collect the draining fluid. |
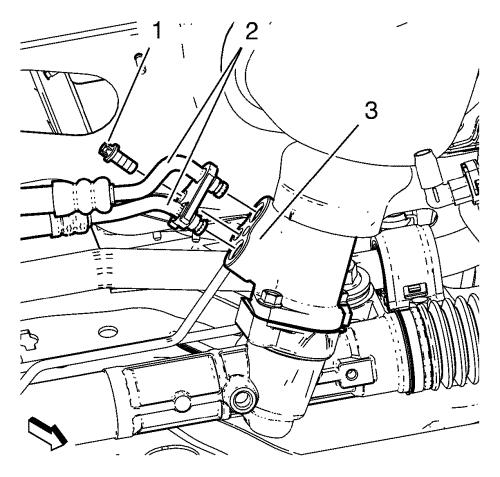
| 13. | Remove the power steering gear inlet and outlet hose bolt (1), remove the inlet and outlet hose (2) from the steering gear (3). |
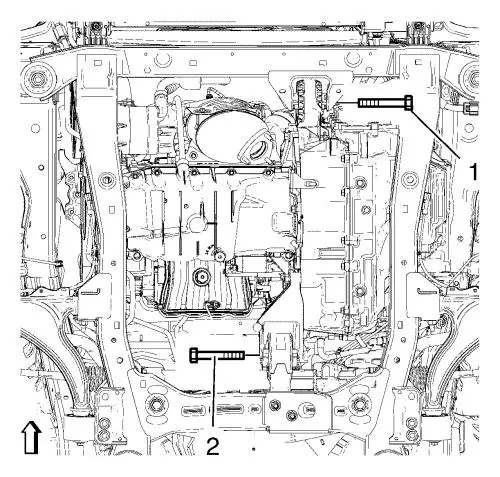
| 14. | Remove the front (1) and the rear (2) transmission mount bracket bolts. |
| 15. | Remove the rear frame to body bolts. Refer to Drivetrain and Front Suspension Frame Replacement . |
| 16. | Lower the rear of the frame max. 50 mm (1.968 in) in order to gain clearance to the steering gear. |
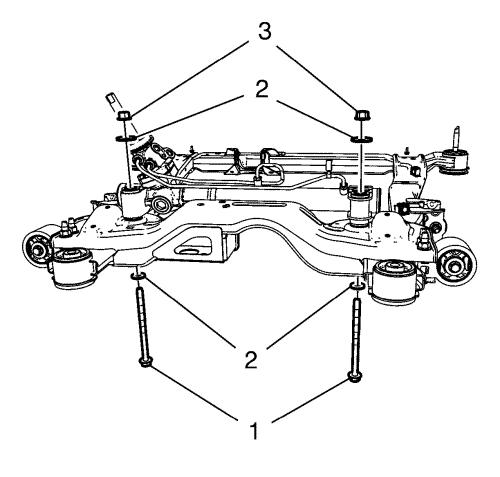
| 17. | Remove and DISCARD the steering gear bolts (1), nuts (3) and washers (2) from the steering gear. |
| 18. | Remove the steering gear. |
Installation Procedure
| Caution: Ensure that the steering column dash seal is installed properly onto steering gear rack pinion housing. The sealing lip MUST rest on lower steering column cover surface evenly. To ease installation of the seal, apply liquid soap to the sealing lip. After installation, verify that the seal lip does not protrude into the vehicle's interior. Improper installation could result in poor sealing performance and water intrusion into the vehicle. |
| 1. | Install the steering gear. |
| 2. | Install NEW steering gear bolts (1), washers (2) and nuts (3) to the steering gear. |
| Warning: Refer to
Torque-to-Yield Fastener Warning
. |
Caution: Refer to Fastener Caution . |
| 3. | Tighten the NEW steering gear bolts to 110 N·m (81 lb ft) + 150° to 165° , using the EN 45059 kit . |
| 4. | Raise the frame with hydraulic jack. |
| 5. | Install the rear frame to body bolts. Refer to drivetrain and front suspension frame replacement Drivetrain and Front Suspension Frame Replacement . |
| 6. | Install the front transmission mount bolt (1) and tighten to 58 N·m (43 lb ft) . |
| 7. | Install the rear transmission mount bracket bolt (2) and tighten to 100 N·m (74 lb ft) . |
| 8. | Replace the O-rings of the inlet and outlet hoses. Lubricate O-rings with a small amount of hydraulic oil. |
| 9. | Install the inlet and outlet hose (2) to the steering gear (3) and install the power steering gear inlet and outlet hose bolt (1). Tighten the power steering inlet and outlet hose bolt to 11 N·m (98 lb in) . |
| 10. | Install the stabilizer shaft link to the strut. |
| 11. | Install the NEW stabilizer shaft link nut (1) and tighten to 65 N·m (48 lb ft) . |
| 12. | Install the steering linkage inner tie rod. Refer to Steering Linkage Inner Tie Rod Replacement . |
| 13. | Install the front compartment insulator, if equipped. Refer to Front Compartment Insulator Replacement . |
| 14. | Install the front compartment splash shield. Refer to Front Compartment Splash Shield Replacement . |
| 15. | Install the exhaust front pipe. Refer to Exhaust Front Pipe Replacement . |
| 16. | Install the front tire and wheel assemblies. Refer to Tire and Wheel Removal and Installation . |
| 17. | Lower the vehicle. |
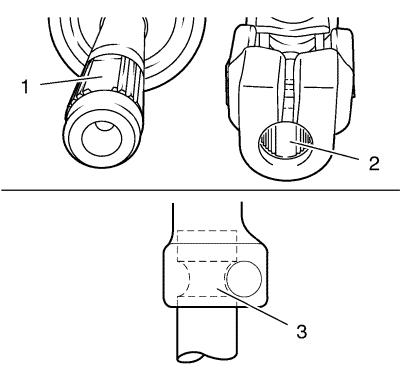
Note: The recess (2) of the fine toothing in the universal joint have to align precisely with the recess (1) of the fine toothing on the steering pinion. The bore in the universal joint have to align with the groove on the steering pinion (3). |
| 18. | Check alignment of fine toothing of universal joint and steering pinion. |
| 19. | Install the lower intermediate steering shaft bolts (1) and tighten to 34 N·m (26 lb ft) . |
| 20. | Adjust the front toe. Refer to Wheel Alignment - Steering Wheel Angle and/or Front Toe Adjustment . |
| 21. | Bleed the hydraulic steering system. Refer to Power Steering System Bleeding . |
‹ Prev Steering Linkage Inner Tie Rod Replacement - Electronic Power SteeringNext › Steering Gear Bushing Replacement
Parts & tools for this job For Vauxhall Astra
- TOOLTie rod end toolSearch: tie rod end puller
- TOOLBall joint separatorSearch: ball joint separator
- FLUIDPower steering fluidSearch: Vauxhall power steering fluid
Links open Amazon search results in a new tab. As an Amazon Associate I earn from qualifying purchases.