|
Centre Valve Body, Dismantle and Assemble (AF
13-II)
Note: The valve body
should only be disassembled for cleaning purposes as the individual
parts are not available from suppliers. Thus extreme care should be
exercised when performing this work.
 Remove Remove
|
| 3. |
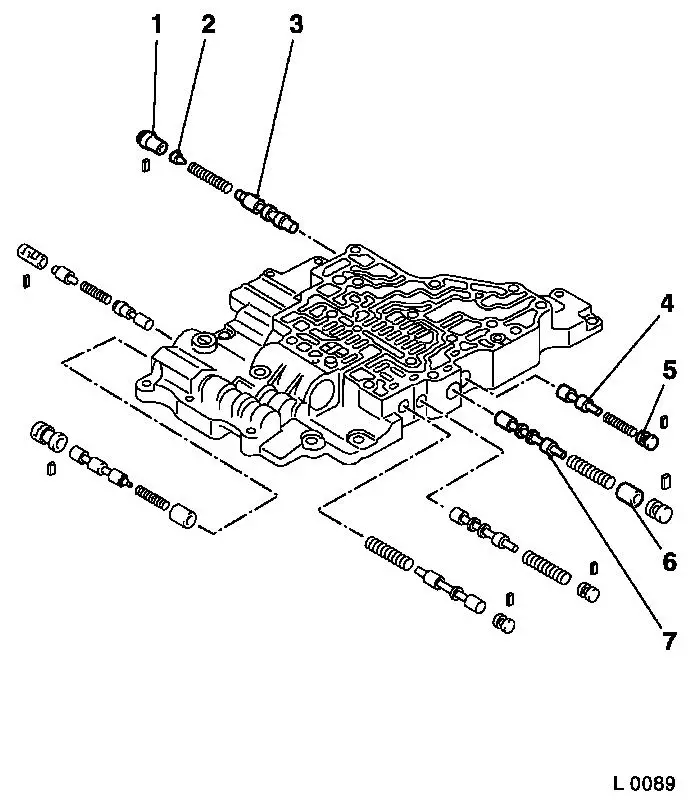
Remove primary control valve
| • |
Consisting of primary control valve (3) with spring, primary
control valve piston (2), and primary control valve sleeve (1) with
primary control valve wedge
|
|
| 4. |
Remove converter clutch modulator
| • |
Consisting of converter clutch modulator (4) with spring, and
converter clutch modulator plug (5) with converter clutch modulator
wedge
|
|
| 5. |
Remove 3-4 gearshift valve
| • |
Consisting of 3-4 gearshift valve (6) with spring, 3-4
gearshift valve sleeve (7) and 3-4 gearshift valve plug with 3-4
gearshift valve wedge
|
|
| 6. |
Remove 2-3 gearshift valve
| • |
Consisting of 2-3 gearshift valve with spring, and 2-3
gearshift valve plug with 2-3 gearshift valve wedge
|
|
|
|
| 7. |
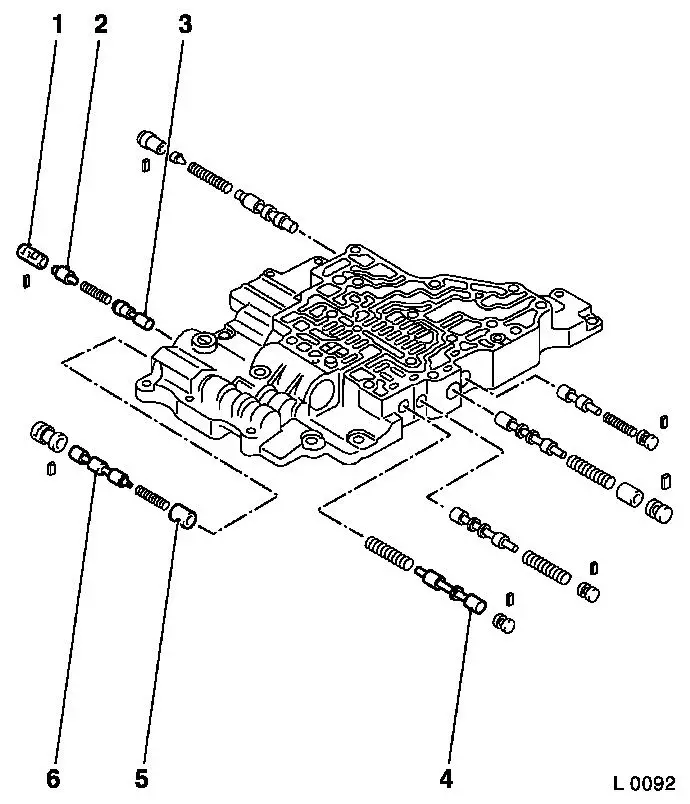
Remove 1-2 gearshift valve
| • |
Consisting of 1-2 gearshift valve (4) with spring, and 1-2
gearshift valve plug with 1-2 gearshift valve wedge
|
|
| 8. |
Remove B1 modulator valve
| • |
Consisting of B1 modulator valve (6) with spring, B1 modulator
valve sleeve (5), and B1 modulator valve plug with B1 modulator
valve wedge
|
|
| 9. |
Remove accumulator control valve
| • |
Consisting of accumulator control valve (3) with spring,
accumulator control valve piston (2), and accumulator control valve
plug (1) with accumulator control valve wedge
|
|
| 10. |
Check all parts for wear or damage
Note: Replace valve
body if necessary.
|
|
 Install
|
| 11. |
Insert accumulator control valve
| • |
Consisting of accumulator control valve (3) with spring,
accumulator control valve piston (2), and accumulator control valve
plug (1)
|
| • |
Lock with accumulator control valve wedge
|
|
| 12. |
Insert B1 modulator control valve
| • |
Consisting of B1 modulator valve (6) with spring, B1 modulator
valve sleeve (5), and B1 modulator valve plug
|
| • |
Lock with B1 modulator valve wedge
|
|
| 13. |
Insert 1-2 gearshift valve
| • |
Consisting of 1-2 gearshift valve (4) with spring, and 1-2
gearshift valve plug
|
| • |
Lock with 1-2 gearshift valve wedge
|
|
|
|
| 14. |
Insert 2-3 gearshift valve
| • |
Consisting of 2-3 gearshift valve with spring, and 2-3
gearshift valve plug
|
| • |
Lock with 2/3 gearshift valve wedge
|
|
| 15. |
Insert 3-4 gearshift valve
| • |
Consisting of 3-4 gearshift valve (6) with spring, 3-4
gearshift valve sleeve (7) and 3-4 gearshift valve plug
|
| • |
Lock with 3-4 gearshift valve wedge
|
|
| 16. |
Insert converter clutch modulator
| • |
Consisting of converter clutch modulator (4) with spring and
converter clutch modulator plug (5)
|
| • |
Lock with converter clutch modulator wedge
|
|
| 17. |
Insert primary control valve
| • |
Consisting of primary control valve (3) with spring, primary
control valve piston (2) and primary control valve sleeve (1)
|
| • |
Lock with primary control vale wedge
|
|
|
|
