volkswagen Workshop Repair Guides

Volkswagen Workshop Service and Repair Manuals

Exhaust turbocharger, G-charger > < Removing and installing cowl together with radiator fanV7 and radiator fan 2V177
Removing and installing radiator
  Note
When renewing expansion tank and during service operations, ensure that 2 silicate cartridges → Electronic parts catalogue are always in expansion tank. The silicate cartridges must not be removed.
   
Special tools and workshop equipment required
t  Adapter for cooling system tester -V.A.G 1274/8-
t  Drip tray for workshop hoist -VAS 6208-
t  Hose clip pliers -V.A.G 1921-
t  Cooling system charge unit -VAS 6096-
t  Refractometer -T10007-

  Note
Even when correctly installed, radiator may show slight impression marks on fins. These are not damage. Radiators must not be renewed because of such slight impressions.
Removing
–  Drain coolant → Chapter.
   
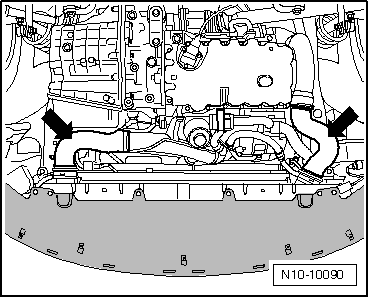
–  Remove charge air covers -arrows-.
–  Bring lock carrier into service position → General body repairs, exterior; Rep. gr.50.
–  Pull coolant hoses off radiator.
–  Remove radiator cowl with radiator fan → Chapter.
  Note
To prevent damage to condenser or to refrigerant lines and hoses, ensure that lines and hoses are not stretched, kinked or bent.
  N10-10090
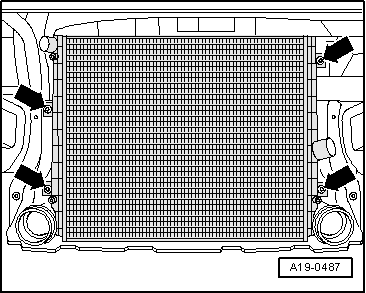
–  Unscrew bolts -arrows- from radiator.
–  Remove radiator upwards.
Installing
Install in reverse order. In the process, note the following:
–  If a new radiator is installed, the old coolant must not be reused.
–  Replenish coolant → Chapter.
Specified torques → Chapter.
  A19-0487

Exhaust turbocharger, G-charger > < Removing and installing cowl together with radiator fanV7 and radiator fan 2V177