
Anti-theft device
- Make
- Alfa Romeo
- Model
- 147 Factory Service Manual
- Year
- 2000–2004
- Section
- Special accessories › Anti-theft device
Anti-theft device
SPECIFCATIONS
The cars are equipped with an electronic system known as the ALFA CODE that acts as an engine immobiliser.
The ALFA CODE system allows the engine to start by means of the Engine NCM only after receiving a secret code memorised previously.
SPECIFIC FEATURES OF THE SYSTEM
The second generation Code system is integrated in the Body Computer Node (NBC).
COMPOSITION
The ALFA CODE system comprises 5 basic elements (in addition to the Body Computer which acts as control unit):
- C CAN line for dialogue with BCN and ECN
- bidirectional serial line for recovery ( W line)
- two to eight electronic keys containing a transponder with a secret code;
- an aerial which reads the code contained in the key transponders;
- the NCM for petrol engines and for electronic diesel pumps or the Diesel Valve Electronic Driver (D._E.D.)
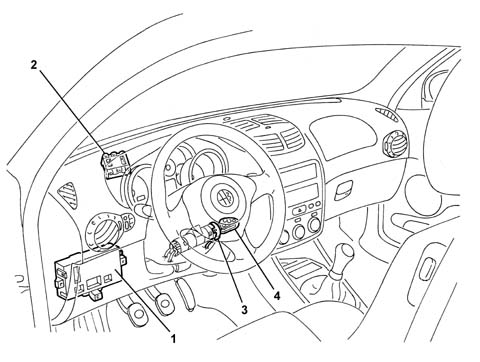
1 - NBC
2 - ECN
3 - Aerial
4 - Key
OPERATION
INTRODUCTION
The ALFA CODE allows engine control management to be commenced by the NCM by coded dialogue between the NBC and NCM during the pre-starting stage.
After the ignition is switched on, the NCM sends a request code to the NBC which responds only after recognizing (via the aerial) a known electronic key inserted in the ignition switch. If the secret code contained in the response is valid, the NCM continues with the usual engine control activity, allowing the engine to be started.
The NCM can memorise the secret code only by means of a particular procedure.
The ALFA CODE function is also guaranteed in the case of malfunction of the other NBC functions.
After recognising an enabled transponder, the ALFA CODE switches off any alarm system.
INTERACTION OF ALFA CODE WITH THE KEY
Each key contains a transponder with the IDENTIFIER CODE and the SECRET CODE.
As soon as the ignition is switched on (+15), the transponder sends the identifier to the ALFA CODE which, recognising it as one of the enabled ones, proceeds with the strategy for recognising the cytographic transponder
If the identifier is not recognised, the procedure aborts, preventing the engine from being started.
The cryptographic transponder is recognised by means of a challenge-response algorithm with exchange of encrypted code.
The code recognition time does not exceed 160 ms per attempt.
The ALFA CODE attempts for 1 second to acquire the transponder.
DIALOGUE BETWEEN ENGINE CONTROL NODE AND ALFA CODE
The dialogue between ALFA CODE (NBC) and NCM takes place on the C-CAN under normal operating conditions. Each exchange of information between ALFA CODE and the NCM (the ALFA CODE never interrogates the NCM, but only answers after a request from the latter).
When the ignition is switched on, the flow of operations involving code exchange between the ALFA CODE and the NCM depends on the state (virgin or memorised) of the engine management control unit.
If the NCM is virgin, the procedure involves the fix code request to the ALFA CODE: in this way, the NCM learns and memorises the secret code. This procedure is called CODE RECORDING.
If the NCM is programmed, the procedure involves checking that the fix code memorised in the engine control unit is the same as that memorised in the ALFA CODE (NBC): the NCM asks the NBC for the secret code and compares it with its own. This procedure is called CODE VERIFY
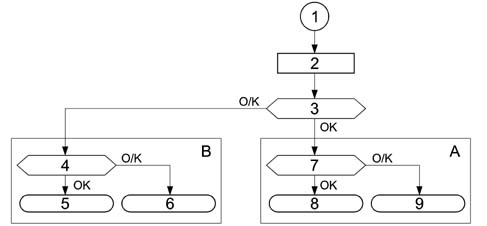
1 - Key on
2 - NCM initialisation
3 - Memorized/virgin NCM status
4 - Memorization successfully completed ?
5 - ENABLE ENGINE MANAGEMENT = the flow of software continues with the management of the engine management.
6 - PROHIBIT ENGINE MANAGEMENT = activates a timer which creates a dely to only enable a new procedure after 0 - 600 secs. It is necessary to remove and and restore +15. If a timer is not available (with + 30) it will be necessary to wait 0 - 600 secs in key on. After this it is possible to carry out a new procedure with a KEY OFF and KEY ON.
7 - Is the secret code valid ?
8 - SEE POINT 6
9 - SEE POINT 5
A - CODE VERIFY
B - CODE RECORDING
Code recording
The CODE RECORDING procedure is the memorisation of the fix code in the engine control unit.
Only after memorising the identifiers, secret code and fix code, the ALFA CODE is ready to meet the request to transmit a code from the NCM which is still virgin.
After 'power on', the engine control unit initialises its software and, if it is virgin, asks for the fix code.
If the ALFA CODE is not virgin, it will respond by sending the fix code, but only after recognising an enabled key. If it is a disabled (unknown) key or there is no key, the ALFA CODE does not respond.
When the ALFA CODE is virgin and there is no transponder in the aerial and a a FIX code request is sent from the NCM to the ALFA CODE, the ALFA CODE does not respond.
Code verify
This is the standard procedure which is repeated during the life the car whenever the driver inserts the key in the ignition switch and turns the ignition on (+15) (= KEY ON): this procedure allows engine starting if the inserted key is enabled.
The code verify procedure continues even wne the driver turns the key to +50 (CRANKING).
After the key is on KEY ON (+15), the ALFA CODE recognises whether the transponder in the key is one of the enabled ones.
At the same time, with the key on +15 or +50, the NCM initialises its software to verify whether a fix code has already been memorised. If it has, it will send a (FIX code request) to the ALFA CODE.
In response to this request, the ALFA CODE will send the fix code, encrypted by the Minikrypt, to the engine management control unit, only if the transponder has been recognised as enabled.
If the ALFA CODE receives further (FIX code) requests, it only reads the transponder in the aerial again before responding to the NCM if there are visible signs of possible manipulation (see later).
If the result of the transponder recognition is negative (incorrect transponder, no transponder in the aerial, etc.), the ALFA CODE will send the code (incorrect transponder or no transponder) to the engine management control unit.
If the ALFA CODE is virgin and the NCM sends a FIX code request, the ALFA CODE, after recognising a transponder, responds by sending an encrypted virgin NBC recognised transponder code, encrypted by the Minikrypt.
METHOD OF USING C-CAN OR RECOVERY W LINE
Communication between the NBC and NCM takes place by default on the C-CAN line; if the C-CAN is faulty, the recovery strategy is as follows:
- C-CAN faulty
- the ECN passes on to recovery on the W serial line, requesting the code from the BCN: if the outcome is positive, starting is permitted
- if there are also problems on the W line, after re-transmission attempts, the NCM passes on to recovery from the accelerator pedal or the diagnostic instrument.
The recovery strategy is mainly managed by the NCM, which acts as a master unit during communication: the NBC acts as the slave unit and must therefore always be ready to respond to code requests from the C-CAN and W serial line.
Communication on c-can
The communication between Body Computer and NCM is achieved by the following two CAN messages:
- IMMO CODE REQUEST (immo code request)
- IMMO CODE RESPONSE (immo code response)
The IMMO CODE REQUEST is sent by the NMC and received by the NBC.
The IMMO CODE RESPONSE is sent by the NBC and received by the NCM.
Communication on w line
If, because of a malfunction on the CAN network, you move on to the recovery condition, the exchange of codes between NCM and NBC takes place on the W serial line.
This code exchange takes place only for the CODE VERIFY procedure: it is therefore not possible to carry out a CODE RECORDING on the W line.
The data exchange on the serial line takes place in the same way as on the C-CAN network: the NCM control unit is master of the communication, while the NBC responds to the requests received from the NCM.
Two messages travel on the serial line, the IMMO CODE REQUEST and the IMMO CODE RESPONSE.
VERIFYING W LINE ELECTRICAL CONNECTION
As the dialogue on the W line only takes place in the case of recovery, an ERROR condition would only be recognised at the time of use, so the end customer would not be able to move the car.
A strategy of verifying the W serial line is therefore introduced in order to diagnose the line itself.
PROTECTION CODES
The ALFA CODE function is implemented via the exchange of secret codes between the various subsystems (keys, NBC, engine management unit).
UNIVERSAL CODE: this is the code which the ALFA CODE, not yet programmed, sends to the NCM when it has recognised the presence of a transponder in the key.
The ALFA CODE warning light comes on at a frequency of 1.6 Hz and duty cycle of 50%.
The flashing of the light explains that the system is correctly connected and working, but the car is not protected by a code.
IMMO CODE: This is the basic code from which the secret code and fix code are obtained. An automatically generated immmo code is associated with each car. All the other secret codes used by the ALFA CODE function are generated from the IMMO CODE.
SECRET CODE: This is the code resident in the transponder. It is memorised in the transponders contained in the car keys at the time of programming the transponders, and in the ALFA CODE at the time of programming the keys at the end of the line.
FIX CODE: This is memorised in the ALFA CODE at the time of end-of-line programming.
ELECTRONIC CODE (PIN): This is obtained from the fix code and is stamped on the CODE CARD which is delivered to the car's owner; it is a 5-digit decimal code (0 is not permitted).
It is used to access, in a protected manner, the NBC memory in order to re-programme or programme new remote control keys and/or carry out particular diagnostic functions.
It is also used in the procedure of recovery from accelerator pedal described in the engine control unit specification.
IDENTIFIER: It is resident in the transponder and is different for each transponder. It is memorised in the ALFA CODE during the programming procedure. The ALFA CODE manages a table of enabled identifications and one for disabled identifications.
DESCRIPTION OF THE COMPONENTS
ALFA CODE FUNCTION IN THE NBC
Specifications
The ALFA CODE on the 147 is a function of the BCN
The main functions of the ALFA CODE are:
- to recognise the introduction and rotation of a key in the ignition switch (+15);
- to de-activate the alarm after recognition of an enabled key;
- to emit an electromagnetic field to read the key's transponder;
- to send the random code to the transponder;
- to receive the cryptographic code emitted by the key;
- to memorise up to 8 identifiers;
- to memorise the secret code;
- to manage a list of a maximum of 8 enabled identifiers;
- to manage a list of at least 16 permanently disabled identifiers;
- to manage the C-CAN line to the engine management control unit;
- to manage the lighting up of the warning light on the panel by dialoguing with the NQS;
- to carry out self-diagnosis.
Aerial
Characteristics
Toroidal aerial
Ohm value= 40 Ohm
Composition
The aerial assembly consists of a 131 coil toroidal reel aerial with built-in connector on the aerial body.
The connecting wiring to the BCN is integrated in the dashboard wiring loom.
Operation
The aerial is supplied by the NBC to energise the key's transponder.
As the aerial needs to be as close as possible to the transponder (for electromagnetic immunity, its small size and the limited range of the transponder), it is attached axially to the ignition switch.
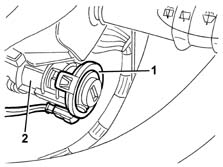
1 - CODE aerial
2 - Ignition switch
IGNITION KEY
Characteristics
The mechanical key contains a cryptographic transponder in the handle.
Operation
When the key is inserted in the switch and the ignition is switched on (+15), the transponder is energized by the aerial and responds by emitting the secret code in a variable and encrypted way.
The emission into the air has sufficient power to have high immunity to electromagnetic interference and a range such that it is received by the aerial mounted in the ignition switch.
If the code is recognised as valid, the ALFA CODE sends the engine control unit, at the request of the latter, a coded signal that allows the engine to be started.
Up to 8 keys can be programmed in the ALFA CODE.
The keys are supplied 'already programmed' by the production factory. All the codes are then stored in a DATA BASE managed by the PARTS DIVISION. Therefore, when a new vehicle is handed over to a customer, the Service Network should not carry out any programming procedures. If a key is mislaid or additional keys are requested, this request should be passed on to the Parts Dept. following the procedures in the 'REPAIR PROCEDURES section.
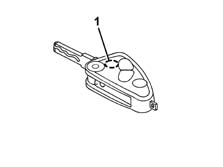
1 - Transponder
KEY TRANSPONDER
Specifcations
The transponder contained in the key has the following coded in its memory:
- SECRET CODE, the same for each transponder in the same key kit;
- IDENTIFIER, different for each transponder produced;
- DATE OF PROGRAMMING the secret code
The identifier differs from transponder to transponder to ensure that, even if duplicates are requested on the Network, there are not several transponders with the same identifier.
Key programming
The storage procedure is divided into two stages in sequence:
- the key transponders are stored in the ALFA CODE;
- the ALFA CODE manages storage of the fix code in the engine management control unit
This second step is implemented automatically when the first is completed successfully at key on.
Supply of key kits
Transponders are sent to the manufacturer programmed with an identifier (different for each transponder).
The key manufacturer generates an immo code, computes the codes (secret code, fix-code) and programmes the secret code and programming date into the key transponders.
Once they are programmed, it printes a bar code onto a disposable label that contains the immo code, the key identifiers, the programming date, the key mechanical code and, if present, the remote control/alarm codes.
The secret code in the kit keys is stored in the ALFA CODE during the end of line programming procedure. It is used in the cryptographic algorithm for key recognition.
Programming a new body computer
If the Body Computer is replaced, the ALFA CODE must be programmed with the secret code and the fix code of the vehicle in which it is installed.
The database is accessed using the chassis number and the car immo code is obtained. The secret code and fix-code are obtained from this and programmed into the NBC.
In the case of a new NBC, the enabled and disabled identifier tables are empty.
Once the NBC has been installed in the car, a tester is used to store the key identifiers (see key programming).
An ALFA CODE can only be programmed for a blank NBC by the ALFA ROMEO parts dept.
Reprogramming the keys
Reprogramming the keys enables the keys authorised to start the car to be memorised in the NBC.
The new keys to be programmed and those already programmed will be inserted in the ignition switch to be recognised by the ALFA CODE which will memorise in the table of enabled identifiers those presented during the procedure, and will transfer from the latter table to the table of disabled identifiers those identifiers which have not been presented.
Table of disabled keys
If an enabled key is no longer available (lost, stolen or no longer working), the subsequent key programming procedure (for example necessary for memorising the new replacement key) should disable its operation.
The ALFA CODE therefore manages a table in EEPROM which can contain the data relating to 16 disabled keys: the identifiers of the enabled keys not presented during the reprogramming procedures are transferred into this table.
If the disabled keys table is full, any new key will replace the first key entered on the table.
This table also permits traceability of the keys used on the car.
Key reprogramming prodecure
The minimum time for a KEY-ON during the storage procedure is 1 seconds.
The key reprogramming procedure is carried out/guided by the Diagnostic/Test Instrument: this procedure is activated by access protected by the car's PIN.
Once the procedure is activated, the flow is as follows:
- the diagnostic instrument instructs the NBC to initialize the key learning procedure.
- the operator enters the first key and requests learning from the NBC: the NBC reads the transponder after Key-on, verifies whether the secret code is correct and, if it is, learns the key's identifier.
- the operator repeats operation 2 for all the car's keys.
- once all the keys have been learnt, the diagnostic instrument instructs the BCN to memorise them permanently in EEPROM, in accordance with the following procedure:
- the BCN compares the learnt identifiers with those currently in memory
- the data of the keys memorised in EEPROM but not presented during learning, they are moved to the disabled keys table.
- the data of the learnt keys are memorised in the enabled keys table only if they are not already present in the disabled keys table.
Up to a maximum of 8 enabled keys can be programmed.
Deletion from memory of a lost key
The procedure is the same as that described in the previous paragraph. All the keys owned must be presented; those not presented will be deleted, i.e. transferred into the table of disabled identifiers. A lost key may be deleted from memory at any time by a diagnostic/test instrument. The identifier of that key is transferred into the disabled keys table and will no longer be recognised.
CODE CARD
Composition
This card contains the following:
- The emergency code (electronic code) which allows the car to be started with the EXAMINER or another diagnostic instrument or, in an emergency, with the accelerator pedal procedure. It is also used to programme the keys and remote controls with the EXAMINER.
- The mechanical code of the keys (mechanical code) identifies the mechanical profile of the key, and must be specified in the order to receive the key already cut.
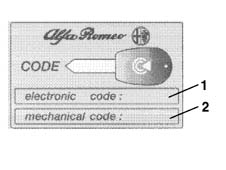
1 - Electronic code
2 - Mechanical code
Operation
The 'electronic' emergency code is also used for diagnosis of the system and for other operations with the Examiner or another diagnostic instrument. Many of these operations (e.g. 'Programming Keys') can only be carried out after this code has been entered.
Therefore before any operation, the Customer must be asked for the Code Card.
The Code Card should not be left in the vehicle in case it is stolen: it should, however, be available for the emergency starting procedure described below.
WARNING LIGHT
Specifcations
The code warning light is located on the instrument panel; it is controlled by a message on the B-CAN network by the NBC.
On the NQS low line, it is positioned in the centre above display 2 (clock/date)
On the NQS high tline, it is displayed in the DOT matrix (only in the case of malfunction).
Operation
With the engine running, the diagnostic warning lights should never come on. Strategies are implemented to prevent the code warning light coming on falsely in the case of +15 at the NBC for t = 5s.
This warning light enters normal operating mode if a code is requested by the NCM.
When the NCM enters 'Prohibit Engine Management' mode, both warning lights display the event as follows:
| EOBD warning light | CODE warning light | |
|---|---|---|
| C-CAN line not activated | ON | ON |
| Incorrect code received | ON | ON |
Method of operation and flashing times of code warning light
The NBC gives the instruction to the panel, via the CAN network, to switch on the ALFA CODE warning light as shown in the 'code warning light blinking modes' table, where the times are considered with a tolerance of ± 10%.
In accordance with the blinking modes (from 1 to 16) identified in the top table, the code warning light should flash as shown in the following table.
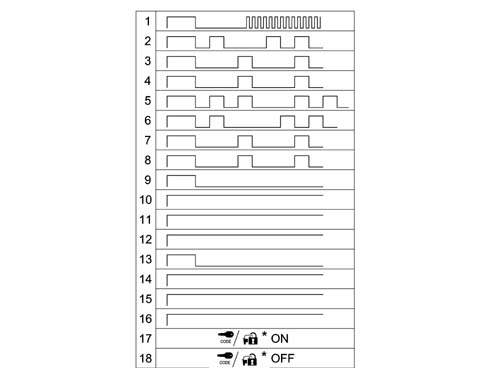
(*) the serigraphy has been modified starting from 09/03.
1 - Virgin BCN, virgin NCM, C-CAN line and W line connected, transponder recognised, starting permitted
2 - Virgin NBC, virgin NCM, C-CAN line and W line connected, transponder not recognised, starting not permitted
3 - Virgin NBC, virgin NCM, C-CAN line not connected and W line not connected, transponder recognised, starting not permitted
4 - Virgin NBC, virgin NCM, C-CAN line not connected and W line not connected, transponder not recognised, starting not permitted
5 - Virgin NBC, memorised NCM, C-CAN line connected and W line connected, transponder recognised, starting not permitted
6 - Virgin NBC, memorised NCM, C-CAN line connected and W line connected, transponder not recognised, starting not permitted
7 - Virgin NBC, memorised NCM, C-CAN line not connected and W line not connected, transponder recognised, starting not permitted
8 - Virgin NBC, memorised NCM, C-CAN line not connected and W line not connected, transponder not recognised, starting not permitted
9 - Memorised NBC, virgin NCM, C-CAN line connected and W line connected, transponder recognised, starting permitted
10 - NBC memorised, virgin NCM, C-CAN line connected and W line connected, transponder not recognised, starting not permitted
11 - NBC memorised, virgin NCM, C-CAN line not connected and W line not connected, transponder recognised, starting not permitted
12 - NBC memorised, virgin NCM, C-CAN line not connected and W line not connected, transponder not recognised, starting not permitted
13 - NBC memorised, NCM memorised, C-CAN line connected and W line connected, transponder recognised, starting permitted
14 - NBC memorised, NCM memorised, C-CAN line connected and W line connected, transponder not recognised, starting not permitted
15 - NBC memorised, NCM memorised, C-CAN line not connected and W line not connected, transponder recognised, starting not permitted
16 - NBC memorised, NCM memorised, C-CAN line not connected and W line not connected, transponder not recognised, starting not permitted
17 - The receipt, by the NBC in VERIFY mode, of a delayed key code following a code request made after 500 ms by Key ON and which caused the code warning light to come on permanently, should cause the light to go out immediately, indicating that the system is connected correctly and working, and the car is protected.
18 - Particular blinking modes of the light are not required when the BCN is in the 'Diagnosis' state
With reference to modes 3 and 4 in the table, if communication is restored, i.e. the NBC receives an ENQp, the code warning light should start to flash at a frequency of 1.6 Hz d.c. 50% to indicate that the system is properly connected and operational. With reference to modes 7 and 8 in the table, if communication is restored, i.e. the NBC receives an ENQ, the code warning light should start to flash in accordance with mode 6 to indicate that the system is properly connected but the transponder has not been recognized by the engine management control unit.
FAULT DIAGNOSIS
The ALFA CODE function permits the possibility of carrying out self-diagnosis of the parts which make up the system.
The NBC can identify and memorise in EEPROM the presence of the following malfunctions:
Transponder:
- faulty or absent or with incorrect secret code
- deleted/disabled
- unknown/not memorised
Transponder aerial:
- faulty electrical connection (open circuit, short circuit to earth or to battery)
Active diagnosis
By means of commands sent from the Tester it is possible to:
Ask whether the ALFA CODE is:
- virgin (each time a key is inserted)
- programmed at the end of the line (each key a key is inserted)
- a replacement part (each time a key is inserted)
- virgin/programmed NCM
- link with NCM OK / KO
Ask the number of keys programmed.
Read one key at a time and know the following for each key:
- valid transponder
- if the key is programmed
- its position in the table
- if the secret code is valid
- the key ID
Ask the number and identifier of the last key used
Ask for the reading of all enabled keys
Ask the number of enabled keys and the number of disabled keys
Manually programme the keys through successive acquisitions with the effectiveness of the transponder being checked at each acquisition.
It should be possible to recognize the presence of a transponder in the aerial and whether or not it is valid.
Request current system status identified by:
- last key used is enabled and recognized
- the BC has received a code request from the engine management control unit
- the NCM is virgin
- the ALFA CODE is virgin
- BC is enabled to send the Minikrypt key
- the identifier of the last key used is present in the enabled keys table
- the identifier of the last key used is present in the disabled keys table
- the ALFA CODE has identified a tamper attempt at +15
Control CODE warning light activation/deactivation on the NQS
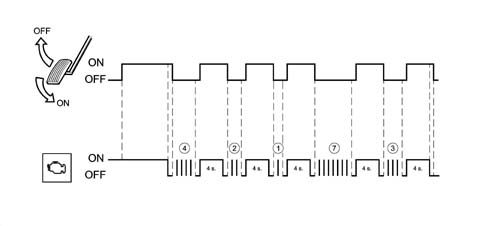
Recovery procedure by accelerator pedal
Whenever the customer wishes to start the engine and has problems with the ALFA CODE, the following procedure should be activated.
The recovery procedure is an emergency procedure and allows the user to regain possession of the car if the key has been lost or damaged. By 'manual' entry of a sub-code (EMERGENCY CODE).
The RECOVERY PROCEDURE can only be activated after the NCM has entered 'ENGINE IMMOBILIZED status.
The RECOVERY PROCEDURE by accelerator pedal can be repeated a limitless number of times;
The RECOVERY PROCEDURE by accelerator pedal must be carried out fully (5 digits); there will be no message if one or more digits of the entered code are incorrect; the only way to check whether the code is correct is to complete the procedure and try to start the engine; the procedure can nevertheless be interrupted by KEY OFF.
If the accelerator pedal is released before a time-out (8 s the first time, 4 secs the other times), the EOBD warning light will not go out and the RECOVERY PROCEDURE will be aborted.
To start the recovery procedure, the user must carry out the following operations in order:
- Read the code on the CODE CARD.
- Turn the key to ON. The diagnosis warning light comes on for the self-test;
- Press and hold down the accelerator pedal. The diagnosis warning light goes out after 8 s.
- When the diagnosis light goes out, release the accelerator pedal.
- After the pedal has been released, the warning light will flash at a frequency of 0.8 Hz duty cycle 25% ON. When the warning light has come on a number of times equal to the first digit in the code, press and hold down the accelerator pedal to allot the NCM to recognise it. The diagnosis light will come on and stay on, fixed, for 4 s.
- When the diagnosis light goes out, release the accelerator pedal.
- After the pedal has been released, the warning light will flash at a frequency of 0.8 Hz duty cycle 25% ON. When the warning light has come on a number of times equal to the next digit in the code, press and hold down the accelerator pedal to allot the NCM to recognise it. The diagnosis light will come on and stay on, fixed, for 4 s.
- When the diagnosis light goes out, release the accelerator pedal.
- Repeat operations 7 and 8 for the next digits up until the last.
- After the pedal has been released, when the last digit has been recognised, the warning light will flash at a frequency of 1.6 Hz duty cycle 25% for 4 s, or will go out sooner, if engine starting is recognised (>450 rpm) indicating that the code has been accepted, or will come on fixed to indicate that the code has been rejected. If the code is accepted, start the engine. If the code is rejected, repeat the procedure from point 2. For NCMs which measure time, engine starting is permitted within 10 minutes without repeating the procedure.
The above diagram shows an example of entering a code (which is 42173).
SPECIFICATIONS:
The alarm system carries out:
- perimeter surveillance
- volumetric surveillance
- surveillance against tilting of the car (with tilt sensor)
- surveillance of cutting the supply cables
- surveillance on the ignition key block.
The system is coordinated by the BC which sends/receives commands from the external modules via the serial line:
The system is switched on/off via the remote control interfaced with a received located in the BCN; the remote control and receiver are at radio frequency.
The alarm system is also switched off by inserting an enabled key recognised by the ALFA CODE (emergency switching off).
When it is switched on, the doors are locked.
When the system is switched on, volumetric protection can be excluded.
After an attempted break-in, a blinking code emitted by the dissuasion warning light indicates which sensor has detected it: this warning light also indicates the state of charge of the transmitter's battery.
DIRECT INPUTS:
- Negative signal from switch indicating driver's door open (NO)
- Negative signal from switch indicating passenger's front door open (NO)
- Negative signal from switch indicating rear left door open (NO)
- Negative signal from switch indicated rear right door open (NO)
- Negative signal from switch indicating switch open (NO)
- Negative signal from switch indicating bonnet open (NC)
- +15
- Serial line with Volumetric Sensors Control Unit (VSCU)
- Radiofrequency receiver
DIRECT OUTPUTS:
- Serial line with Siren Control Unit (SCU)
- Serial line with Volumetric Sensors Control Unit (VSCU)
- Operation of front right direction indicator
- Operation of rear right direction indicator
- Operation of right side repeater
- Operation of front left direction indicator
- Operation of left side repeater
- Operation of rear left direction indicator
- Operation of hazard warning lights LED
- A-Bus serial line
COMPOSITION
STRUCTURE
The alarm system consists of the following modules:
- Body Computer: manages the system's functions and controls the external modules.
- Sensors on doors, bonnet, boot: detect attempts to open the doors, boot, bonnet.
- Remote control system (transmitter + receiver included in the BCN).
- Stand-alone siren: emits beeps and the acoustic signal.
- Ultrasound sensors: detect movements inside the interior compartment.
- Anti-tilt sensor: detects a change in the car's tilt following lifting.
- A-Bus serial line: connects all the modules relating to the alarm system.
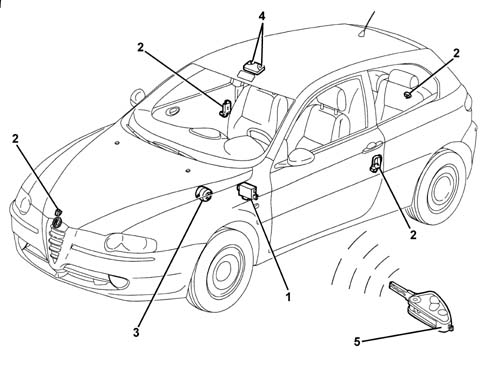
1 - BCN
2 - Door switches
3 - Siren
4 - Ultrasound sensors
5 - Key
OPERATION
There are eight states in which the alarm system may be:
- DISABLED;
- REST;
- ON;
- SURVEILLANCE;
- ALARM;
- OFF;
- PROGRAMMING;
- DIAGNOSIS.
Each of these states is described in the following paragraphs.
OFF
The OFF state is the state in which the BC is whenever an enabled key is recognised by the ALFA CODE.
This operation automatically switches off the alarm.
In the OFF state, the alarm system does not respond to the receiver's commands.(key on ON)
From the OFF state, you move to the rest state by turning the key to KEY-OFF.
REST
The rest state is the base state of the alarm system.
From this state, you can change to the state of:
- diagnosis: when a diagnosis session is activated by a diagnostic instrument connected to the BC.
- surveillance: when, by means of a command to switch on and passing through the switching on stage, the car is to be protected
- OFF: when an enabled key is recognised by the immobilizer.
In the rest condition, the BC continues to acquire the state of +15 to prevent the change to surveillance and, above all, to alarm. This information distinguishes the two basic modes of the rest state: car operating (+15 present), or abandoned (+15 absent), which is a prelude to the surveillance condidtion.
EXCLUSION OF VOLUMETRIC SENSORS
Volumetric protection can be excluded manually in the rest state.
Exclusion of volumetric protection automatically switches off the volumetric sensors, which interrupt the emission of ultrasound.
Exclusion is activated by the ignition key by means of a consecutive sequence, in strict order, of KEY-OFF (<2 s), KEY-ON (<1s), KEY-OFF, starting from a STABLE KEY-ON state: at the end of the manoeuvre, the dissuasion warning light comes on for 2 s to indicate that exclusion has taken place.
If, at the end of the sequence, the reoccurrence of the +15 signal lasts less than 30 s (for example to shut windows accidentally left open), the exclusion continues to remain active.
The re-enablement of the volumetric protection must take place if the occurrence of the +15 lasts over 30 s and at all events after the next switching off of the alarm system.
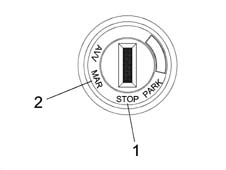
1 - Key-OFF
2 - Key-ON
SWITCHING ON
The switching on operation allows the alarm to change from rest to surveillance.
This operation is always inhibited if the +15 signal is present.
The command to switch on is effected by pressing the transmitter button, and is indicated by the direction indicators coming on for 2.5 s and by the emission of a synchronous beep.
On receipt of the command, the BC activates within 100 ms the procedure for switching on the alarm, as described:
Indication of switching on in progress
Activation of blinkers fixed for 2.5 s
Command for flashing of dissuasion light at 4 Hz
Sending of BEEP command to siren
System diagnosis/check
The control unit carries out the diagnosis of the components:
- volumetric sensors module;
- anti-tilt module (if present);
- siren;
Check via appropriate commands the state of the sensors:
- after max. of 3 seconds the siren;
- after max. of 4 seconds the volumetric sensors module;
- after max. of 4 seconds the anti-tilt module (if present).
if the responses to the check commands do not arrive within the times indicated, the module in question is declared to be malfunctioning.
Also check on plausibility of status of door switches (2 or 4), bonnet and boot (perimeter protection): if the non-closure of one of the entry points is detected, this entry point is excluded from surveillance.
Check on door locking status: 4 seconds after switching on, the door locking status is checked and any cases of repulsion (door locking manoeuvre not carried out correctly) are recognised.
Display of diagnostic information
Problems present at switching on are indicated by:
- issue of an attenuation beep by the siren (ref. B in figure)
- flashing of the blinkers for siren fault (ref. A in figure)
- indication of type of problem by dissuasion light (ref. C in figure)
Flashing at 8 Hz for 2.5 s indicates that one or more of the following causes of fault have been detected:
- one or more doors open
- boot open
- bonnet open
- door locking not done (repulsion)
- faulty volumetric sensors
The warning light staying on fixed for 10 seconds indicates that one or more of the following causes of fault have been detected:
- siren faulty
- anti-tilt sensor faulty; if the faults are simultaneous, the priority of the indication is as described in the above point
Switching on sensors
Sending command to volumetric sensors module
Sending command to anti-tilt module (if present)
Switching on siren
If the siren is working properly, the command to switch on the siren is sent and management of the heart-beat begins on the serial line.
End of procedure
The alarm system is switched on: the dissuasion light is operated, flashing at 0.8 Hz.
Operating diagrams for blinking (A), acoustic signal (B) and dissuasion LED (C).
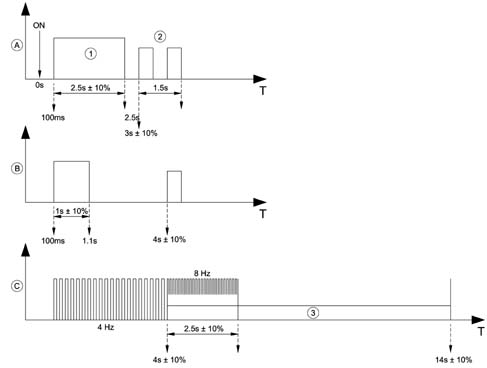
1 - Switching on of blinkers
2 - Siren fault
3 - Fixed light
INTERRUPTION BECAUSE OF SWITCH-OFF REQUEST
If, during the switching-on stage, a switch-off command is received from the remote control, the procedure is interrupted and the switch-off phase is entered.
If visual or acoustic indications are in progress, these are interrupted to give way to the switch-off indications.
SECRET CODE FOR SWITCHING ON SIREN
At the time of switching on, the BC generates a random code which it sends to the siren with the switch-on command.
The siren memorises the random code.
When the switching off of the alarm system is requested, the BC sends the switch-off command to the siren together with the random code: the siren compares the code with its memorised code and is only switched off if the comparison is positive.
In this way the system is protected from intrusion attempts aimed at deactivating the siren.
In addition at each switch-on the BC memorises in EEPROM:
- code used
- any excluded external modules
- condition of entry points (doors, boot), so as to have this information available even after an undesired reset of the system
AUTO SWITCH-ON
The auto switch-on operation allows the alarm system to change from rest to surveillance automatically and on a timed basis.
There are two methods of auto switch-on.
FROM KEY-OFF
- KEY-OFF is detected
- The auto switch-on counter starts counting
- If a transition from open to closed on any of the doors or the bonnet or boot is detected, the counter restarts from zero.
- The counter reaches the 'AUTO SWITCH-ON TIME
- The BC checks whether an enabled key is inserted
- If an enabled key is inserted, auto switch-on is carried out
- If an enabled key is not present, auto switch-on is carried out
PASSIVE method
- KEY-OFF is detected
- The auto switch-on counter starts counting
- If a transition from open to closed on the driver's door, or any of the doors or the bonnet or boot is detected, the counter restarts from zero
- if the counter reaches the value of 2 minutes without any transition from open to closed being made, auto switch-on is cancelled.
- the counter reaches the 'AUTO SWITCH-ON TIME
- the BC checks whether an enabled key is inserted
- if an enabled key is inserted, auto switch-on is carried out
- if an enabled key is not present, aut switch-on is carried out
The auto switch-on methods are enabled depending on the operating modes (see country map table 'PASSIVE AUTO SWITCH-ON ENABLEMENT and 'KEY-OFF AUTO SWITCH-ON ENABLEMENT).
Surveillance from auto switch-on is complete for all entry points; the operating modes make it possible to:
- activate/deactivate volumetric surveillance
- activate/deactive the anti-tilt module
In auto switch-on, the system test is carried out as in ordinary switch-on.
Door locking is not activated during auto switch-on.
The visual/acoustic indications are enabled by the operating modes
The definition of the driver's door in the different versions (right-hand drive and left-hand drive) is specified during end-of-line programming by the manufacturer.
RE-SWITCHING ON
Re-switching on allows the alarm system to change ffrom rest to surveillance automatically when, after an authorised switch-off, there are no door/bonnet/boot openings or other consistent actions.
The re-switching on procedure is as follows:
- The alarm system is switched off
- The re-switching on counter starts counting
- If a transition from closed to open on any of the doors, or the bonnet or boot is detected, re-switching on is cancelled.
- The counter reaches the 'AUTO SWITCH-ON TIME
- The alarm is switched on taking account of any exclusions of parts of the system (volumetric protection, siren, etc.) carried out at the last switch-on.
SURVEILLANCE
During the surveillance state, the BC carries out the following operations:
Check +15 signal
The BC acquires information on the presence of the +15: if it detects the presence of the +15 signal for over 100 ms without a previous switch-off command, the BC interprets this manoeuvre as a theft attempt and issues the command for the change to the alarm state;
Exclusion of external modules because of low battery voltage
If the battery voltage remains 8.5 V for over 30 minutes, the BC switches off the external modules (volumetric sensors, anti-tilt sensor, external input modules) in order to protect the battery's life and the possibility of subsequent engine starting.
Perimeter surveillance
The BC checks the state of the six inputs coming from the four doors, bonnet and boot: if one of these changes state for over 100 ms, the BC changes to the alarm state.
Management of heart-beat command
During surveillance, the BC periodically sends a command to the siren, in order to check the condition of the serial connection between the two devices: this periodical command is called 'heart-beat' and allows any attempts at intrusion or cable cutting to be detected on the serial line.
Every 500 ms, the BC sends the heart-beat command via a crypto-rolling code to the siren and checks that it has been received correctly.
If the BC does not manage to send the heart-beat command, the crypto-rolling code is updated as follows:
- the BC does not manage to send the command (e.g. because of a short-circuit on the serial line): the BC makes 2 further attempts to send the command without changing the crypto-rolling code.
- the BC sends the command but the serial line is disturbed: the BC makes 2 further attempts to send the command without changing the crypto-rolling code.
- the BC sends the command but the state of the siren is not correct or there is a loss of synchronisation on the heart-beat signal: the BC makes 2 further attempts to send the command, changing the crypto-rolling code at each attempt.
If after the attempts to repeat the command, the heart-beat synchronisation is not restored correctly, the BC changes to the alarm state and implements the necessary counter-measures (activation of blinkers, etc.).
As the siren also no longer receives the heart-beat command, the blinkers visual indication will be accompanied by the acoustic indication activated by the siren, which will intervene at the same time as the BC (for 3 failed attempts at heart-beat exchange made every 500 ms).
At all events, the heart-beat command continues to be issued until the system is switched off, and also during the alarm state.
Protection from false alarms due to reset of the bc
During the surveillance stage, it is possible that an external disturbance or attempted break-in causes a reset of the BC which re-initialises its functions.
In this case, the BC checks whether the alarm was on before the reset, so as to be able to re-synchronise the heart-beat with the siren, avoiding a false alarm.
The BC also switches on the external modules again, except those excluded at the last switch-on.
In the case of a reset, there is no visual/acoustic indication to the outside.
Activation of alarm
During the surveillance stage, the alarm may be activated, not only by the perimeter protection, but also by the external modules (ultrasound, anti-tilt, etc.) or the siren (because of cut cables).
On receipt of one of the alarm activation signals, the BC immediately changes to the alarm state, triggering the cycles determined for the type of alarm received.
Anti-intrusion strategy
If, during the surveillance stage, the BC reads on the serial line a siren switch-off command, or an ultrasound switch-off command or an anti-tilt switch-off command, interprets this situation as an attempted intrusion into the system, in order to exclude the acoustic alarm or the car's protections.
On receipt of one of three commands, the BC changes immediately to the alarm state, triggering the cycles determined in the case of alarm caused by cut leads.
ALARMS
If one of the surveillance sensors identifies a faulty situation (attempted or successful intrusion, interference and/or theft of the vehicle), the alarm system changes to the alarm state.
The alarm state is characterised by the actuation of visual/acoustic indications consisting of the activation of the siren and direction indicators.
Indications
The indication consists of a succession of 'alarm cycles'.
The parameters relating to the operating modes are defined in the 'operating modes' table.
The BC is responsible for managing the type, number and duration of the alarm cycles in accordance with the operating mode: the siren may actually be activated (start of acoustic emission) and deactivated (interruption of acoustic emission).
For example, if the operating mode involves the emission of 3 alarm cycles lasting 26 s with 6 s pauses, the BC will behave as follows:
- Activation of blinkers and activation command to the siren with relevant sound configuration parameters.
- After 26 s deactivation of blinkers and deactivation command to the siren
- 6 s wait.
- Repetition of points 1, 2 and 3 until the end of the required cycles.
Memorisation of the cause of alarm
For diagnostic purposes, a record is kept of the causes of alarm recognised by the BC.
The BC memorises in a table the last 10 causes of alarm, associating with each of the causes the state of the alarm system at the time of switching on the system.
The following causes of alarm can be memorised (alarm caused by ...):
- left front door
- right front door
- left rear door
- right rear door
- ultrasound sensor
- anti-tilt sensor (if present)
- cutting of siren cables
- boot
- bonnet
- +15
- cut cables +30
- intrusion on the siren with incorrect siren switch-off command
- intrusion on the external modules with command to switch off ultrasound or anti-tilt
- incorrect heart-beat
For each cause of alarm, the state of the system is memorised, described by:
- left front door open
- right front door open
- left rear door open
- right rear door open
- ultrasound sensor faulty
- faulty anti-tilt sensor (if present)
- faulty siren
- serial line not working
From the alarm situation, you change to the following states:
- rest: with a switch-off command or by recognition of an enabled key by the immobilizer at Key On.
- surveillance: at the end of activated alarm cycles
DEACTIVATION
Deactivation may take place either in the surveillance state, or in the alarm state.
It is carried out by pressing the button on the transmitter, which instructs the BC to deactivate the alarm system in accordance with the following procedure: deactivation is indicated by two flashes of the blinkers at 1Hz ± 10%, d.c. 50% and two beeps (the indication is enabled/disabled depending on the operating mode).
This indication is activated within 100 ms from receipt of the deactivation command:
- the siren is deactivated.
- the external modules are deactivated.
- the BC interrupts perimter protection and all counter-measures in progress, if there are any.
The command is also accepted in the presence of the +15 signal.
After carrying out deactivation and at the first Key-On, the control unit indicates discharged transmitter batteries, alarms from volumetric, anti-tilt, perimeter sensors,+15 and +30.
The indication takes place by the flashing of the dissuasion light for 120 ± 10% s.
The meanings of the flashing are as follows:
| Light on fixed: transmitter | batteries discharged (disguises all the indications) |
|---|---|
| 1 flash | one or more doors |
| 2 flashes | boot |
| 3 flashes | bonnet |
| 4 flashes | ultrasound module |
| 5 flashes | anti-tilt module |
| 6 flashes | +15 |
| 7 flashes | +30/earth |
| 8 flashes | serial line (no signal/incorrect signal from siren for more than 3 times) |
| 9 flashes | at least three causes of alarm |
The flashes last 0.5 s ON, 0.5 s OFF and the indications are repeated after a pause of 1.5 s. If there are two different causes of alarm, these are displayed in cycles.
PROGRAMMING OPERATING MODES
The programming state allows the BC to memorise in EEPROM the active operating mode.
It therefore allows the alarm system to be configured so that it acts in accordance with the legal requirements stated in the 'operating modes' table.
You enter programming from the rest state.
Operating modes
Operating modes table
| FUNCTIONS | relay | relay | 3 | 4 | 5 | RANGE |
|---|---|---|---|---|---|---|
| COUNTRY | EEC | G.B. | BELGIUM | HOLLAND | WORLD | |
| Activation of blinkers in alarm | yes | yes | yes | yes | yes | n/a |
| Flashing of blinkers in alarm (s) | 26 | 26 | 26 | 26 | 26 | 255 s |
| Frequency of blinkers in alarm (Hz); d.c. 50% | relay | relay | relay | relay | relay | 20 Hz |
| Siren alarm time (s) | 26 | 26 | 26 | 26 | 26 | 255 s |
| Siren power (dBA) | 110 | 110 | 110 | 114 | 110 | 255 dBA |
| Type of acoustic signal | continuous | continuous | continuous | continuous | continuous | n/a |
| Type of siren sound | modulated | modulated | modulated | modulated | modulated | n/a |
| Modulation of siren frequency (Hz) | 2?relay | 2?relay | 2?relay | 2?relay | 2?relay | 20 Hz |
| Frequency of siren sound (Hz) | 1800-3500 | 1800-3500 | 1800-3500 | 1800-3500 | 1800-3500 | 5000 Hz |
| Number of door/bonnet/boot/key on alarm cycles | 3 | 8 | 3 | 3 | 3 | 31 |
| Number of volumetric and anti-tilt alarm cycles | 3 | 8 | 3 | 3 | 3 | 31 |
| Number of cut cables alarm cycles | 3 | 12. | 3 | 3 | 3 | 31 |
| Alarm auto-reset for every monitored entry point | yes | yes | yes | yes | yes | n/a |
| Pause between alarm cycles (s) | 6 | 6 | 4 | 6 | 6 | 31 s |
| Number of total siren/blinker cycles | 10 | 24 | 12. | 12. | 10 | 255 |
| Number of additional blinker cycles | 8 | 8 | 0 | relay | 8 | 31 |
| Enablement of passive auto switch-on | no | no | yes | no | no | n/a |
| Enablement of key-off auto switch-on | no | no | no | no | no | n/a |
| Enablement of re-switching on | no | no | no | no | no | n/a |
| Blinkers on/off | yes | yes | yes | yes | yes | n/a |
| Beep on/off | yes | yes | yes | no | yes | n/a |
| Blinkers in auto switch-on | yes | yes | yes | yes | yes | n/a |
| Beep in auto switch-on | yes | yes | yes | no | yes | n/a |
| Auto switch-on from opening/closure of last door | yes | yes | yes | yes | yes | n/a |
| Auto switch-on from opening/closure of driver's door | no | no | no | no | no | n/a |
| Auto switch-on of alarm with recognised and enabled transponder | no | no | no | no | no | n/a |
| Auto switch-on time (s) | 28 | 28 | 28 | 28 | 28 | 120 s |
| Anti-tilt module surveillance in auto switch-on | yes | yes | yes | yes | yes | n/a |
| Volumetric sensors surveillance in auto switch-on | yes | yes | yes | yes | yes | n/a |
ENABLEMENT OF BLINKERS IN ALARM: indicates the enablement of the light signal by blinkers during the alarm stage.
FLASHING OF BLINKERS IN ALARM: indicates the duration of the light signal by blinkers in an alarm cycle.
FREQUENCY OF BLINKERS IN ALARM: indicates the flashing frequency of the light signal by blinkers.
NUMBER OF DOORS/BONNET/BOOT/KEY ON ALARM CYCLES: indicates the number of indication cycles to be triggered in the case of activation caused by perimeter surveillance, understood as the number of alarms to be triggered for each of the entry points indicated
NUMBER OF VOLUMETRIC / ANTI-TILT SENSOR ALARM CYCLES: indicates the number of indication cycles to be triggered in the case of activation caused by external modules, understood as the number of alarms to be triggered for each of the entry points indicated
NUMBER OF ALARM CYCLES FROM CUT CABLES: indicates the number of indication cycles triggered by the siren in the case of cut cables.
ALARM AUTO RESET FOR EACH MONITORED ENTRY POINT: indicates whether the continuation of the cause of alarm is still triggering the indication (e.g. door left open).
NUMBER OF TOTAL SIREN+BLINKERS CYCLES: indicates the total maximum number of indication cycles that may be triggered until the next deactivation
NUMBER OF ADDITIONAL BLINKER CYCLES: indicates the number of blinker cycles which are activated once the maximum number of siren plus blinker cycles has been achieved.
Example:
- no. of total siren + blinker cycles = 10;
- additional blinker cycles = 8;
- cycles for each door, boot, bonnet and ultrasound = 3;
- break in on right front door = 3 siren + blinker cycles;
- break in on left front door = 3 siren + blinker cycles;
- break in on right rear door = 3 siren + blinker cycles;
- break in on left rear door = 1 siren + blinker cycle following by 2 additional blinker cycles;
- break in on bonnet = 3 additional blinker cycles;
- break in on boot = 3 additional blinker cycles;
- volumetric break in = no indication.
PAUSE BETWEEN ALARM CYCLES: indicates the time interval which has to pass between alarm cycles.
The functions of indicating the state of the alarm system via the direction indicators have priority over the Emergency function.
In addition, the characteristics of the sound emitted by the siren are defined on the basis of:
- SIREN ALARM TIME: indicates the duration of the siren's sound emission in an indication cycle.
- SIREN POWER: indicates the acoustic power in dBA emitted by the siren (measured at 2 m).
- TYPE OF ACOUSTIC SIGNAL: may be continuous or intermittent.
- TYPE OF SIREN SOUND: may be single tone, two tone or modulated.
- SIREN FREQUENCY MODULATION: in the case of a modulated siren sound, indicates the modulation frequency of the sound.
- SIREN SOUND FREQUENCY: indicates the bottom and top limits of the frequency of the sound emitted.
The default operating mode is EEC (1).
The operating mode can be changed by diagnostic instrument or the following manual procedure:
- set the ignition key to Key-On;
- activate the hazard warning flasher
- press the rear fog light control button and hold it down
- using the ignition key, carry out the following sequence in strict order: Key-Off (for less than 2 s), Key-On (for less than 1 s), Key-Off, starting from the Key-On state, always holding down the rear fog light button.
- at the end of the sequence, the siren emits 5 beeps to indicate the activation of programming.
- release the rear fog light switch and press it again the same number of times as the desired mode (each press gives a feedback beep)
If the button is pressed for an invalid number of times (e.g. greater than the number of available operating modes), the siren emits 5 beeps and is cancelled and the country code is not changed:
- set the ignition key to the Key-On position within 10 s of the last press on the rear fog light button.
- the siren emits the same number of beeps as the number which indicates the selected operating mode: each beep lasts 1 s and is followed by a 0.5 s pause.
- at the end of the beeps, set the key to the Key-Off position: the BC is programmed in the new operating mode.
Cancelling the procedure
If, during entry of the operating mode, the rear fog lights button is not pressed within an interval of 10 s, the procedure is aborted: in this case the siren emits 5 beeps to warn the operator and the BC maintains the previous operating mode.
The market can be changed from 1,2,3,4,5 using the diagnostic instrument or manual procedure.
It is not possible to enable/disable the market by setting the value 0
DIAGNOSIS OF EXTERNAL MODULES
The BC conducts a diagnosis on the serial line connecting to the siren and external modules, checking whether there is a short circuit to earth or to the battery or an open circuit.
The diagnostic check on the serial line is carried out at the time when the communication is activated, typically when the alarm system is switched on.
The diagnosis on the external modules is carried out when the system is switched on, by means of the diagnostic commands from which the following information is obtained:
There are no diagnostic checks on the perimetral protection switches.
Siren:
- not working (sound transducer faulty)
- already on (misalignment between BC and siren)
- does not respond (communication with siren not possible - serial line broken)
Ultrasound module:
- not working
- does not respond (communication with module not possible - serial line broken)
Anti-tilt module (if present):
- not working
- out of range (fitted incorrectly)
- does not respond (communication with module not possible - serial line broken)
The diagnostic information obtained at the time of switching on is memorised in EEPROM to ensure that system repairs can be carried out.
To carry out diagnosis, use the diagnostic equipment supplied.
ACTIVE DIAGNOSIS
During a diagnosis session, the BC may be asked to carry out a diagnostic check on the external modules: the BC then sends the appropriate command and communicates the result to the diagnostic instrument.
If, during this operation, the BC does not manage to communicate with the module, the response to the diagnostic instrument will be:
- interference on serial line
- module does not respond
Similarly a diagnostic check on the serial line may be requested, which may have the following results: OK, short circuit to earth, short circuit to battery.
It is also possible to read the table relating to the alarm causes memorised in the BC.
RECOVERY
If an external module (ultrasound, anti-tilt etc.) is recognised as working, it is excluded for the whole surveillance cycle.
When the system is switched on again, the diagnostic check is repeated on the modules which have to be reactivated if recognised as working.
EXTERNAL MODULES OF THE BCN
Connection diagram
Electrical connection between BCN and external modules
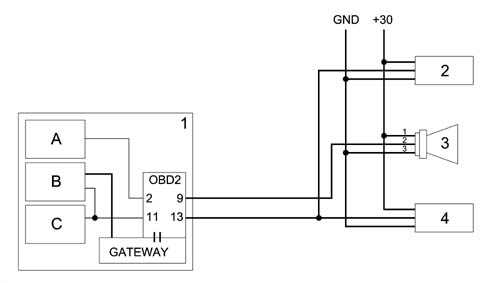
1 - Body Computer
2 - Volumetric sensors electronics
3 - STAND-ALONE siren
4 - Anti-tilt sensor electronics
A - Immobilizer electronics
B - Alarm electronics
C - Remote control receiver electronics
SIREN FOR ANTI-THEFT DEVICE
The following figure shows the anti-theft siren.
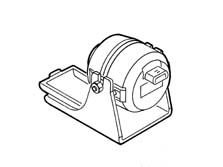
Specifications:
The main specifications of the siren are:
- fluid-tight casing
- green batteries for self-supply if the cables are cut
- battery recharging from command
- programmable acoustic emission
- serial dialogue with body computer and other alarm system components
- self-test
Composition
The anti-theft device has a stand-alone siren which gives an acoustic signal to indicate an attempted break-in, on a command from the BCN.
The stand-alone siren is connected to the rest of the system with:
- a dedicated serial line between NBC and siren
- a supply for the siren/internal battery recharging
The siren can respond to the diagnostic messages sent by the BCN (internal self-test)
Location
The siren is located in the front left wheelarch.
SIREN PIN OUT

1 - Siren supply
2 - Serial line
3 - Earth
4 - N.C.
Maximum permitted current consumptions:
| OPERATING STATE OF THE SIREN | MAX CURRENT ABSORPTION (at 12.5V) |
|---|---|
| REST | 0.002A tbd |
| Surveillance | ----------tbd |
| ALARM | 1.2 A tbd |
CAV VOLUMETRIC SENSORS CONTROL UNIT
Specifications:
The volumetric sensors are mounted in the interior compartment on the courtesy light, and are of the self-adapting ultrasound volumetric type.
Composition
The sensors consist of a receiver and ultrasound emitter connected to a module connected to the anti-theft control unit.
PINS
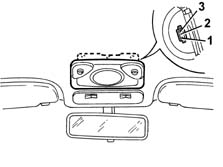
1 - Supply
2 - Serial line
3 - Earth
Operation
Surveillance
During surveillance, the sensors are active unless the exclusion procedure has been carried out; they check a possible (intrusion, interference with and/or theft of the vehicle).
The sensors send (pin 2) the control unit the signal state: high level.
Alarms
If one of the sensors assigned to surveillance identifies a faulty situation (attempted or actual intrusion, interference with and/or theft of the vehicle), it sends the alarm signal to the control unit.
The control unit triggers an alarm when the volumetric modules (pin 2) send the control unit the signal state: low level
State of pin 2 volumetric sensors:
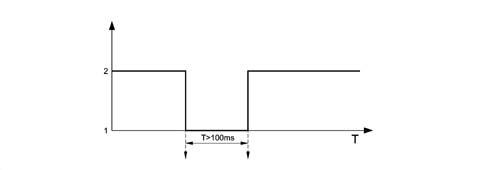
1 - Alarm = low
2 - Surveillance = high
REMOTE CONTROL AND RECEIVER
Specifications:
The remote control/receiver is interfaced with the BCN to activate the following functions:
- activate the central locking and opening of the doors and, if applicable, windows, electric sunroof and the lighting up of the courtesy light.
- switch on and off any alarm system.
Composition
The remote control system comprises:
- transmitter: is built into the key handle, it is on radio frequency and sends a variable code to the receiver. It has two or three function control keys and an LED for checking the transmission of the code and the state of charge of the batteries.
- receiver: radiofrequency built into the NBC with operating frequency of 433.92 MHz.
Memorises up to eight transmitters, and is characterised by a wire aerial which comes out of the BCN and is built into the dashboard wiring
The system is based on the transmission and receipt of a radio frequency signal with variable numerical code (Rolling Code).
Each transmission generates a variable code, managed by a mathematical algorithm.
Transmitter
The following figure shows the transmitter.
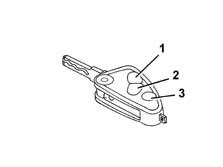
1 - Lock button
2 - Unlock button
3 - Boot button
Specifications:
The transmitter is the device which transmits the command code to the receiver; it is built into the key handle
Composition
The transmitter has a radio frequency stage at 433.92 MHz with range of 20 m.
It has 3 buttons and one LED: the buttons activate the control, while the LED visually checks that the transmitter is sending the code and indicates the discharged battery condition.
Pressing the buttons can be perceived by the user to allow tactile control of the command received. The position of the buttons is such as to prevent or minimise the risk of involuntary activations (e.g. at the time of key-on).
Button operation
The remote control has 3 buttons called lock, unlock, boot.
LOCK: when the lock button is pressed, the doors are locked. When the button is held down for more than 4 s, the windows are closed and the sunroof is closed (SUPER LOCKING). When the button is released, the movements are interrupted; to resume movement press again for 4 seconds.
UNLOCK: when the unlock button is pressed, the doors are unlocked and the courtesy light is switched on. If the button is held down for more than 4 s, the windows and sunroof are opened (SUPER OPENING). When the button is released, the movements are interrupted; to resume movement press again for 4 seconds.
BOOT: When the button is pressed, the boot / tailgate is released, visible by it lifting slightly.
Receiver
Specifications:
The receiver is located in the BCN and has a wire aerial which emerges from the body computer.
Composition
Receiver module with operating frequency 433.92 MHz, and has the following functions:
- it receives and decodes the signals coming from the transmitter
- it manages the memorisation of a maximum of 8 transmitters
- it generates the command for opening and closing the doors (actuating as appropriate the exit from blinker command, if required).
- it activates and deactivates the alarm system.
- it generates the command to light up the timed courtesy light.
Operation
The remote control and receiver system has two operating states:
- switch on;
- switch off.
Switch on command
With the switch-on command, the receiver sends a signal to the BCN which:
- activates the door locking
- issues the instruction to change from rest to surveillance to the larm system, in the case of prepared BC.
The command to switch on is made by pressing the button on the transmitter: it is indicated by the direction indicators coming on for 2.5 s (the indication is enabled/disabled by EEPROM).
Switching on is always inhibited (except in diagnosis) if the key-on +15 signal is present.
While the button is being pressed, the flashing frequency of the transmitter LED is 3 Hz.
The transmitter makes a complete transmission of the variable code in response to continued pressure on the button lasting at least 50 ms.
If the button is held pressed continuously, the transmitter interrupts the transmission after 20 s; to transmit further, release and press again the button on the transmitter.
If the receiver recognizes a continuous transmission (code received always the same), after the initial switching of state, it excludes the possibility of a continuous switching of the control.
SWITCHING ON
The receiver acquires the variable code, compares it with the codes memorised during programming and recognises it as one of those.
After recognising the code, the receiver controls the locking of the doors and the change from rest to surveillance of the alarm in the case of prepared BC.
In the case of BC with alarm system, if the car has already been locked with the mechanical key, when the transmitter button is activated the BC should activate the door locking/alarm switch-on as follows:
- Doors locked with key and alarm switched off (auto switch-on time not yet elapsed): no door locking or switching on of the alarm
- Doors locked with key and alarm switched on (auto switch-on time already elapsed): operation of door locking (opening) and switching off of alarm.
- Doors unlocked and alarm switched off (auto switch-on time not yet elapsed): operation of door locking (locking) and switching on of alarm.
- Doors unlocked and alarm switched on (auto switch-on time already elapsed): no operation of door locking and switching off of alarm.
The activation of the blinkers indicates the change of state of the door locking in accordance with the figure:
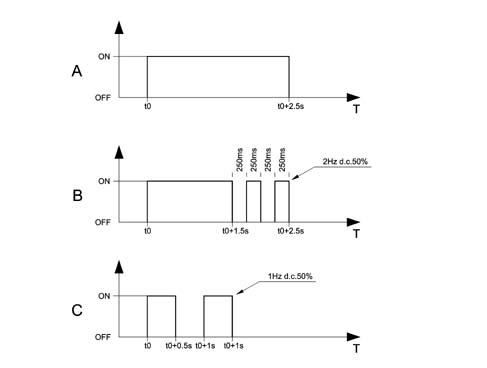
A - Locking command
B - Locking command with repulsion
C - Unlock command
Comfort function
The comfort function (function present in BCN on request) is obtained by pressing the transmitter button for less than 4 s; after receiving the signal, the receiver transmits a suitable command to the BCN which interprets it as: command to activate the controlled window closing/opening
Boot opening function
When the boot opening button is opened, the boot may be opened, and the receiver, after recognising the message from the remote control, sends the message to the BCN for:
- boot unlock
- switching off of anti-theft protection
Deactivation
After receiving the switch-off command from the transmitter, the receiver sends a message to te BCN which:
- instructs the unlocking of the doors
- permits the change from surveillance/alarm at rest in the case of prepared BC.
Switching off is carried out by pressing the button on the transmitter: this is indicated by two flashes of the blinkers at a frequency of 1 Hz, d.c. 50%, (function enabled/disabled by EEPROM).
Switching off is also enabled in the presence of the +15 signal.
The receiver controls unlocking following the same rules as those described in the switching-on section (obviously only if the lock status is active).
The alarm system is also switched off.
Transmitter batteries run down information
With the switch-off command, the receiver sends the alarm system the batteries discharged status.
The transmitter indicates the batteries discharged condition by issuing, when activated, a single flash lasting 200 ms when the button is pressed: the transmitter returns to the normal flashing mode if the battery charge returns to above the pre-established threshold.
From the moment the transmitter signals the batteries discharged condition, 100 switch-on / switch-off actuations are guaranteed.
The correct indication of the battery status is restored at the 2nd activation of the transmitter after the batteries have been replaced.
PROGRAMMING
Specifications:
The receiver/transmitter system is programmed at the end of the line together with the ALFA CODE.
During the car's life, the receiver can be made to learn new transmitters, for example in the case of new keys or cancellation of lost keys.
At each new programming procedure, all transmitters not presented during the above-mentioned procedure are eliminated from memory.
At each programming, all the available transmitters must be programmed. The transmitters not presented are deleted from memory.
Key programming procedure
The remote control key programming procedure is managed by the diagnostic equipment and can only be activated by entering the CODE'S ELECTRONIC CODE.
The procedure is divided into 2 parts: key learning (during which the secret codes of the keys are received by the BC) and a memorisation (during which the codes received are memorised permanently in the BC's EEPROM memory).
Once the procedure is activated, the flow is as follows:
- the diagnostic instrument instructs the BC to initialise the key learning procedure and gives confirmation to the operator.
- the operator presses the button on the key to be memorised
- holding the button down, the operator requests learning: the diagnostic instrument instructs the BC to learn the remote control key.
- the BC receives the secret code and the ID of the key and learns it.
- the diagnostic instrument confirms completed learning and the operator releases the button.
- the previous steps are repeated for each remote control key which has to be learned, up to a maximum of 8 keys.
- once all the keys have been learned, the operator asks the diagnostic instrument to memorise the keys.
- the diagnostic instrument instructs the BC to memorise the keys learnt: only the keys learnt during the procedure will be memorised in EEPROM (so all the keys currently memorised are lost and each key not learnt during the procedure will not be memorised).
Blinker enablement/disablement
Using the diagnostic instrument, blinker enablement/disablement is possible in order to adapt the vehicle to the market where it is sold.
Parts & tools for this job For 2000 Alfa Romeo 147
- TOOLDigital multimeterSearch: automotive digital multimeter
- PARTAssorted fuse kitSearch: car fuse assortment kit
- TOOLWire crimper and connector kitSearch: wire crimper connector kit
Links open Amazon search results in a new tab. As an Amazon Associate I earn from qualifying purchases.