
Ignition/injection system control unit mount - r r
- Make
- Alfa Romeo
- Model
- 147 Factory Service Manual
- Year
- 2000–2004
- Section
- Petrol injection system › Ignition/injection system control unit mount - r r
Ignition/injection system control unit mount - r r
Removing
Ensure that the ignition key is in the OFF postition, then disconnect the battery negative terminal.
| Name | Connector | |
|---|---|---|
| Battery | A1B |
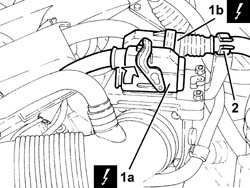
1. Disconnect electrical connections (1a) and (1b) from the injection-ignition control unit.
| Name | Connector | |
|---|---|---|
| 1a | Engine management ECU | M10A |
| Name | Connector | |
|---|---|---|
| 1b | Engine management ECU | M10B |
2. Release the electrical wiring from the fastening on the ignition/injection system control unit mount.
Proceed with the removal - 1048A34 sleeve(s) from flow meter to air supply capacity case - r + r.
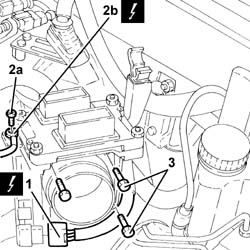
1. Disconnect the electrical connection from the throttle body integrated with D.V.L. and release the wiring from the band on the mount.
| Name | Connector | |
|---|---|---|
| 1 | Throttle body actuator | N75 |
2. Undo nut (2a) and disconnect earth lead (2b) from the injection-ignition control unit mount
| Name | Connector | |
|---|---|---|
| 2b | Earth on engine | C40C |
3. Undo the bolts securing the ignition/injection system control unit mounting.
The above bolts also secure the throttle body with DVL to the air chamber.
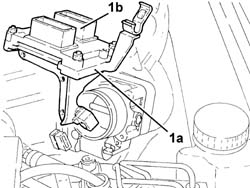
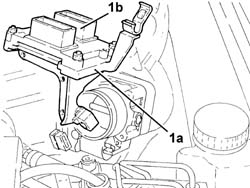
1. Remove ignition/injection system control unit mount (1a) with control unit (1b).
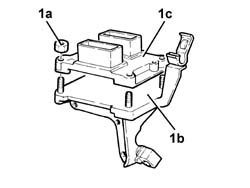
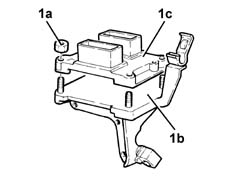
1. Working at the bench, undo nuts (1a) and separarate the ignition/injection system control unit mount (1b) from control unit (1c).
Refitting
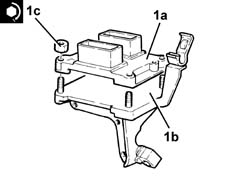
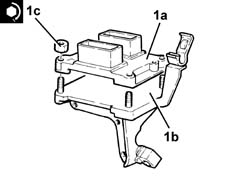
1. Working at the bench, assemble control unit (1a) to injection/ignition control unit mount (1b) and secure by tightening nuts (1c) to the specified torque.
| Fastening | Component | Ø | Value (daNm) | |
|---|---|---|---|---|
| 1c | Nut | INJECTION/IGNITION SYSTEM E.C.U. | M6 | (Support side) 0.8÷1.1 |
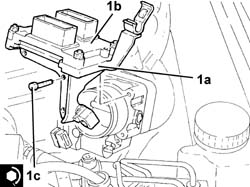
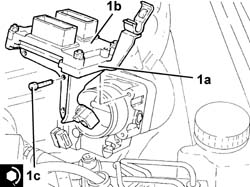
1. Refit the ignition/injection control unit mount (1a) with control unit (1b) and secure by tightening bolts (1c) to the specified torque.
The above bolts also secure the throttle body with DVL to the air chamber.
| Fastening | Component | Ø | Value (daNm) | |
|---|---|---|---|---|
| 1c | Bolt | BUTTERFLY VALVE CASE/S (MPI) | M6 | (Air chamber side) 0.8 ÷ 1.1 |
Connect the earth lead to the injection / ignition control unit mount and secure it with its bolt.
Connect the electrical connection to the throttle body integrated with the D.V.L. and secure the wiring to the band on the mount.
Proceed with the refitting - 1048A34 sleeve(s) from flow meter to air supply capacity case - r + r.
Connect the electrical connections to the injection-ignition control unit and secure the electrical wiring to the ignition/injection system control unit mount.
Connect the battery terminal (-).
Removing
Ensure that the ignition key is in the OFF postition, then disconnect the battery negative terminal.
| Name | Connector | |
|---|---|---|
| Battery | A1B |
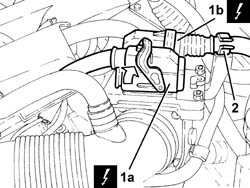
1. Disconnect electrical connections (1a) and (1b) from the injection-ignition control unit.
| Name | Connector | |
|---|---|---|
| 1a | Engine management ECU | M10A |
| Name | Connector | |
|---|---|---|
| 1b | Engine management ECU | M10B |
2. Release the electrical wiring from the fastening on the ignition/injection system control unit mount.
Proceed with the removal - 1048A34 sleeve(s) from flow meter to air supply capacity case - r + r.
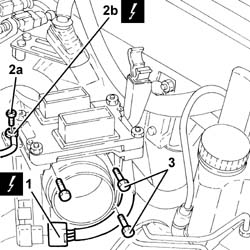
1. Disconnect the electrical connection from the throttle body integrated with D.V.L. and release the wiring from the band on the mount.
| Name | Connector | |
|---|---|---|
| 1 | Throttle body actuator | N75 |
2. Undo nut (2a) and disconnect earth lead (2b) from the injection-ignition control unit mount
| Name | Connector | |
|---|---|---|
| 2b | Earth on engine | C40C |
3. Undo the bolts securing the ignition/injection system control unit mounting.
The above bolts also secure the throttle body with integral DVL to the modular intake manifold.
1. Remove ignition/injection system control unit mount (1a) with control unit (1b).
1. Working at the bench, undo nuts (1a) and separate the ignition/injection system control unit mount (1b) from control unit (1c).
Refitting
1. Working at the bench, assemble control unit (1a) to injection/ignition control unit mount (1b) and secure by tightening nuts (1c) to the specified torque.
| Fastening | Component | Ø | Value (daNm) | |
|---|---|---|---|---|
| 1c | Nut | INJECTION/IGNITION SYSTEM E.C.U. | M6 | (Support side) 0.8÷1.1 |
1. Refit the ignition/injection control unit mount (1a) with control unit (1b) and secure by tightening bolts (1c) to the specified torque.
The above bolts also secure the throttle body with integral DVL to the modular intake manifold.
| Fastening | Component | Ø | Value (daNm) | |
|---|---|---|---|---|
| 1c | Bolt | BUTTERFLY VALVE CASE/S (MPI) | M6 | (Modular intake manifold side) 0.8 ÷ 1.1 |
Connect the earth lead to the injection / ignition control unit mount and secure it with its bolt.
Connect the electrical connection to the throttle body integrated with the D.V.L. and secure the wiring to the band on the mount.
Proceed with the refitting - 1048A34 sleeve(s) from flow meter to air supply capacity case - r + r.
Connect the electrical connections to the injection-ignition control unit and secure the electrical wiring to the ignition/injection system control unit mount.
Connect the battery terminal (-).
Parts & tools for this job For 2000 Alfa Romeo 147
- PARTEngine gasket setSearch: Alfa Romeo 147 2000 engine gasket set
- TOOLTorque wrenchSearch: 3/8 inch torque wrench
- TOOLFeeler gauge setSearch: feeler gauge set
Links open Amazon search results in a new tab. As an Amazon Associate I earn from qualifying purchases.