
System cable bundle - r + r
- Make
- Alfa Romeo
- Model
- 147 Factory Service Manual
- Year
- 2000–2004
- Section
- Petrol injection system › System cable bundle - r + r
System cable bundle - r + r
Removing
Position the vehicle on the ramp.
Ensure that the ignition key is in the OFF postition, then disconnect the battery negative terminal.
| Name | Connector | |
|---|---|---|
| Battery | A1B |
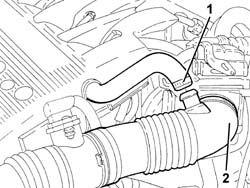
1. Disconnect the fuel vapour recirculation pipe from the air inake sleeve.
2. Disconnect the intake hose from the throttle body integrated with D.V.L. and move to one side.
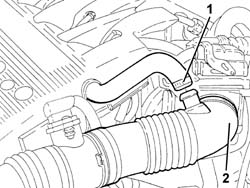
Proceed with the removal - 1016A40 ignition coil cover on cylinder head- r+r.
Proceed with the removal - 1072C44 exhaust manifold heat shield on bulkhead - r+r.
1. Disconnect the electrical connection for the air conditioning compressor electromagnet coupling.
| Name | Connector | |
|---|---|---|
| 1 | Air conditioning compressor engagement electro-magnet | L20 |
2. Disconnect electrical connections (2a) and (2b) from the lambda probes
| Name | Connector | |
|---|---|---|
| 2a | Lambda sensor on pre-catalyzer | K15 |
| Name | Connector | |
|---|---|---|
| 2b | Lambda sensor downstream of post-catalyzer | K17 |
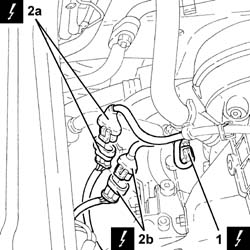
1. Disconnect the electrical connections from the ignition coils.
| Name | Connector | |
|---|---|---|
| 1 | Ignition coil | A30 |
2. Release the electrical wiring from the fastenings on the tappet cover.
3. Undo the bolt (3a) and disconnect the earth lead (3b) from the ignition coils support plate.
| Name | Connector | |
|---|---|---|
| 3b | Earth on engine | C40B |
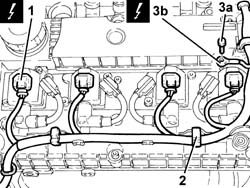
1. Disconnect the electrical connections from the injectors.
| Name | Connector | |
|---|---|---|
| 1 | Injector | N70 |
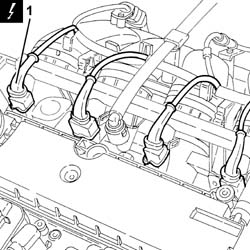
1. Disconnect the electrical connection from the engine coolant temperature sensor.
| Name | Connector | |
|---|---|---|
| 1 | Engine temperature sender unit | K36 |
2. Undo nut (2a) and disconnect earth lead (2b) from the intake manifold.
| Name | Connector | |
|---|---|---|
| 2b | Earth on engine | C40A |
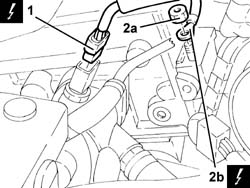
1. Disconnect the electrical connection from the fuel injection-ignition control unit.
| Name | Connector | |
|---|---|---|
| 1 | Engine management ECU | M10A |
2. Undo nut (2a) and disconnect earth lead (2b) from the injection-ignition control unit mount
| Name | Connector | |
|---|---|---|
| 2b | Earth on engine | C40C |
3. Disconnect the electrical connection from the throttle body integrated with D.V.L. and release the wiring from the fastening.
| Name | Connector | |
|---|---|---|
| 3 | Throttle body actuator | N75 |
4. Disconnect the electrical connection from the fuel vapour solenoid valve.
| Name | Connector | |
|---|---|---|
| 4 | Fuel vapour recovery solenoid | L10 |
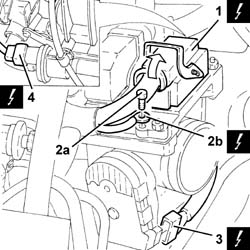
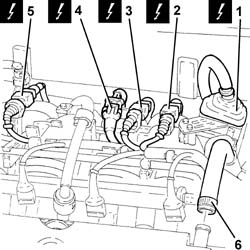
1. Disconnect the engine front connection.
| Name | Connector | |
|---|---|---|
| 1 | Front / engine coupling | D4 |
2. Disconnect the electrical connection for the rpm sensor.
| Name | Connector | |
|---|---|---|
| 2 | RPM sensor | K46 |
3. Disconnect the electrical connection for the detonation sensor.
| Name | Connector | |
|---|---|---|
| 3 | Detonation sensor - 1 | K50 |
4. Disconnect the electrical connection for the cam angle sensor.
| Name | Connector | |
|---|---|---|
| 4 | Timing sensor. | K47 |
5. Disconnect the oil vapour recovery pipe from the air chamber
Release the system wiring harness from the fastenings on the air chamber.
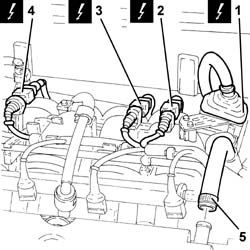
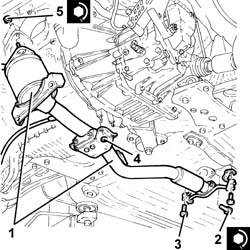
1. Undo the nuts securing the catalytic converter to the exhaust manifold.
2. Undo the nuts securing the catalytic converter to the engine sump.
3. Undo the bolts securing the catalytic converter flexible mounting brackets to the bodywork.
4. Undo the bolts securing the catalytic converter to the intermediate silencer.
5. Remove the complete catalytic converter.
Remove the gaskets.
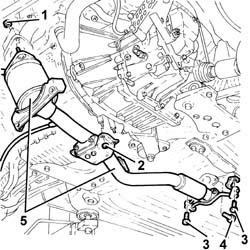
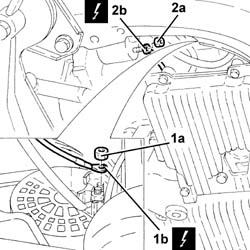
1. Undo the nut (1a) and disconnect supply lead (1b) from the alternator.
| Name | Connector | |
|---|---|---|
| 1b | Alternator | A10A |
2. Undo nut (2a) and disconnect supply lead (2b) from the starter motor.
| Name | Connector | |
|---|---|---|
| 2b | Starter motor | A20B |
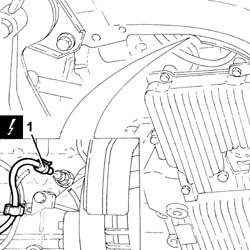
1. Disconnect the electrical connection from the insufficient engine oil pressure warning light sensor.
| Name | Connector | |
|---|---|---|
| 1 | Engine oil pressure sensor | K30 |
Remove the system cable loom.
Refitting
Place the system cable loom back in its housing.
Connect the electrical connection to the engine oil pressure warning light sensor.
Connect the earth lead to the starter motorand secure it using the nut.
Connect the earth lead to the alternator and secure it using the nut.
1. Refit the catalytic converter in its seat complete with gaskets.
2. Tighten, to the specified torque, the bolts securing the catalytic converter to the intermediate silencer.
| Fastening | Component | Ø | Value (daNm) | |
|---|---|---|---|---|
| 2 | Bolt | CATALYTIC CONVERTER (ONE) | M8 | (Intermediate silencer side) 2.7 ÷ 3.3 |
3. Tighten the bolts securing the catalytic converter flexible mounting brackets to the bodywork.
4. Tighten the nuts securing the catalytic converter mounting to the engine sump.
5. Tighten, to the specified torque, the nuts securing the catalytic converter to the exhaust manifold.
| Fastening | Component | Ø | Value (daNm) | |
|---|---|---|---|---|
| 5 | Nut | CATALYTIC CONVERTER (ONE) | M10 | (Manifold side) 4.1 ÷ 5.0 |
Secure the system wiring harness with fastenings to the air chamber.
Connect the fuel vapour recovery pipe to the air chamber.
Connect the electrical connection to the cam angle sensor
Connect the electrical connection for the detonation sensor.
Connect the electrical connection for the rpm sensor.
Connect the engine front coupling.
Connect the electrical connection to the fuel vapour solenoid valve.
Connect the electrical connection to the throttle body integrated with D.V.L. and secure the electrical wiring.
Connect the earth lead to the injection / ignition control unit mount and secure it with its bolt.
Connect the electrical connection to the fuel injection-ignition control unit.
Connect the earth lead to the intake manifold and secure it using the nut.
Connect the electrical connection to the engine coolant temperature sensor.
Connect the electrical connections to the injectors.
Connect the earth lead to the ignition coils support plate and secure it using the bolt.
Secure the electrical wiring to the cam cover using fastenings.
Connect the electrical connections to the ignition coils.
Connect the Lambda probe electrical connections.
Connect the electrical connection to the air conditioning compressor electromagnet coupling.
Proceed with the refitting - 1072C44 exhaust manifold heat shield on bulkhead - r+r.
Proceed with the refitting - 1016A40 ignition coil cover on cylinder head- r+r.
Refit the intake sleeve and connect it to the throttle body with integrated D.V.L.
Connect the oil vapour recovery pipe to the air intake sleeve.
Connect the battery terminal (-).
Remove the car from the ramp.
Removing
Position the vehicle on the ramp.
Ensure that the ignition key is in the OFF postition, then disconnect the battery negative terminal.
| Name | Connector | |
|---|---|---|
| Battery | A1B |
1. Disconnect the fuel vapour recirculation pipe from the air inake sleeve.
2. Disconnect the intake hose from the throttle body integrated with D.V.L. and move to one side.
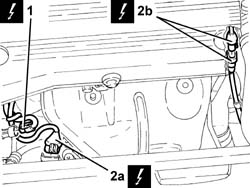
1. Disconnect the electrical connection for the air conditioning compressor electromagnet coupling.
| Name | Connector | |
|---|---|---|
| 1 | Air conditioning compressor engagement electro-magnet | L20 |
2. Disconnect electrical connections (2a) and (2b) from the lambda probes
| Name | Connector | |
|---|---|---|
| 2a | Lambda sensor on left pre-catalyzer | K16 |
| Name | Connector | |
|---|---|---|
| 2b | Lambda sensor on pre-catalyzer | K15 |
Proceed with the removal - 1016A40 ignition coil cover on cylinder head- r+r.
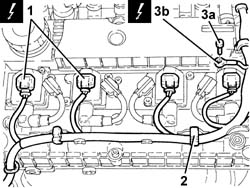
1. Disconnect the electrical connections from the ignition coils.
| Name | Connector | |
|---|---|---|
| 1 | Ignition coil | A30 |
2. Release the electrical wiring from the fastenings on the tappet cover.
3. Undo the bolt (3a) and disconnect the earth lead (3b) from the ignition coils support plate.
| Name | Connector | |
|---|---|---|
| 3b | Earth on engine | C40B |
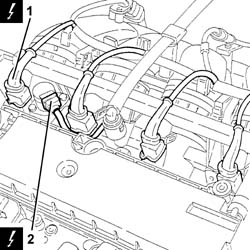
1. Disconnect the electrical connections from the injectors.
| Name | Connector | |
|---|---|---|
| 1 | Injector | N70 |
2. Disconnect the electrical connection from the variable valve timing electro-magnet.
| Name | Connector | |
|---|---|---|
| 2 | Timing variator actuator | N76 |
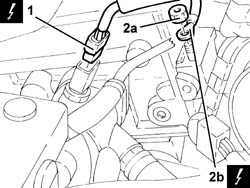
1. Disconnect the electrical connection from the engine coolant temperature sensor.
| Name | Connector | |
|---|---|---|
| 1 | Engine temperature sender unit | K36 |
2. Undo nut (2a) and disconnect earth lead (2b) from the intake manifold.
| Name | Connector | |
|---|---|---|
| 2b | Earth on engine | C40A |
1. Disconnect the electrical connection from the fuel injection-ignition control unit.
| Name | Connector | |
|---|---|---|
| 1 | Engine management ECU | M10A |
2. Undo nut (2a) and disconnect earth lead (2b) from the injection-ignition control unit mount
| Name | Connector | |
|---|---|---|
| 2b | Earth on engine | C40C |
3. Disconnect the electrical connection from the throttle body integrated with D.V.L. and release the wiring from the fastening.
| Name | Connector | |
|---|---|---|
| 3 | Throttle body actuator | N75 |
4. Disconnect the electrical connection from the fuel vapour solenoid valve.
| Name | Connector | |
|---|---|---|
| 4 | Throttle body actuator | N75 |
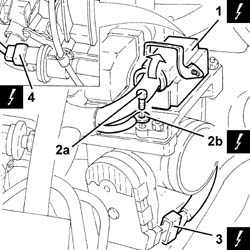
1. Disconnect the engine front connection.
| Name | Connector | |
|---|---|---|
| 1 | Front / engine coupling | D4 |
2. Disconnect the electrical connection for the rpm sensor.
| Name | Connector | |
|---|---|---|
| 2 | RPM sensor | K46 |
3. Disconnect the electrical connection for the detonation sensor.
| Name | Connector | |
|---|---|---|
| 3 | Detonation sensor - 1 | K50 |
4. Disconnect the electrical connection for the Lambda sensor.
| Name | Connector | |
|---|---|---|
| 4 | Lambda sensor downstream of post-catalyzer | K17 |
5. Disconnect the electrical connection for the cam angle sensor.
| Name | Connector | |
|---|---|---|
| 5 | Timing sensor. | K47 |
6. Disconnect the oil vapour recovery pipe from the tappet cover.
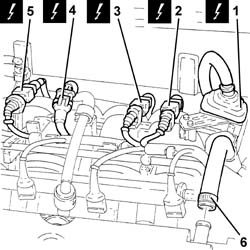
Release the system wiring harness from the fastenings on the air chamber.
Proceed with the removal - 1072C44 exhaust manifold heat shield on bulkhead - r+r.
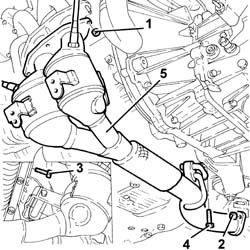
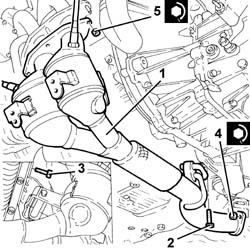
1. Undo the nuts securing the catalytic preconverter to the exhaust manifold.
2. Unscrew the nuts securing the catalytic preconverter to the catalytic converter
3. Unscrew the bolts securing the catalytic preconverter to the crankcase.
4. Undo the bolt securing the catalytic converter flexible mounting to the front suspension crossmember.
5. Remove the catalytic preconverter complete with Lambda sensors.
Remove the gaskets.
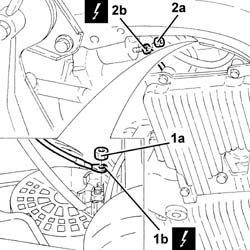
1. Undo the nut (1a) and disconnect supply lead (1b) from the alternator.
| Name | Connector | |
|---|---|---|
| 1b | Alternator | A10A |
2. Undo nut (2a) and disconnect supply lead (2b) from the starter motor.
| Name | Connector | |
|---|---|---|
| 2b | Starter motor | A20B |
1. Disconnect the electrical connection from the insufficient engine oil pressure warning light sensor.
| Name | Connector | |
|---|---|---|
| 1 | Engine oil pressure sensor | K30 |
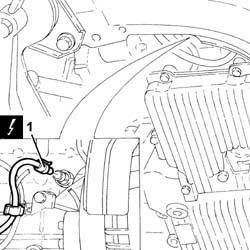
Remove the system cable loom.
Refitting
Place the system cable loom back in its housing.
Connect the electrical connection to the engine oil pressure warning light sensor.
Connect the earth lead to the starter motorand secure it using the nut.
Connect the earth lead to the alternator and secure it using the nut.
1. Place the catalytic preconverter complete with Lambda sensors and gaskets back in its housing.
2. Tighten the bolt securing the catalytic preconverter flexible mounting to the front suspension crossmember.
3. Tighten the bolts securing the catalytic preconverter mounting bracket to the crankcase.
4. Tighten the nuts fixing the catalytic preconverter to the catalytic converter to the specified torque.
| Fastening | Component | Ø | Value (daNm) | |
|---|---|---|---|---|
| 4 | Nut | CATALYTIC PRE-CONVERTER | M8 | (Catalytic converter side) 2.7 ÷ 3.3 |
5. Tighten, to the specified torque, the nuts securing the catalytic preconverter to the exhaust manifold.
| Fastening | Component | Ø | Value (daNm) | |
|---|---|---|---|---|
| 5 | Nut | CATALYTIC PRE-CONVERTER | M8 | (Manifold side) 2.7 ÷ 3.3 |
Proceed with the refitting - 1072C44 exhaust manifold heat shield on bulkhead - r+r.
Secure the system wiring harness with fastenings to the air chamber.
Connect the electrical connection to the cam angle sensor
Connect the electrical connection for the Lambda sensor.
Connect the electrical connection for the detonation sensor.
Connect the electrical connection for the rpm sensor.
Connect the engine front coupling.
Connect the electrical connection to the fuel vapour solenoid valve.
Connect the electrical connection to the throttle body integrated with D.V.L. and secure the electrical wiring.
Connect the earth lead to the injection / ignition control unit mount and secure it with its bolt.
Connect the electrical connection to the fuel injection-ignition control unit.
Connect the earth lead to the intake manifold and secure it using the nut.
Connect the electrical connection to the engine coolant temperature sensor.
Connect the electrical connection to the phase transformer electro-magnet.
Connect the electrical connections to the injectors.
Connect the earth lead to the ignition coils support plate and secure it using the bolt.
Secure the electrical wiring to the cam cover using fastenings.
Connect the electrical connections to the ignition coils.
Proceed with the refitting - 1016A40 ignition coil cover on cylinder head- r+r.
Connect the Lambda probe electrical connections.
Connect the electrical connection to the air conditioning compressor electromagnet coupling.
Refit the intake sleeve and connect it to the throttle body with integrated D.V.L.
Connect the oil vapour recovery pipe to the air intake sleeve.
Connect the battery terminal (-).
Remove the car from the ramp.
Removing
Position the vehicle on the ramp.
Ensure that the ignition key is in the OFF postition, then disconnect the battery negative terminal.
| Name | Connector | |
|---|---|---|
| Battery | A1B |
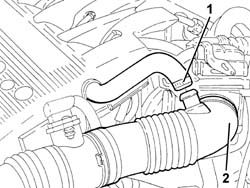
1. Disconnect the fuel vapour recirculation pipe from the air inake sleeve.
2. Disconnect the intake hose from the throttle body integrated with D.V.L. and move to one side.
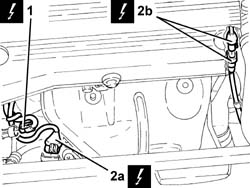
1. Disconnect the electrical connection for the air conditioning compressor electromagnet coupling.
| Name | Connector | |
|---|---|---|
| 1 | Air conditioning compressor engagement electro-magnet | L20 |
2. Disconnect electrical connections (2a) and (2b) from the lambda probes
| Name | Connector | |
|---|---|---|
| 2a | Lambda sensor on left pre-catalyzer | K16 |
| Name | Connector | |
|---|---|---|
| 2b | Lambda sensor on pre-catalyzer | K15 |
Proceed with the removal - 1016A40 ignition coil cover on cylinder head- r+r.
1. Disconnect the electrical connections from the ignition coils.
| Name | Connector | |
|---|---|---|
| 1 | Ignition coil | A30 |
2. Release the electrical wiring from the fastenings on the tappet cover.
3. Undo the bolt (3a) and disconnect the earth lead (3b) from the ignition coils support plate.
| Name | Connector | |
|---|---|---|
| 3b | Earth on engine | C40B |
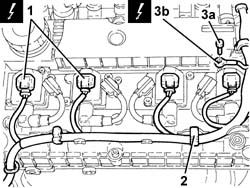
1. Disconnect the electrical connections from the injectors.
| Name | Connector | |
|---|---|---|
| 1 | Injector | N70 |
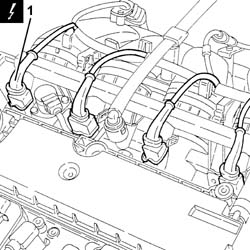
1. Disconnect the electrical connection from the engine coolant temperature sensor.
| Name | Connector | |
|---|---|---|
| 1 | Engine temperature sender unit | K36 |
2. Undo nut (2a) and disconnect earth lead (2b) from the intake manifold.
| Name | Connector | |
|---|---|---|
| 2b | Earth on engine | C40A |
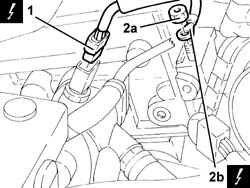
1. Disconnect the electrical connection from the fuel injection-ignition control unit.
| Name | Connector | |
|---|---|---|
| 1 | Engine management ECU | M10A |
2. Undo nut (2a) and disconnect earth lead (2b) from the injection-ignition control unit mount
| Name | Connector | |
|---|---|---|
| 2b | Earth on engine | C40C |
3. Disconnect the electrical connection from the throttle body integrated with D.V.L. and release the wiring from the fastening.
| Name | Connector | |
|---|---|---|
| 3 | Throttle body actuator | N75 |
4. Disconnect the electrical connection from the fuel vapour solenoid valve.
| Name | Connector | |
|---|---|---|
| 4 | Throttle body actuator | N75 |
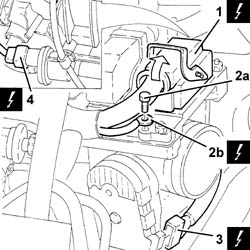
1. Disconnect the engine front connection.
| Name | Connector | |
|---|---|---|
| 1 | Front / engine coupling | D4 |
2. Disconnect the electrical connection for the rpm sensor.
| Name | Connector | |
|---|---|---|
| 2 | RPM sensor | K46 |
3. Disconnect the electrical connection for the detonation sensor.
| Name | Connector | |
|---|---|---|
| 3 | Detonation sensor - 1 | K50 |
4. Disconnect the electrical connection for the Lambda sensor.
| Name | Connector | |
|---|---|---|
| 4 | Lambda sensor downstream of post-catalyzer | K17 |
5. Disconnect the electrical connection for the cam angle sensor.
| Name | Connector | |
|---|---|---|
| 5 | Timing sensor. | K47 |
6. Disconnect the oil vapour recovery pipe from the tappet cover.
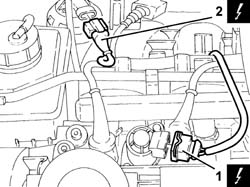
1. Disconnect the electrical connection from the variable valve timing electro-magnet.
| Name | Connector | |
|---|---|---|
| 1 | Timing variator actuator | N76 |
2. Disconnect the electrical connection from the enablement solenoid of the changeover device actuator.
| Name | Connector | |
|---|---|---|
| 2 | Variable geometry control solenoid | L15 |
Release the system wiring harness from the fastenings on the air chamber.
Proceed with the removal - 7055B54 under-engine guard - r r.
Proceed with the removal - 1072C44 exhaust manifold heat shield on bulkhead - r+r.
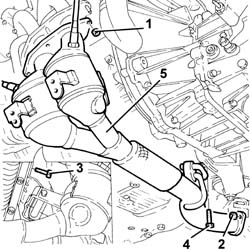
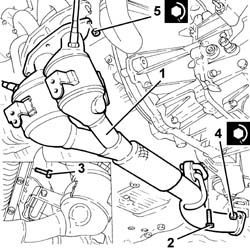
1. Undo the nuts securing the catalytic preconverter to the exhaust manifold.
2. Unscrew the nuts securing the catalytic preconverter to the catalytic converter
3. Unscrew the bolts securing the catalytic preconverter to the crankcase.
4. Undo the bolt securing the catalytic converter flexible mounting to the front suspension crossmember.
5. Remove the catalytic preconverter complete with Lambda sensors.
Remove the gaskets.
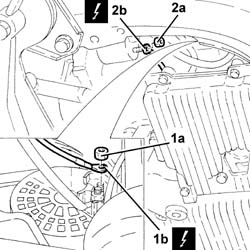
1. Undo the nut (1a) and disconnect supply lead (1b) from the alternator.
| Name | Connector | |
|---|---|---|
| 1b | Alternator | A10A |
2. Undo nut (2a) and disconnect supply lead (2b) from the starter motor.
| Name | Connector | |
|---|---|---|
| 2b | Starter motor | A20B |
1. Disconnect the electrical connection from the insufficient engine oil pressure warning light sensor.
| Name | Connector | |
|---|---|---|
| 1 | Engine oil pressure sensor | K30 |
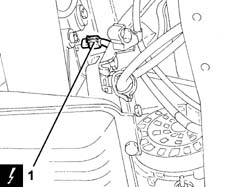
Remove the system cable loom.
Refitting
Place the system cable loom back in its housing.
Connect the electrical connection to the engine oil pressure warning light sensor.
Connect the earth lead to the starter motorand secure it using the nut.
Connect the earth lead to the alternator and secure it using the nut.
1. Place the catalytic preconverter complete with Lambda sensors and gaskets back in its housing.
2. Tighten the bolt securing the catalytic preconverter flexible mounting to the front suspension crossmember.
3. Tighten the bolts securing the catalytic preconverter mounting bracket to the crankcase.
4. Tighten the nuts fixing the catalytic preconverter to the catalytic converter to the specified torque.
| Fastening | Component | Ø | Value (daNm) | |
|---|---|---|---|---|
| 4 | Nut | CATALYTIC PRE-CONVERTER | M8 | (Catalytic converter side) 2.7 ÷ 3.3 |
5. Tighten, to the specified torque, the nuts securing the catalytic preconverter to the exhaust manifold.
| Fastening | Component | Ø | Value (daNm) | |
|---|---|---|---|---|
| 5 | Nut | CATALYTIC PRE-CONVERTER | M8 | (Manifold side) 2.7 ÷ 3.3 |
Proceed with the refitting - 1072C44 exhaust manifold heat shield on bulkhead - r+r.
Proceed with the refitting - 7055B54 under-engine guard - r r.
Secure the system wiring harness with fastenings to the air chamber.
Connect the electrical connection from the enablement solenoid of the changeover device actuator.
Connect the electrical connection to the phase transformer electro-magnet.
Connect the electrical connection to the cam angle sensor
Connect the electrical connection for the Lambda sensor.
Connect the electrical connection for the detonation sensor.
Connect the electrical connection for the rpm sensor.
Connect the engine front coupling.
Connect the electrical connection to the fuel vapour solenoid valve.
Connect the electrical connection to the throttle body integrated with D.V.L. and secure the electrical wiring.
Connect the earth lead to the injection / ignition control unit mount and secure it with its bolt.
Connect the electrical connection to the fuel injection-ignition control unit.
Connect the earth lead to the intake manifold and secure it using the nut.
Connect the electrical connection to the engine coolant temperature sensor.
Connect the electrical connections to the injectors.
Connect the earth lead to the ignition coils support plate and secure it using the bolt.
Secure the electrical wiring to the cam cover using fastenings.
Connect the electrical connections to the ignition coils.
Proceed with the refitting - 1016A40 ignition coil cover on cylinder head- r+r.
Connect the Lambda probe electrical connections.
Connect the electrical connection to the air conditioning compressor electromagnet coupling.
Refit the intake sleeve and connect it to the throttle body with integrated D.V.L.
Connect the oil vapour recovery pipe to the air intake sleeve.
Connect the battery terminal (-).
Remove the car from the ramp.
Removing
Position the vehicle on the ramp.
Ensure that the ignition key is in OFF position, then disconnect the battery negative terminal (-).
| Name | Connector | |
|---|---|---|
| Battery | A1B |
Proceed with removal - 7055B54 under-engine guard - r r.
1. Disconnect the electrical connection for the air conditioning compressor electromagnet coupling.
| Name | Connector | |
|---|---|---|
| 1 | Air conditioning compressor engagement electro-magnet | L20 |
2. Disconnect the electrical connection for the upper left Lambda sensor.
| Name | Connector | |
|---|---|---|
| 2 | Lambda sensor on pre-catalyzer | K15 |
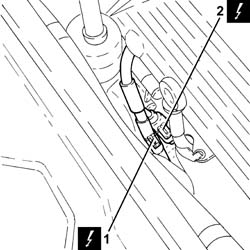
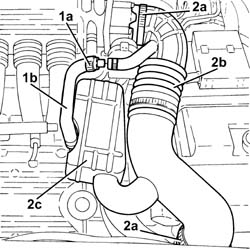
1. Loosen the band (1a) and disconnect the oil vapour recirculation pipe (1b) from the corrugated hose.
2. Loosen the bands (2a) and remove the corrugated hose (2b), complete with resonator (2c).
Proceed with removal - 1016A42 left hand cylinder head ignition coil cover - r+r.
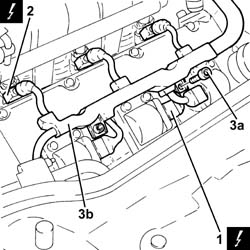
1. Disconnect the electrical connections from the left cylinder head ignition coils.
| Name | Connector | |
|---|---|---|
| 1 | Ignition coil | A30 |
2. Disconnect the electrical connections from the left cylinder head injectors.
| Name | Connector | |
|---|---|---|
| 2 | Injector | N70 |
3. Undo the bolts (3a) fixing the cable duct (3b) to the left tappet cover.
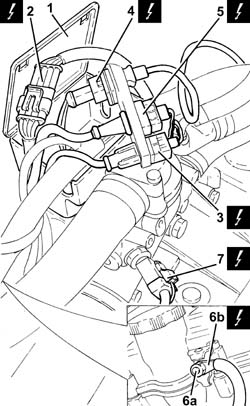
1. Open the electrical connections box cover.
2. Disconnect the electrical connection for the upper right Lambda sensor.
| Name | Connector | |
|---|---|---|
| 2 | Lambda sensor on left pre-catalyzer | K16 |
3. Disconnect the electrical connection for the rpm sensor.
| Name | Connector | |
|---|---|---|
| 3 | RPM sensor | K46 |
4. Disconnect the electrical connection for the cam angle sensor.
| Name | Connector | |
|---|---|---|
| 4 | Timing sensor. | K47 |
5. Disconnect the electrical connection for the knock sensor flywheel side.
| Name | Connector | |
|---|---|---|
| 5 | Detonation sensor - 1 | K50 |
6. Undo the nut (6a) and disconnect the earth lead (6b) from the left tappet cover.
| Name | Connector | |
|---|---|---|
| 6b | Earth on engine | C40 |
7. Disconnect the electrical connection from the engine coolant temperature sensor.
| Name | Connector | |
|---|---|---|
| 7 | Engine temperature sender unit | K36 |
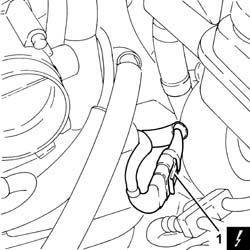
1. Disconnect the electrical connection.
Proceed with removal - 1072B50 sleeves connecting air capacity box to inlet manifold is - r+r.
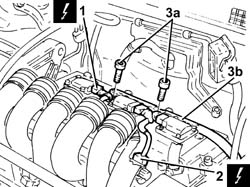
1. Disconnect the electrical connections from the right cylinder head ignition coils.
| Name | Connector | |
|---|---|---|
| 1 | Ignition coil | A30 |
2. Disconnect the electrical connections from the right cylinder head injectors.
| Name | Connector | |
|---|---|---|
| 2 | Injector | N70 |
3. Undo the bolts (3a) fixing the cable duct (3b) to the right tappet cover.
Remove the system cable loom after having released it from the fastenings.
Refitting
Place the cable loom back in its housing and fix it using the bands.
Tighten the bolts fixing the cable duct to the right tappet cover.
Connect the electrical connections to the right cylinder head injectors.
Connect the electrical connections to the right cylinder head ignition coils.
Proceed with refitting - 1072B50 sleeves connecting air capacity box to inlet manifold is - r+r.
Connect the electrical connection.
Connect the electrical connection to the engine coolant temperature sensor.
Connect the earth lead to the left tappet cover and tighten the nut.
Connect the electrical connection for the knock sensor flywheel side.
Connect the electrical connection for the cam angle sensor.
Connect the electrical connection for the rpm sensor.
Connect the electrical connection for the right upper Lambda sensor.
Close the electrical connections box cover.
Tighten the bolts fixing the cable duct to the left tappet cover.
Connect the electrical connections to the left cylinder head injectors.
Connect the electrical connections to the left cylinder head ignition coils.
Proceed with refitting - 1016A42 left hand cylinder head ignition coil cover - r+r.
Place the corrugated hose, complete with resonator, back in its housing and tighten the bands.
Connect the oil vapour recirculation pipe to the corrugated hose and tighten the band.
Connect the electrical connection for the left upper Lambda sensor.
Connect the electrical connection to the air conditioning compressor electromagnet coupling.
Proceed with refitting - 7055B54 under-engine guard - r r.
Connect the negative (-) battery terminal.
Remove the car from the ramps.
Parts & tools for this job For 2000 Alfa Romeo 147
- PARTEngine gasket setSearch: Alfa Romeo 147 2000 engine gasket set
- TOOLTorque wrenchSearch: 3/8 inch torque wrench
- TOOLFeeler gauge setSearch: feeler gauge set
Links open Amazon search results in a new tab. As an Amazon Associate I earn from qualifying purchases.