
Piston connecting rod set - r r
- Make
- Alfa Romeo
- Model
- 147 Factory Service Manual
- Year
- 2000–2004
- Section
- Pistons and connecting rods › Piston connecting rod set - r r
Piston connecting rod set - r r
Removing
Rotate the engine through 180° on the overhauling stand.
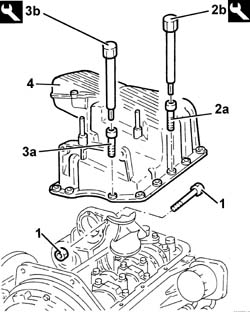
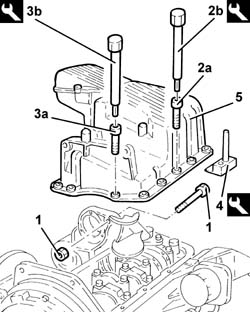
1. Undo the bolt connecting the crankcase sump to the intermediate shaft support.
2. Undo the front and rear bolts (2a) for the crankcase sump using the tool (2b).
| Name | Country | |
|---|---|---|
| 2b | Key | 1.822.145.000 |
3. Undo the side bolts (3a) for the crankcase sump using the tool (3b).
| Name | Country | |
|---|---|---|
| 3b | Key | 1.822.144.000 |
4. Remove the crankcase sump.
To release the sump, tap it gently with a wooden or resin hammer, then use a screwdriver to lever against the specific projections on the sides of the sump.
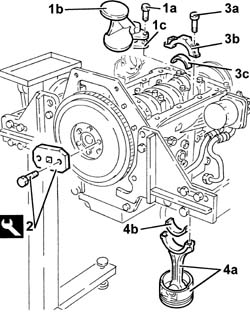
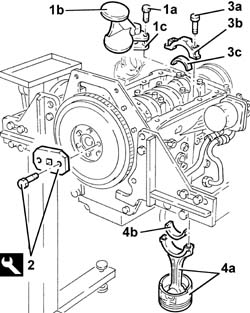
1. Undo the bolts (1a) and remove the oil intake duct (1b) with its gasket (1c).
2. Fit the tool.
| Name | Country | |
|---|---|---|
| 2 | Flange | 1.820.618.000 |
Rotate the crankshaft using the tool fitted previously until the pistons of cylinders no. 1 and no. 4 are at B.D.C.
3. Undo the bolts (3a) and remove the big end bearing caps (3b) with their bearing shells (3c) of cylinders no. 1 and no. 4.
4. Remove the connecting rod-piston assemblies complete with bearing shells (4b) for cylinders no. 1 and 4.
Follow the same procedure to remove the connecting rod-piston assemblies for cylinders no. 2 and no. 3.
Refitting
Rotate the crankshaft until cylinders no. 1 and no. 4 are at B.D.C.
Choose the connecting rod bearing halves as described in - 1004E20 engine - dismantle and re-build following operation 1004e10 - wash and check dismantled parts - re-fit cylinder head and oil sump - does not include repairs to cylinder head and auxiliary unit.
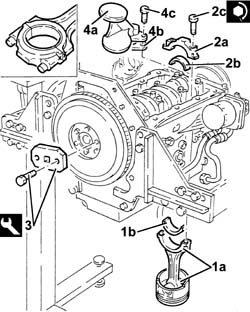
1. Fit the connecting rod-piston assemblies (1a) complete with bearing shells (1b) of cylinders no. 1 and no. 4.
2. Fit the big end bearing caps (2a) complete with bearing shells (2b) and tighten the bolts (2c) to the recommended torque.
The connecting rod caps are fitted so that the number stamped on them is facing the same side as the one stamped on the big end.
| Fastening | Component | Ø | Value (daNm) | |
|---|---|---|---|---|
| 2c |
Use the goniometer for angle tightening the big end bearing cap bolts.
| Name | Country | |
|---|---|---|
| Protractor | 1.860.942.000 |
Follow the same procedure to fit the connecting rod-piston assemblies of cylinders no. 2 and 3.
3. Remove the tool.
| Name | Country | |
|---|---|---|
| 3 | Flange | 1.820.618.000 |
4. Fit the intake duct (4a) complete with gasket (4b) and fix it using the bolts (4c).
Apply silicone sealant around the edge of the crankcase sump.
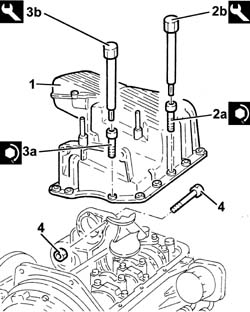
1. Fit the crankcase sump.
2. Tighten the front and rear bolts (2a) fixing the crankcase sump to the recommended torque using the tool (2b).
| Fastening | Component | Ø | Value (daNm) | |
|---|---|---|---|---|
| 2a |
| Name | Country | |
|---|---|---|
| 2b | Key | 1.822.145.000 |
3. Tighten the side bolts (3a) for the crankcase sump to the recommended torque using the tool (3b).
| Fastening | Component | Ø | Value (daNm) | |
|---|---|---|---|---|
| 3a |
| Name | Country | |
|---|---|---|
| 3b | Key | 1.822.144.000 |
4. Tighten the crankcase sump bolt to the intermediate shaft support.
Rotate the engine through 180° on the overhauling stand.
Removing
Rotate the engine through 180° on the overhauling stand.
1. Undo the bolt fixing the crankcase sump to the support on the engine for the reaction rod.
2. Undo the front and rear bolts (2a) for the crankcase sump using the tool (2b).
| Name | Country | |
|---|---|---|
| 2b | Key | 1.822.145.000 |
3. Undo the side bolts (3a) for the crankcase sump using the tool (3b).
| Name | Country | |
|---|---|---|
| 3b | Key | 1.822.144.000 |
4. Cut the crankcase sump sealant using the tool.
| Name | Country | |
|---|---|---|
| 4 | Blade | 1.870.718.000 |
5. Remove the crankcase sump.
1. Undo the bolts (1a) and remove the engine oil inlet (1b) complete with gasket (1c).
2. Fit the tool.
| Name | Country | |
|---|---|---|
| 2 | Flange | 1.820.618.000 |
Rotate the crankshaft using the tool fitted previously until the pistons of cylinders no. 1 and no. 4 are at B.D.C.
3. Undo the bolts (3a) and remove the big end bearing caps (3b) with their bearing shells (3c) of cylinders no. 1 and no. 4.
4. Remove the connecting rod-piston assemblies complete with bearing shells (4b) for cylinders no. 1 and 4.
Follow the same procedure to remove the piston-connecting rod assemblies for cylinders 2 and 3.
Refitting
Choose the connecting rod bearing halves as described in - 1004E20 engine - dismantle and re-build following operation 1004e10 - wash and check dismantled parts - re-fit cylinder head and oil sump - does not include repairs to cylinder head and auxiliary unit.
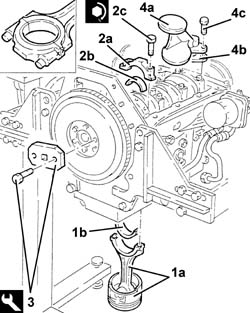
1. Place the connecting rod-piston assemblies (1a), complete with half-bearings (1b), for cylinders 2 and 3 back in their housings.
The piston-connecting rod assemblies should be fitted with the large references (for the inlet valves) on the piston crowns facing the inlet side.
2. Fit the big end bearing caps (2a) complete with bearing shells (2b) and tighten the bolts (2c) to the recommended torque.
The connecting rod caps are fitted so that the number stamped on them is facing the same side as the one stamped on the big end.
| Fastening | Component | Ø | Value (daNm) | |
|---|---|---|---|---|
| 2c | Bolt | BIG END BEARING CAPS | M9 | 2.4 ÷ 2.6 + 60 |
Use the goniometer for angle tightening the big end bearing cap bolts.
| Name | Country | |
|---|---|---|
| Protractor | 1.860.942.000 |
Follow the same procedure to fit the connecting rod-piston assemblies of cylinders no. 1 and 4.
3. Remove the tool.
| Name | Country | |
|---|---|---|
| 3 | Flange | 1.820.618.000 |
4. Fit the intake duct (4a) complete with gasket (4b) and fix it using the bolts (4c).
Clean the contact surfaces between the crankcase sump and the crankcase.
Apply silicone sealant around the edge of the crankcase sump.
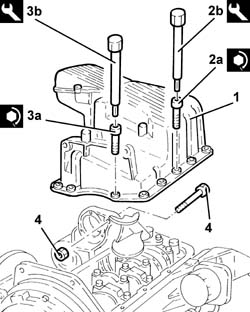
1. Place the crankcase sump back in its housing.
2. Tighten the front and rear bolts (2a) fixing the crankcase sump to the recommended torque using the tool (2b).
| Fastening | Component | Ø | Value (daNm) | |
|---|---|---|---|---|
| 2a | Bolt | OIL SUMP | M8 | (Engine crankcase side) 2.3 ÷ 2.8 |
| Name | Country | |
|---|---|---|
| 2b | Key | 1.822.145.000 |
3. Tighten the side bolts (3a) for the crankcase sump to the recommended torque using the tool (3b).
| Fastening | Component | Ø | Value (daNm) | |
|---|---|---|---|---|
| 3a | Bolt | OIL SUMP | M6 | (Engine crankcase side) 0.8 ÷ 1.0 |
| Name | Country | |
|---|---|---|
| 3b | Key | 1.822.144.000 |
4. Tighten the bolt fixing the crankcase sump to the support on the engine for the reaction rod.
Removing
1. Undo the bolt connecting the crankcase sump to the intermediate shaft support.
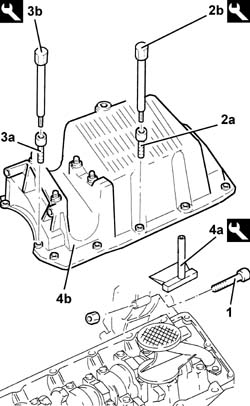
2. Undo the front and rear bolts (2a) for the crankcase sump using the tool (2b).
| Name | Country | |
|---|---|---|
| 2b | Key | 1.822.145.000 |
3. Undo he side bolts (3a) for the crankcase sump using the tool (3b).
| Name | Country | |
|---|---|---|
| 3b | Key | 1.822.144.000 |
4. Using the tool (4a), cut the sealant and remove the crankcase sump (4b).
| Name | Country | |
|---|---|---|
| 4a | Blade | 1.870.718.001 |
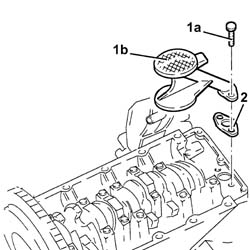
1. Undo the bolts (1a) and remove the engine oil inlet (1b).
2. Remove the seal.
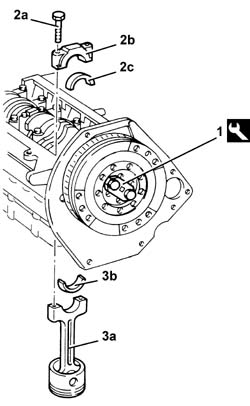
1. Fit the tool and rotate the crankshaft until the cylinder concerned is at B.D.C.
| Name | Country | |
|---|---|---|
| 1 | Flange | 1.820.618.000 |
2. Undo bolts (2a) and remove big end bearing caps (2b) complete with bearing shells (2c).
3. Remove the connecting rod-piston assembly (3a), complete with half-bearing (3b).
Proceed in the same way with the removal of the pistons and connecting rods for the remaining cylinders.
Refitting
Rotate the cylinder block through 90° on the overhauling stand.
Rotate the crankshaft using the tool fitted previously until the cylinder concerned is at B.D.C.
Choose the connecting rod bearing halves as described in - 1004E20 engine - dismantle and re-build following operation 1004e10 - wash and check dismantled parts - re-fit cylinder head and oil sump - does not include repairs to cylinder head and auxiliary unit.
1. Fit the connecting rod-piston assembly (1a), complete with half-bearing, using the tool (1b).
The piston - connecting rod assemblies are fitted in the cylinder block/crankcase so that the explosion chamber in the piston is facing the inlet side.
2. Fit the cap (2a) complete with half-bearing and fix it using the bolts (2b) without tightening them.
The connecting rod caps are fitted with the number stamped on them facing the same way as the number stamped on the connecting rod (inlet side).
Work in the same way when refitting the pistons and connecting rods for the remaining cylinders.
Rotate the cylinder block through 90° on the overhauling stand.
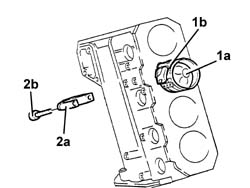
1. Tighten the big end bearing cap bolts (1a) to the recommended torque; use tool (1b) for angular tightening.
| Fastening | Component | Ø | Value (daNm) | |
|---|---|---|---|---|
| 1a | Bolt | BIG END BEARING CAPS | M9 | 2.4 ÷ 2.6 + 60 |
| Name | Country | |
|---|---|---|
| 1b | Protractor | 1.860.942.000 |
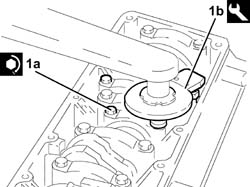
Remove the tool.
| Name | Country | |
|---|---|---|
| Flange | 1.820.618.000 |
Fit the engine oil inlet complete with gasket and secure using the bolts.
Clean the contact surfaces of crankcase sump and cylinder block.
Apply silicone sealant around the edge of the crankcase sump.
Fit the crankcase sump.
Tighten the side bolts for the crankcase sump to torque using the tool.
| Fastening | Component | Ø | Value (daNm) | |
|---|---|---|---|---|
| Side bolt | OIL SUMP | M6 | (Engine crankcase side) 0.8 - 1.0 |
| Name | Country | |
|---|---|---|
| Key | 1.822.144.000 |
Tighten the front and rear bolts for the crankcase sump to torque using the tool.
| Fastening | Component | Ø | Value (daNm) | |
|---|---|---|---|---|
| Front and rear bolt | OIL SUMP | M8 | (Engine crankcase side) 2.1 - 2.6 |
| Name | Country | |
|---|---|---|
| Key | 1.822.145.000 |
Tighten the bolt securing the oil sump to the intermediate shaft support.
Removing
1. Fit the flywheel lock.
| Name | Country | |
|---|---|---|
| 1 | Counter-torque | 1.860.846.001 |
2. Undo the bolts (2a) and remove the engine flywheel (2b).
The engine flywheel retaining bolts are treated with a compound to prevent them coming undone they should therefore be replaced whenever they are removed.
Remove the flywheel lock.
| Name | Country | |
|---|---|---|
| Counter-torque | 1.860.846.001 |
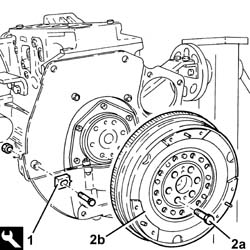
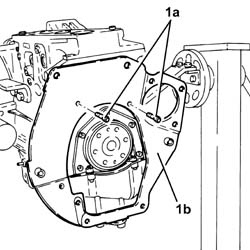
1. Undo the bolts (1a) and remove the engine flywheel protection (1b).
1. Undo the front and rear bolts (1a) securing the crankcase sump using tool (1b).
| Name | Country | |
|---|---|---|
| 1b | Spanner | 1.860.833.001 |
2. Undo the side bolts (2a) securing the crankcase sump using tool (2b).
| Name | Country | |
|---|---|---|
| 2b | Spanner | 1.860.834.001 |
3. Use the tool to cut the crankcase sump sealant.
| Name | Country | |
|---|---|---|
| 3 | Blade | 1.870.718.000 |
4. Remove the crankcase sump.
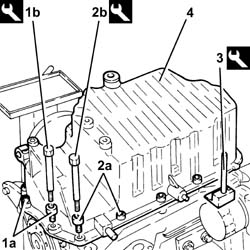
1. Undo the bolts (1a) and remove the engine oil inlet (1b).
2. Remove the gasket.
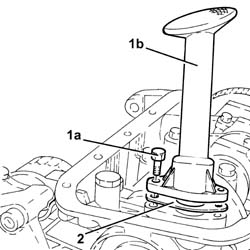
1. Fit the tool.
| Name | Country | |
|---|---|---|
| 1 | Flange | 1.820.618.000 |
Rotate the crankshaft using the tool fitted previously until the cylinder concerned is at B.D.C.
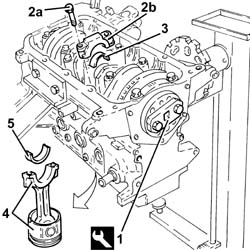
2. Undo the bolts (2a) and remove the big end bearing cap (2b).
3. Remove the lower big end bearing shell.
4. Remove the connecting rod-piston assembly.
5. Remove the upper big end bearing shell.
Proceed in the same way with the removal of the pistons and connecting rods for the remaining cylinders.
Refitting
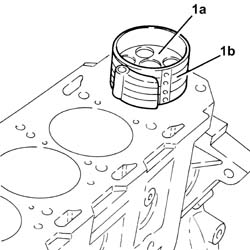
1. Refit the piston - connecting rod assembly (1a), complete with half-bearing, using the tool (1b).
To select the connecting rod half-bearings, follow the procedure described previously for the main journal half-bearings - 1004E20 engine - dismantle and re-build following operation 1004e10 - wash and check dismantled parts - re-fit cylinder head and oil sump - does not include repairs to cylinder head and auxiliary unit.
The piston - connecting rod assemblies are fitted in the cylinder block/crankcase so that the discharge on the piston skirt is in line with the oil jet fitted on the cylinder block/crankcase.
Proceed in the same way with the refitting of the pistons and connecting rods for the remaining cylinders.
1. Check the clearance of the connecting rod bearings, using the calibrated wire (Plastigage).
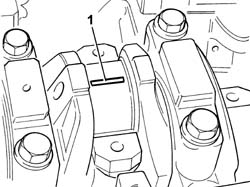
Place the big end caps complete with half-bearings back in their housings.
The connecting rod caps are fitted so that the number stamped on them is facing the same side as the one stamped on the big end (inlet side).
1. Tighten bolts (1a) to the recommended torque using angular tightening tool (1b).
| Fastening | Component | Ø | Value (daNm) | |
|---|---|---|---|---|
| 1a | Bolt | BIG END BEARING CAPS | M9 | 2.4 ÷ 2.6 + 60 |
| Name | Country | |
|---|---|---|
| 1b | Protractor | 1.860.942.000 |
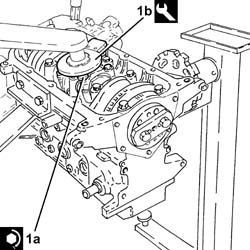
Undo the nuts and remove the connecting rod caps complete with half-bearings fitted previously.
1. Using a suitable graduated measuring instrument (1a), measure the clearance shown by the calibrated wire (1b).
| Measurement | Value | ||
|---|---|---|---|
| 1b | Clearance between big end bearings-Crankpins (mm) | 0.016 ÷ 0.070 |
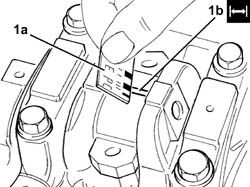
If the value measured does not correspond to the recommended figures, replace the connecting rod bearings.
Carry out this check on all the connecting rod bearings, one at a time, without rotating the crankshaft.
Place the connecting rod cap, complete with half-bearing, back in its housing and fix it using the bolts without tightening them.
The connecting rod caps are fitted so that the number stamped on them is facing the same side as the one stamped on the big end (inlet side).
1. Tighten the bolts (1a) for the connecting rod caps to the recommended torque, using the angular tightening tool (1b).
| Fastening | Component | Ø | Value (daNm) | |
|---|---|---|---|---|
| 1a | Bolt | BIG END BEARING CAPS | M9 | 2.4 ÷ 2.6 + 60 |
| Name | Country | |
|---|---|---|
| 1b | Protractor | 1.860.942.000 |
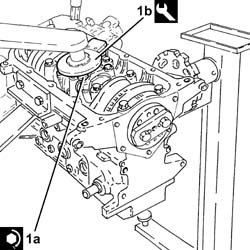
Remove the tool.
| Name | Country | |
|---|---|---|
| Flange | 1.820.618.000 |
Place the engine oil intake, complete with gasket, back in its housing and secure it using the bolts.
Apply silicone sealant around the edge of the crankcase sump.
1. Refit the crankcase sump.
2. Tighten the side bolts (2a) for the crankcase sump to the recommended torque using the tool (2b).
| Fastening | Component | Ø | Value (daNm) | |
|---|---|---|---|---|
| 2a | Side bolts | OIL SUMP | M8 | (Engine crankcase side) 2.3 ÷ 2.8 |
| Name | Country | |
|---|---|---|
| 2b | Spanner | 1.860.833.001 |
3. Tighten the front and rear bolts (3a) for the crankcase sump to the recommended torque using the tool (3b).
| Fastening | Component | Ø | Value (daNm) | |
|---|---|---|---|---|
| 3a | Front and rear bolt | OIL SUMP | M6 | (Crankcase front/rear covers side) 0.8 ÷ 1.0 |
| Name | Country | |
|---|---|---|
| 3b | Spanner | 1.860.834.001 |
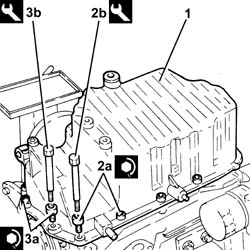
Place the engine flywheel protection back in its housing and secure it using the bolts.
1. Fit the flywheel lock.
| Name | Country | |
|---|---|---|
| 1 | Counter-torque | 1.860.846.001 |
2. Refit the engine flywheel (2a) and secure by tightening new sealant-treated bolts (2b) to the recommended torque.
| Fastening | Component | Ø | Value (daNm) | |
|---|---|---|---|---|
| 2b | Bolt | FLYWHEEL | M12 | (Crankshaft side) 14.4 - 17.6 |
Use the tool for angular tightening of the engine flywheelbolts.
| Name | Country | |
|---|---|---|
| Protractor | 1.860.942.000 |
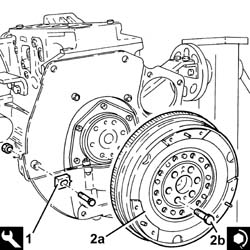
Remove the flywheel lock.
| Name | Country | |
|---|---|---|
| Counter-torque | 1.860.846.001 |
Parts & tools for this job For 2000 Alfa Romeo 147
- PARTEngine gasket setSearch: Alfa Romeo 147 2000 engine gasket set
- TOOLTorque wrenchSearch: 3/8 inch torque wrench
- TOOLFeeler gauge setSearch: feeler gauge set
Links open Amazon search results in a new tab. As an Amazon Associate I earn from qualifying purchases.