
Connecting rod and piston set - r r
- Make
- Alfa Romeo
- Model
- 147 Factory Service Manual
- Year
- 2000–2004
- Section
- Pistons and connecting rods › Connecting rod and piston set - r r
Connecting rod and piston set - r r
Removing
Position the vehicle on the ramp.
Ensure that the ignition key is in the OFF postition, then disconnect the battery negative terminal.
| Name | Connector | |
|---|---|---|
| Battery | A1B |
Proceed with the removal - 4450B10 Front WHEEL (one) - R.R. (Right side).
Proceed with the removal - 7055B64 Engine compartment DUST shield in front wheel arch (one), left or right - R.R. (Right side).
Proceed with the removal - 1016A40 ignition coil cover on cylinder head- r+r.
Proceed with the removal - 5510C14 ignition coil/s - r+r.
Proceed with the removal - 1016A20 single cam cover - r + r and replace gasket.
Proceed with the removal - 1056B60 single fuel manifold pipe, with injectors - r + r.
Proceed with the removal - 1072B50 sleeves connecting air capacity box to inlet manifold is - r+r.
Proceed with the removal - 1072C44 exhaust manifold heat shield on bulkhead - r+r.
Proceed with the removal - 1092G10 single engine belt r r.
Proceed with the removal - 1092G20 engine component single belt fixed tensioner - one - r + r.
Proceed with the removal - 1092A10 Crankshaft services PULLEY - R.R..
Proceed with the removal - 1032D12 timing system protective cover(s) - r + r.
Proceed with the removal - 1032B10 toothed timing belt - r + r for timing adjustment or replacement.
Proceed with the removal - 1016C10 cylinder head - r + r and replace gasket.
Proceed with the removal - 1080B62 catalytic converter - r + r.
Proceed with the removal - 1008A44 rear rigid mount - r r.
Proceed with the removal - 1020A20 crank case oil sump - r + r clean seals for sealant application.
Rotate the crankshaft until the pistons for cylinders 1 and 4 are at B.D.C.
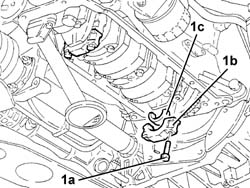
1. Undo the bolts (1a) and remove the connecting rod caps (1b) for cylinders 1 and 4 complete with connecting rod bearing halves.
1. Release and remove the piston-connecting rod assemblies (1a), complete with half-bearings (1b) for cylinders 1 and 4.
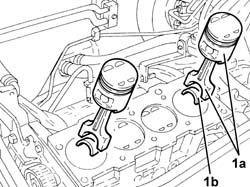
Follow the same procedure to remove the piston-connecting rod assemblies for the 2nd and 3rd cylinders.
Refitting
1. Place the piston-connecting rod assemblies (1a) for the 2nd and 3rd cylinders, complete with half-bearings (1b), back in their housings using a suitable fitting tool (1c).
The piston-connecting rod assemblies should be fitted with the large references (for the inlet valves) on the piston crowns facing the inlet side.
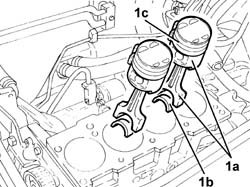
1. Fit the connecting rod caps (1a) for the 2nd and 3rd cylinders, complete with half-bearings (1b) and secure them by tightening the bolts (1c) to the recommended torque.
The big end bearing caps should be fitted so that the number stamped on them is facing the same side a the one stamped on the big end.
| Fastening | Component | Ø | Value (daNm) | |
|---|---|---|---|---|
| 1c | Bolt | BIG END BEARING CAPS | M9 | 2.4 ÷ 2.6 + 60 |
Use the goniometer for angle tightening the big end bearing cap bolts.
| Name | Country | |
|---|---|---|
| Protractor | 1.860.942.000 |
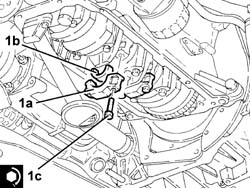
Follow the same procedure when fitting the piston-connecting rod assemblies for the 1st and 4th cylinders.
Proceed with the refitting - 1020A20 crank case oil sump - r + r clean seals for sealant application.
Proceed with the refitting - 1008A44 rear rigid mount - r r.
Proceed with the refitting - 1080B62 catalytic converter - r + r.
Proceed with the refitting - 1016C10 cylinder head - r + r and replace gasket.
Proceed with the refitting - 1032B10 toothed timing belt - r + r for timing adjustment or replacement.
Proceed with the refitting - 1032D12 timing system protective cover(s) - r + r.
Proceed with the refitting - 1092A10 Crankshaft services PULLEY - R.R..
Proceed with the refitting - 1092G20 engine component single belt fixed tensioner - one - r + r.
Proceed with the refitting - 1092G10 single engine belt r r.
Proceed with the refitting - 1072C44 exhaust manifold heat shield on bulkhead - r+r.
Proceed with the refitting - 1072B50 sleeves connecting air capacity box to inlet manifold is - r+r.
Proceed with the refitting - 1056B60 single fuel manifold pipe, with injectors - r + r.
Proceed with the refitting - 1016A20 single cam cover - r + r and replace gasket.
Proceed with the refitting - 5510C14 ignition coil/s - r+r.
Proceed with the refitting - 1016A40 ignition coil cover on cylinder head- r+r.
Proceed with the refitting - 7055B64 Engine compartment DUST shield in front wheel arch (one), left or right - R.R. (Right side).
Proceed with the refitting - 4450B10 Front WHEEL (one) - R.R. (Right side).
Connect the battery terminal (-).
Remove the car from the ramp.
Removing
Position the vehicle on the ramp.
Ensure that the ignition key is in the OFF postition, then disconnect the battery negative terminal.
| Name | Connector | |
|---|---|---|
| Battery | A1B |
Proceed with the removal - 4450B10 Front WHEEL (one) - R.R. (Right side).
Proceed with the removal - 7055B64 Engine compartment DUST shield in front wheel arch (one), left or right - R.R. (Right side).
Proceed with the removal - 1016A40 ignition coil cover on cylinder head- r+r.
Proceed with the removal - 5510C14 ignition coil/s - r+r.
Proceed with the removal - 1016A20 single cam cover - r + r and replace gasket.
Proceed with the removal - 1056B60 single fuel manifold pipe, with injectors - r + r.
Proceed with the removal - 1072B50 sleeves connecting air capacity box to inlet manifold is - r+r.
Proceed with the removal - 1072C44 exhaust manifold heat shield on bulkhead - r+r.
Proceed with the removal - 1092G10 single engine belt r r.
Proceed with the removal - 1092G20 engine component single belt fixed tensioner - one - r + r.
Proceed with the removal - 1092A10 Crankshaft services PULLEY - R.R..
Proceed with the removal - 1032D12 timing system protective cover(s) - r + r.
Proceed with the removal - 1032B10 toothed timing belt - r + r for timing adjustment or replacement.
Proceed with the removal - 1016C10 cylinder head - r + r and replace gasket.
Proceed with the removal - 1080B40 catalytic pre-converter - r r.
Proceed with the removal - 1008A44 rear rigid mount - r r.
Proceed with the removal - 1020A20 crank case oil sump - r + r clean seals for sealant application.
Rotate the crankshaft until the pistons for cylinders 1 and 4 are at B.D.C.
1. Undo the bolts (1a) and remove the connecting rod caps (1b) for cylinders 1 and 4 complete with connecting rod bearing halves.
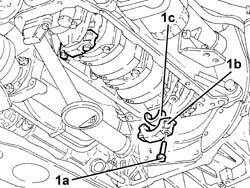
1. Release and remove the piston-connecting rod assemblies (1a), complete with half-bearings (1b) for cylinders 1 and 4.
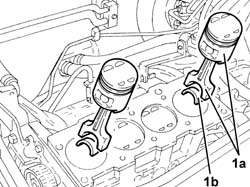
Follow the same procedure to remove the piston-connecting rod assemblies for the 2nd and 3rd cylinders.
Refitting
1. Place the piston-connecting rod assemblies (1a) for the 2nd and 3rd cylinders, complete with half-bearings (1b), back in their housings using a suitable fitting tool (1c).
The piston-connecting rod assemblies should be fitted with the large references (for the inlet valves) on the piston crowns facing the inlet side.
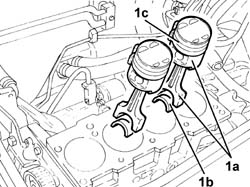
1. Fit the connecting rod caps (1a) for the 2nd and 3rd cylinders, complete with half-bearings (1b) and secure them by tightening the bolts (1c) to the recommended torque.
The connecting rod caps are fitted so that the number stamped on them is facing the same side as the one stamped on the big end.
| Fastening | Component | Ø | Value (daNm) | |
|---|---|---|---|---|
| 1c | Bolt | BIG END BEARING CAPS | M9 | 2.4 ÷ 2.6 + 60 |
Use the goniometer for angle tightening the big end bearing cap bolts.
| Name | Country | |
|---|---|---|
| Protractor | 1.860.942.000 |
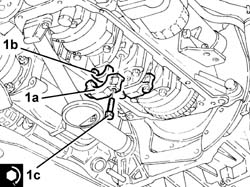
Follow the same procedure when fitting the piston-connecting rod assemblies for the 1st and 4th cylinders.
Proceed with the refitting - 1020A20 crank case oil sump - r + r clean seals for sealant application.
Proceed with the refitting - 1008A44 rear rigid mount - r r.
Proceed with the refitting - 1080B40 catalytic pre-converter - r r.
Proceed with the refitting - 1016C10 cylinder head - r + r and replace gasket.
Proceed with the refitting - 1032B10 toothed timing belt - r + r for timing adjustment or replacement.
Proceed with the refitting - 1032D12 timing system protective cover(s) - r + r.
Proceed with the refitting - 1092A10 Crankshaft services PULLEY - R.R..
Proceed with the refitting - 1092G20 engine component single belt fixed tensioner - one - r + r.
Proceed with the refitting - 1092G10 single engine belt r r.
Proceed with the refitting - 1072C44 exhaust manifold heat shield on bulkhead - r+r.
Proceed with the refitting - 1072B50 sleeves connecting air capacity box to inlet manifold is - r+r.
Proceed with the refitting - 1056B60 single fuel manifold pipe, with injectors - r + r.
Proceed with the refitting - 1016A20 single cam cover - r + r and replace gasket.
Proceed with the refitting - 5510C14 ignition coil/s - r+r.
Proceed with the refitting - 1016A40 ignition coil cover on cylinder head- r+r.
Proceed with the refitting - 7055B64 Engine compartment DUST shield in front wheel arch (one), left or right - R.R. (Right side).
Proceed with the refitting - 4450B10 Front WHEEL (one) - R.R. (Right side).
Connect the battery terminal (-).
Refill the engine oil lubrication system - 1084A10 ENGINE OIL - Check level and top up, if necessary.
Remove the car from the ramp.
Removing
Position the vehicle on the ramp.
Proceed with the removal - 5530B10 battery - r+r.
Proceed with the removal - 4450B10 Front WHEEL (one) - R.R. (Right side).
Proceed with the removal - 7055B64 Engine compartment DUST shield in front wheel arch (one), left or right - R.R. (Right side).
Proceed with the removal - 7055B54 under-engine guard - r r.
Proceed with the removal - 1016A40 ignition coil cover on cylinder head- r+r.
Proceed with the removal - 5510C14 ignition coil/s - r+r.
Proceed with the removal - 1016A20 single cam cover - r + r and replace gasket.
Proceed with the removal - 1056B60 single fuel manifold pipe, with injectors - r + r.
Proceed with the removal - 1072D10 modular inlet manifold - r+r.
Proceed with the removal - 1072C44 exhaust manifold heat shield on bulkhead - r+r.
Proceed with the removal - 1092G10 single engine belt r r.
Proceed with the removal - 1092A10 Crankshaft services PULLEY - R.R..
Proceed with the removal - 1092G20 engine component single belt fixed tensioner - one - r + r.
Proceed with the removal - 1092G14 engine component single belt mobile tensioner - r + r.
Proceed with the removal - 1032D12 timing system protective cover(s) - r + r.
Proceed with the removal - 1092E10 counter-rotating shaft drive toothed belt - r + r.
Proceed with the removal - 1032B10 toothed timing belt - r + r for timing adjustment or replacement.
Proceed with the removal - 1016C10 cylinder head - r + r and replace gasket.
Proceed with the removal - 1080B40 catalytic pre-converter - r r.
Proceed with the removal - 1008A44 rear rigid mount - r r.
Proceed with the removal - 1020A20 crank case oil sump - r + r clean seals for sealant application.
Rotate the crankshaft until the pistons for cylinders 1 and 4 are at B.D.C.
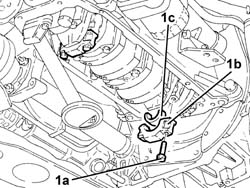
1. Undo the bolts (1a) and remove the connecting rod caps (1b), complete with half-bearings (1c), for cylinders 1 and 4.
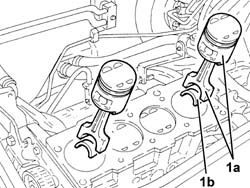
1. Release and remove the piston-connecting rod assemblies (1a), complete with half-bearings (1b) for cylinders 1 and 4.
Follow the same procedure to remove the piston-connecting rod assemblies for the 2nd and 3rd cylinders.
Refitting
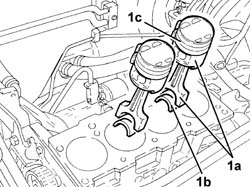
1. Place the piston-connecting rod assemblies (1a) for the 2nd and 3rd cylinders, complete with half-bearings (1b), back in their housings using a suitable fitting tool (1c).
The piston-connecting rod assemblies should be fitted with the large references (for the inlet valves) on the piston crowns facing the inlet side.
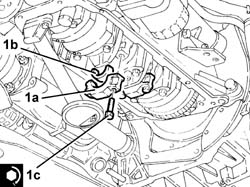
1. Fit the connecting rod caps (1a) for the 2nd and 3rd cylinders, complete with half-bearings (1b) and secure them by tightening the bolts (1c) to the recommended torque.
The connecting rod caps are fitted so that the number stamped on them is facing the same side as the one stamped on the big end.
| Fastening | Component | Ø | Value (daNm) | |
|---|---|---|---|---|
| 1c | Bolt | BIG END BEARING CAPS | M9 | 2.4 ÷ 2.6 +60 |
Use the goniometer for angle tightening the big end bearing cap bolts.
| Name | Country | |
|---|---|---|
| Protractor | 1.860.942.000 |
Follow the same procedure when fitting the piston-connecting rod assemblies for the 1st and 4th cylinders.
Proceed with the refitting - 1020A20 crank case oil sump - r + r clean seals for sealant application.
Proceed with the refitting - 1008A44 rear rigid mount - r r.
Proceed with the refitting - 1080B40 catalytic pre-converter - r r.
Proceed with the refitting - 1016C10 cylinder head - r + r and replace gasket.
Proceed with the refitting - 1032B10 toothed timing belt - r + r for timing adjustment or replacement.
Proceed with the refitting - 1092E10 counter-rotating shaft drive toothed belt - r + r.
Proceed with the refitting - 1032D12 timing system protective cover(s) - r + r.
Proceed with the refitting - 1092G14 engine component single belt mobile tensioner - r + r.
Proceed with the refitting - 1092G20 engine component single belt fixed tensioner - one - r + r.
Proceed with the refitting - 1092A10 Crankshaft services PULLEY - R.R..
Proceed with the refitting - 1092G10 single engine belt r r.
Proceed with the refitting - 1072C44 exhaust manifold heat shield on bulkhead - r+r.
Proceed with the refitting - 1072D10 modular inlet manifold - r+r.
Proceed with the refitting - 1056B60 single fuel manifold pipe, with injectors - r + r.
Proceed with the refitting - 1016A20 single cam cover - r + r and replace gasket.
Proceed with the refitting - 5510C14 ignition coil/s - r+r.
Proceed with the refitting - 1016A40 ignition coil cover on cylinder head- r+r.
Proceed with the refitting - 7055B54 under-engine guard - r r.
Proceed with the refitting - 7055B64 Engine compartment DUST shield in front wheel arch (one), left or right - R.R. (Right side).
Proceed with the refitting - 4450B10 Front WHEEL (one) - R.R. (Right side).
Proceed with the refitting - 5530B10 battery - r+r.
Refill the engine oil lubrication system - 1084A10 ENGINE OIL - Check level and top up, if necessary.
Refill the cooling system - 0010T20 coolant change.
Remove the car from the ramp.
Refer to op. 1028H20 piston with connecting rod - r r
Removing
Position the vehicle on the ramp.
Proceed with removal - 7025A12 Engine front sound insulation COVER - R.R..
Proceed with removal - 7025A14 Bonnet LID - R.R..
Proceed with removal - 1016A10 sound-proofing cover - r + r.
Ensure that the ignition key is in the OFF position, then disconnect the negative battery terminal (-).
| Name | Connector | |
|---|---|---|
| Battery | A1B |
Proceed with removal - 1008C10 power unit upper reaction link r r.
Proceed with removal - 1060G80 ds electric injection control unit - r r.
Proceed with removal - 4450B04 right front wheel r r.
Proceed with removal - 7055B54 under-engine guard - r r.
Proceed with removal - 7055B91 Right front WHEEL ARCH LINER - R.R..
Proceed with removal - 1092G10 single engine belt r r.
Proceed with removal - 1092A10 Crankshaft services PULLEY - R.R..
Proceed with removal - 1092G20 engine component single belt fixed tensioner - one - r + r.
Proceed with removal - 1032D12 timing system protective cover(s) - r + r.
Proceed with removal - 5530B10 battery - r+r.
Proceed with removal - 1016C10 cylinder head - r + r and replace gasket.
1. Undo the plug and drain the engine oil.
Collect the engine oil in a suitable container. Engine oil contains substances harmful to the environment. Discard the oil in containers designed for their disposal.
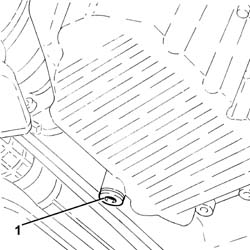
1. Undo the bolt securing the intermediate drive shaft mounting to the crankcase oil sump.
2. Undo the bolts fixing the manual gearbox and differential to the cylinder block/crankcase.
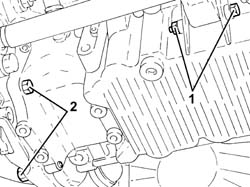
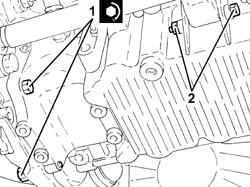
1. Undo the front and rear bolts (1a) securing the crankcase sump using tool (1b).
| Name | Country | |
|---|---|---|
| 1b | Spanner | 1.860.833.001 |
2. Undo the side bolts (2a) securing the crankcase sump using tool (2b).
| Name | Country | |
|---|---|---|
| 2b | Spanner | 1.860.834.001 |
3. Use the tool to cut the crankcase sump sealant.
| Name | Country | |
|---|---|---|
| 3 | Blade | 1.870.718.000 |
4. Remove the crankcase sump.
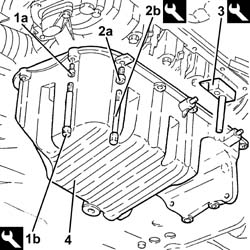
1. Undo the bolts (1a) and remove the connecting rod caps (1b), complete with half-bearings (1c).
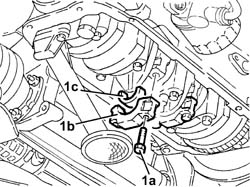
1. Release and remove the piston-connecting rod assemblies (1a), complete with half-bearings (1b).
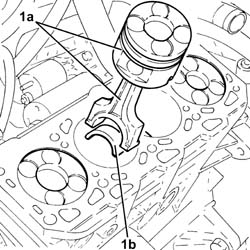
Refitting
1. Place the piston-connecting rod assemblies (1a), complete with half-bearings (1b), back in their housings using a suitable fitting tool.
The piston - connecting rod assemblies are fitted in the cylinder block/crankcase so that the drain on the piston skirt is in line with the oil jet fitted on the cylinder block/crankcase.
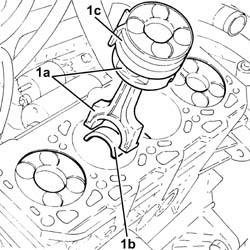
1. Refit the connecting rod caps (1a), complete with half-bearings (1b), and fix them tightening the bolts (1c) to the recommended torque.
The connecting rod caps are fitted so that the number stamped on them is facing the same side as the one stamped on the big end (inlet side).
| Fastening | Component | Ø | Value (daNm) | |
|---|---|---|---|---|
| 1c |
Use the tool for angular tightening of the connecting rod cap bolts.
| Name | Country | |
|---|---|---|
| Protractor | 1.860.942.000 |
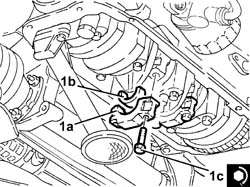
Thoroughly clean the contact surfaces of crankcase sump and cylinder block of sealant residues.
Apply silicon sealant around the edge of the crankcase sump.
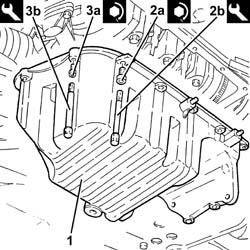
1. Refit the crankcase sump
When fitting the crankcase sump, avoid major sideways movements which may remove the sealant.
2. Tighten the side bolts (2a) for the crankcase sump to the recommended torque using the tool (2b).
| Fastening | Component | Ø | Value (daNm) | |
|---|---|---|---|---|
| 2a |
| Name | Country | |
|---|---|---|
| 2b | Spanner | 1.860.833.001 |
3. Tighten the front and rear bolts (3a) for the crankcase sump to the recommended torque using the tool (3b).
| Fastening | Component | Ø | Value (daNm) | |
|---|---|---|---|---|
| 3a |
| Name | Country | |
|---|---|---|
| 3b | Spanner | 1.860.834.001 |
1. Tighten the bolts securing the manual gearbox with differential to the crankcase to the specified torque.
| Fastening | Component | Ø | Value (daNm) | |
|---|---|---|---|---|
| 1 |
2. Tighten the bolt securing the intermediate drive shaft mounting to the oil sump.
Place a new engine oil sump drain plug, complete with new gasket, back in its housing and tighten it to the recommended torque.
| Fastening | Component | Ø | Value (daNm) |
|---|
Proceed with refitting - 1016C10 cylinder head - r + r and replace gasket.
Proceed with refitting - 5530B10 battery - r+r.
Proceed with refitting - 1032D12 timing system protective cover(s) - r + r.
Proceed with refitting - 1092G20 engine component single belt fixed tensioner - one - r + r.
Proceed with refitting - 1092A10 Crankshaft services PULLEY - R.R..
Proceed with refitting - 1092G10 single engine belt r r.
Proceed with refitting - 7055B91 Right front WHEEL ARCH LINER - R.R..
Proceed with refitting - 7055B54 under-engine guard - r r.
Proceed with refitting - 4450B04 right front wheel r r.
Proceed with refitting - 1060G80 ds electric injection control unit - r r.
Proceed with refitting - 1008C10 power unit upper reaction link r r.
Refill the engine oil lubrication system - 0010T11 engine oil check level and top up.
Refill the engine cooling system with coolant - 0010T20 coolant change.
Connect the negative (-) battery terminal.
Proceed with refitting - 1016A10 sound-proofing cover - r + r.
Proceed with refitting - 7025A14 Bonnet LID - R.R..
Proceed with refitting - 7025A12 Engine front sound insulation COVER - R.R..
Remove the car from the ramps.
Parts & tools for this job For 2000 Alfa Romeo 147
- PARTEngine gasket setSearch: Alfa Romeo 147 2000 engine gasket set
- TOOLTorque wrenchSearch: 3/8 inch torque wrench
- TOOLFeeler gauge setSearch: feeler gauge set
Links open Amazon search results in a new tab. As an Amazon Associate I earn from qualifying purchases.