
Front crank shaft cover oil seal - replace
- Make
- Alfa Romeo
- Model
- GT Factory Service Manual
- Year
- 2003–2010
- Section
- Crankcase sump and covers › Front crank shaft cover oil seal - replace
FRONT CRANK SHAFT COVER OIL SEAL - REPLACE
Removing
Position the vehicle on a lift.
Make sure that the ignition key is in the OFF position, then disconnect the negative battery terminal.
| Description | Connector | |
|---|---|---|
| Battery | See A1B BATTERY ( BATTERY NEGATIVE ) |
Proceed with the removal
Op. 4450B04 RIGHT FRONT WHEEL R R.
Proceed with the removal
Op. 7055B54 UNDER-ENGINE GUARD - R R.
Proceed with the removal
Op. 1016A40 IGNITION COIL COVER ON CYLINDER HEAD- R+R.
Proceed with the removal
Op. 1032B10 TOOTHED TIMING BELT - R + R FOR TIMING ADJUSTMENT OR REPLACEMENT.
Proceed with the removal
Op. 1032B46 TOOTHED DRIVE PULLEY - R + R.
Remove the crankshaft key using a suitable drift.
1. Release and remove the crankshaft front oil seal cover.
Take care not to damage the oil seal seat during its removal.
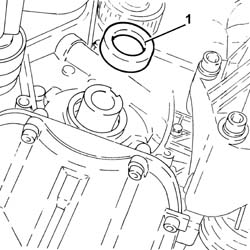
Refitting
1. Fit a new the crankshaft front cover oil seal (1a) in the housing using the tool (1b).
| Description | Code | |
|---|---|---|
| 1b | Fitting tool | 1.821.147.000 |
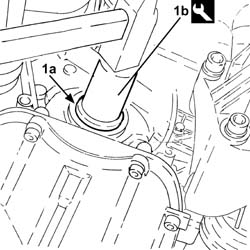
Place the key in the housing in the crankshaft.
Proceed with the refitting
Op. 1032B46 TOOTHED DRIVE PULLEY - R + R.
Proceed with the refitting
Op. 1032B10 TOOTHED TIMING BELT - R + R FOR TIMING ADJUSTMENT OR REPLACEMENT.
Proceed with the refitting
Op. 1016A40 IGNITION COIL COVER ON CYLINDER HEAD- R+R.
Proceed with the refitting
Op. 7055B54 UNDER-ENGINE GUARD - R R.
Proceed with the refitting
Op. 4450B04 RIGHT FRONT WHEEL R R.
Connect the negative battery terminal (-).
Remove the vehicle from the lift.
Removing
Position the vehicle on a lift.
Proceed with the removal
Op. 4450B04 RIGHT FRONT WHEEL R R.
Proceed with the removal
Op. 7055B64 LH OR RH REFLECTOR(ONE) ON REAR BUMPERS - R R.
Proceed with the removal
Op. 1092G10 SINGLE ENGINE BELT R R.
Proceed with the removal
Op. 1092A10 CRANKSHAFT SERVICES PULLEY - R.R..
Proceed with the removal
Op. 1032D12 TIMING SYSTEM PROTECTIVE COVER(S) - R + R.
Proceed with the removal
Op. 1016A42 LEFT HAND CYLINDER HEAD IGNITION COIL COVER - R+R.
Proceed with the removal
Op. 5510C16 LEFT HAND CYLINDER HEAD IGNITION COIL - R+R.
Proceed with the removal
Op. 1016A30 LEFT CAM COVER - R + R AND REPLACE GASKET.
Proceed with the removal
Op. 1072B50 SLEEVES CONNECTING AIR CAPACITY BOX TO INLET MANIFOLD IS - R+R.
Proceed with the removal
Op. 5510C18 RIGHT HAND CYLINDER HEAD IGNITION COIL - R+R.
Proceed with the removal
Op. 1016A34 RIGHT-HAND CAM COVER - R + R AND REPLACE GASKET.
Proceed with the removal
Op. 1032B10 TOOTHED TIMING BELT - R + R FOR TIMING ADJUSTMENT OR REPLACEMENT.
1. Remove the toothed drive pulley
2. Remove the spacer.
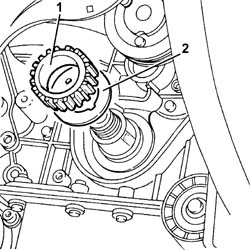
1. Remove the crankshaft key using a suitable drift.
2. Release and remove the crankshaft front oil seal cover.
Take care not to damage the oil seal seat during its removal.
The oil seal is ruined during the removal operation so it must always be replaced.
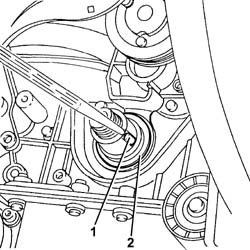
Refitting
1. Fit a new the crankshaft front cover oil seal (1a) in the housing using the tool (1b).
| Description | Code | |
|---|---|---|
| 1b | Fitting tool | 1.860.949.000 |
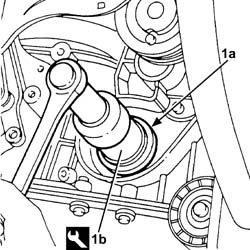
Place the key in the housing in the crankshaft.
Place the spacer back in its housing.
Place the toothed drive pulley in its housing.
Proceed with the refitting
Op. 1032B10 TOOTHED TIMING BELT - R + R FOR TIMING ADJUSTMENT OR REPLACEMENT.
Proceed with the refitting
Op. 1016A34 RIGHT-HAND CAM COVER - R + R AND REPLACE GASKET.
Proceed with the refitting
Op. 5510C18 RIGHT HAND CYLINDER HEAD IGNITION COIL - R+R.
Proceed with the refitting
Op. 1072B50 SLEEVES CONNECTING AIR CAPACITY BOX TO INLET MANIFOLD IS - R+R.
Proceed with the refitting
Op. 1016A30 LEFT CAM COVER - R + R AND REPLACE GASKET.
Proceed with the refitting
Op. 5510C16 LEFT HAND CYLINDER HEAD IGNITION COIL - R+R.
Proceed with the refitting
Op. 1016A42 LEFT HAND CYLINDER HEAD IGNITION COIL COVER - R+R.
Proceed with the refitting
Op. 1032D12 TIMING SYSTEM PROTECTIVE COVER(S) - R + R.
Proceed with the refitting
Op. 1092A10 CRANKSHAFT SERVICES PULLEY - R.R..
Proceed with the refitting
Op. 1092G10 SINGLE ENGINE BELT R R.
Proceed with the refitting
Op. 7055B64 LH OR RH REFLECTOR(ONE) ON REAR BUMPERS - R R.
Proceed with the refitting
Op. 4450B04 RIGHT FRONT WHEEL R R.
Remove the vehicle from the lift.
Removing
Position the vehicle on a lift.
Make sure that the ignition key is in the OFF position, then disconnect the negative battery terminal.
| Description | Connector | |
|---|---|---|
| Battery | See A1B BATTERY ( BATTERY NEGATIVE ) |
Proceed with the removal
Op. 1008C10 POWER UNIT UPPER REACTION LINK R R.
Proceed with the removal
Op. 1060G80 DS ELECTRIC INJECTION CONTROL UNIT - R R.
Proceed with the removal
Op. 4450B04 RIGHT FRONT WHEEL R R.
Proceed with the removal
Op. 7055B54 UNDER-ENGINE GUARD - R R.
Proceed with the removal
Op. 7055B91 RIGHT FRONT WHEEL ARCH LINER - R.R..
Proceed with the removal
Op. 1092G10 SINGLE ENGINE BELT R R.
Proceed with the removal
Op. 1092A10 CRANKSHAFT SERVICES PULLEY - R.R..
Proceed with the removal
Op. 1092G20 ENGINE COMPONENT SINGLE BELT FIXED TENSIONER - ONE - R + R.
Proceed with the removal
Op. 1032D12 TIMING SYSTEM PROTECTIVE COVER(S) - R + R.
Proceed with the removal
Op. 1032B10 TOOTHED TIMING BELT - R + R FOR TIMING ADJUSTMENT OR REPLACEMENT.
Proceed with the removal
Op. 1032B44 TOOTHED DRIVE PULLEY - R + R WITH TIMING BELT REMOVED.
Release and remove the crankshaft front oil seal cover.
take care not to damage the oil seal seat during its removal.
The oil seal is ruined during the removal operation so it must always be replaced.
Refitting
1. Fit a new the crankshaft front cover oil seal (1a) in the housing using the tool (1b).
| Description | Code | |
|---|---|---|
| 1b | Fitting tool | 1.821.247.000 |
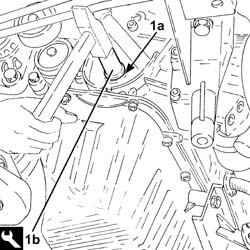
Proceed with the refitting
Op. 1032B44 TOOTHED DRIVE PULLEY - R + R WITH TIMING BELT REMOVED.
Proceed with the refitting
Op. 1032B10 TOOTHED TIMING BELT - R + R FOR TIMING ADJUSTMENT OR REPLACEMENT.
Proceed with the refitting
Op. 1032D12 TIMING SYSTEM PROTECTIVE COVER(S) - R + R.
Proceed with the refitting
Op. 1092G20 ENGINE COMPONENT SINGLE BELT FIXED TENSIONER - ONE - R + R.
Proceed with the refitting
Op. 1092A10 CRANKSHAFT SERVICES PULLEY - R.R..
Proceed with the refitting
Op. 1092G10 SINGLE ENGINE BELT R R.
Proceed with the refitting
Op. 7055B91 RIGHT FRONT WHEEL ARCH LINER - R.R..
Proceed with the refitting
Op. 7055B54 UNDER-ENGINE GUARD - R R.
Proceed with the refitting
Op. 4450B04 RIGHT FRONT WHEEL R R.
Proceed with the refitting
Op. 1060G80 DS ELECTRIC INJECTION CONTROL UNIT - R R.
Proceed with the refitting
Op. 1008C10 POWER UNIT UPPER REACTION LINK R R.
Connect the negative battery terminal (-).
Remove the vehicle from the lift.
Removing
Proceed with the removal
Op. 4450B04 RIGHT FRONT WHEEL R R
Proceed with the removal
Op. 7055B66 ENGINE COMPARTMENT DUST SHIELD PROTECTION IN RIGHT FRONT WHEEL ARCH - R.R.
Proceed with the removal
Op. 1092G10 SINGLE ENGINE BELT R R.
Proceed with the removal
Op. 1092A10 CRANKSHAFT SERVICES PULLEY - R.R..
Proceed with the removal
Op. 1092G20 ENGINE COMPONENT SINGLE BELT FIXED TENSIONER - ONE - R + R.
Proceed with the removal
Op. 1032D12 TIMING SYSTEM PROTECTIVE COVER(S) - R + R.
Proceed with the removal
Op. 1016A40 IGNITION COIL COVER ON CYLINDER HEAD- R+R.
Proceed with the removal
5510C14 ROCCHETTI/BOBINE di accensione - S.R.
Proceed with the removal
Op. 1016A20 SINGLE CAM COVER - R + R AND REPLACE GASKET.
Proceed with the removal
Op. 1032B10 TOOTHED TIMING BELT - R + R FOR TIMING ADJUSTMENT OR REPLACEMENT.
Proceed with the removal
Op. 1032B46 TOOTHED DRIVE PULLEY - R + R.
1. Release and remove the crankshaft front oil seal cover.
Take care not to damage the oil seal seat during its removal.
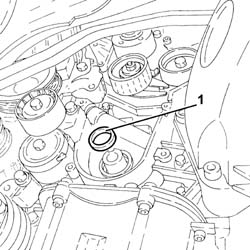
Refitting
1. Fit a new the crankshaft front cover oil seal (1a) in the housing using the tool (1b).
| Description | Code | |
|---|---|---|
| 1b | Fitting tool | 1.821.247.000 |
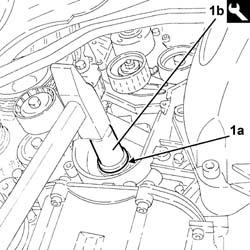
Proceed with the refitting
Op. 1032B46 TOOTHED DRIVE PULLEY - R + R.
Proceed with the refitting
Op. 1032B10 TOOTHED TIMING BELT - R + R FOR TIMING ADJUSTMENT OR REPLACEMENT.
Proceed with the refitting
Op. 1016A20 SINGLE CAM COVER - R + R AND REPLACE GASKET.
Proceed with the refitting
5510C14 ROCCHETTI/BOBINE di accensione - S.R.
Proceed with the refitting
Op. 1016A40 IGNITION COIL COVER ON CYLINDER HEAD- R+R.
Proceed with the refitting
Op. 1032D12 TIMING SYSTEM PROTECTIVE COVER(S) - R + R.
Proceed with the refitting
Op. 1092G20 ENGINE COMPONENT SINGLE BELT FIXED TENSIONER - ONE - R + R.
Proceed with the refitting
Op. 1092A10 CRANKSHAFT SERVICES PULLEY - R.R..
Proceed with the refitting
Op. 1092G10 SINGLE ENGINE BELT R R.
Proceed with the refitting
Op. 7055B66 ENGINE COMPARTMENT DUST SHIELD PROTECTION IN RIGHT FRONT WHEEL ARCH - R.R.
Proceed with the refitting
Parts & tools for this job For 2003 Alfa Romeo GT
- PARTOil filterSearch: Alfa Romeo GT 2003 oil filter
- TOOLOil filter wrenchSearch: oil filter wrench
- FLUIDEngine oilSearch: Alfa Romeo GT engine oil
Links open Amazon search results in a new tab. As an Amazon Associate I earn from qualifying purchases.