
Install
- Make
- Aston Martin
- Model
- V8 Vantage Factory Workshop Manual
- Year
- 2005–2010
- Section
- Engine Sealing › Install
03 EngineInstall
- Remove and discard the seals for the 14 cam cover screws.
- Remove the cam cover.
- Remove the breather pipe stub.
- Remove and discard the seal for the breather pipe stub.
- Remove and discard the O-ring seal for the VVT solenoid.
- Remove and discard the cam cover gasket.
- Remove and discard the four O-ring seals from the spark plug wells.
- Clean the component mating faces.
Install
- Install four new O-ring seals in the spark plug wells.
- Install a new O-ring seal for the VVT solenoid.
- Install a new cam cover gasket.
- Install a new seal for the breather pipe stub.
- Install the breather pipe stub.
- Apply a 6 mm diameter sphere of silicon RTV sealant at the positions shown in Figure C03-10-102.
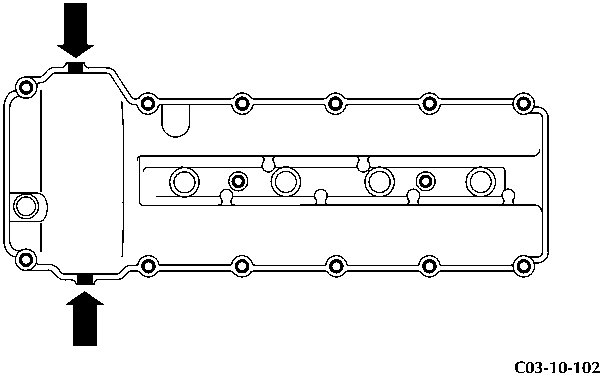
Figure C03-10-102
- Install the cam cover.
- Install new seals for the 14 cam cover screws.
CAUTION Tighten the screws gradually and equally in the step that follows. If you do not, the cam cover gasket can be damaged.
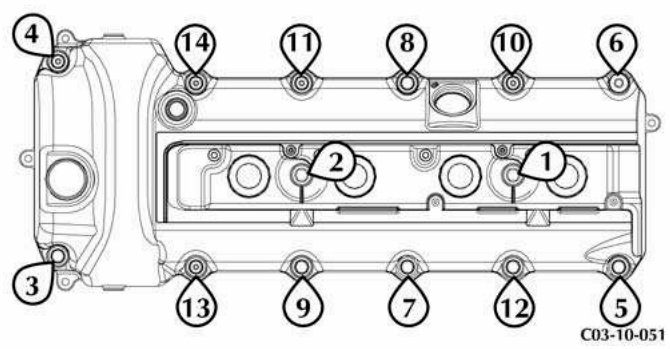
Figure C03-10-051
- Install the four ignition coils.
- Install and torque the screw that attaches each of the four ignition coils to 5 Nm.
- Install the front bracket for the wiring harness.
- Install the rear bracket for the wiring harness.
- Install and torque the three screws that attach the rear bracket for the wiring harness to 11 Nm.
- Install and tighten the two nuts and three bolts that attach the front bracket for the wiring harness.
- Install the purge pipe and heater pipe into the two clips on the wiring harness bracket.
- Use four applicable cable ties to attach the rear of the wiring harness to the front bracket.
- Install the wiring harness for the injectors into the mounts.
- Install the fir tree clip that attaches the wiring harness for the ignition coils.
- Connect the electrical connector to each of the four ignition coils.
- Connect the electrical connector to the VVT solenoid.
- Install the ignition coil cover.
- Remove and discard the caps from the breather pipes.
- Connect the breather pipes to the cam cover and the oil tank Y-piece.
CAUTION Make sure that the vehicle is on its road wheels on level ground when you do the steps that follow. If you do not, the front of the vehicle can be twisted when the cross brace is tightened.
- Install the left side front crush bar for the body reinforcement. (Refer to procedure 01.01.AC - Left Side Front Crush Bar for the Body Reinforcement).
- Install the front crush brace. (Refer to procedure 01.01.LC - Front Crush Brace).
- Connect the battery earth cable
Left Side Cam Cover Gasket - Renew
Repair Operation Time (ROT)
| Item | Code |
|---|---|
| Cam Cover Gasket-Renew | LH-LHD 03.10.AJ |
| Cam Cover Gasket-Renew | LH-RHD 03.10.CJ |
Removal
- Remove the left cam cover (Refer to 'Left Side Cam Cover - Remove and Install', page 3-10-4).
- Remove and discard the cam cover gasket.
Installation
- Clean the mating faces of the cam cover and the cylinder head.
- Put the new cam cover gasket in position.
- Install the left cam cover (Refer to 'Left Side Cam Cover - Remove and Install', page 3-10-4).
Parts & tools for this job For 2005 Aston Martin V8 Vantage
- PARTEngine gasket setSearch: Aston Martin V8 Vantage 2005 engine gasket set
- TOOLTorque wrenchSearch: 3/8 inch torque wrench
- TOOLFeeler gauge setSearch: feeler gauge set
Links open Amazon search results in a new tab. As an Amazon Associate I earn from qualifying purchases.