
Removal
- Make
- Aston Martin
- Model
- V8 Vantage Factory Workshop Manual
- Year
- 2005–2010
- Section
- Engine Sealing › Removal
03 EngineRemoval · page 1 of 2
Removal
- Remove the left side cam cover (Refer to ‘Left Side Cam Cover - Remove and Install’, page 3-10-4).
- Remove the right side cam cover (Refer to ‘Right Side Cam Cover - Remove and Install’, page 3-10-9).
Install
- Install the left side cam cover (Refer to ‘Left Side Cam Cover - Remove and Install’, page 3-10-4).
- Install the right side cam cover (Refer to ‘Right Side Cam Cover - Remove and Install’, page 3-10-9).
Engine Timing Cover-Renew (with Engine Removed)
| Item | Code |
|---|---|
| Engine Timing Cover-Renew | 03.10.BF |
Removal
- Remove the engine assembly (refer Workshop Manual procedure 03.00.AA Engine Assembly - Renew).
- Position drain container.
- Remove the drain plug and drain the oil from the sump.
- Remove the left cam cover (Refer to ‘Left Side Cam Cover - Remove and Install’, page 3-10-4).
- Remove the right cam cover (Refer to ‘Right Side Cam Cover - Remove and Install’, page 3-10-9).
- Release the hose clips and disconnect the two coolant hoses from the coolant manifold.
- Release the hose clip and disconnect the hose from the oil separator.
- Remove the four Torx bolts that attach the coolant manifold to cylinder heads (refer to Figure 1).
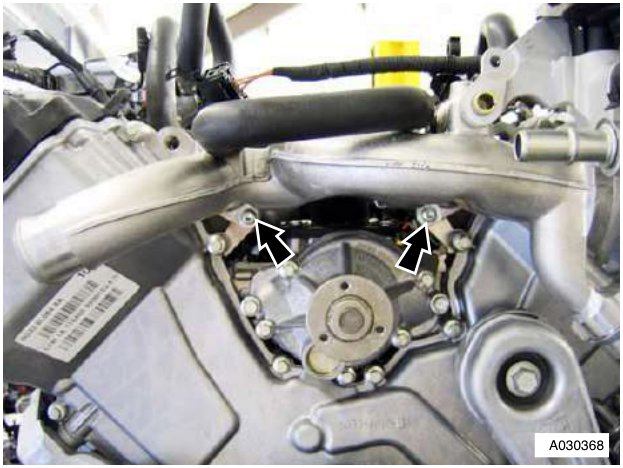
- Release the coolant manifold from coolant pipe, disconnect the temperature sensor multiplex.
- Remove the coolant manifold.
- Remove and discard the two O-rings from the coolant manifold.
- Loosen the three water pump pulley bolts (refer to Figure 2).
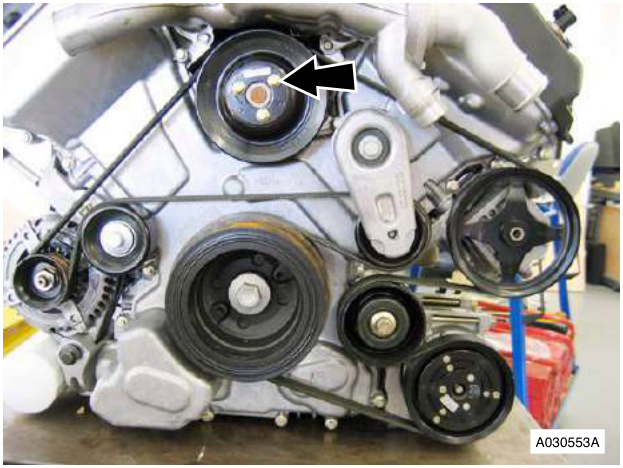
- Use an applicable socket bar to release the auxiliary drive belt tensioner.
- Remove the drive belt.
- Remove the three bolts and remove the water pump pulley.
- Remove the bolt that attaches the auxiliary drive belt tensioner.
- Remove the tensioner (refer to Figure 3).
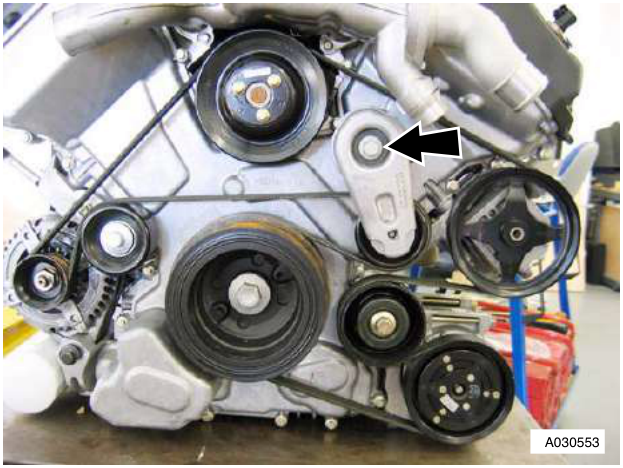
- Remove the two bolts that attach the inspection cover to the lower crankcase. Remove the cover.
- Install tool (303-1185) to hold flywheel. Install and tighten the two bolts.
- Install the thrust button of tool (303 -1186) into the crankshaft.
- Put the tool in position in the pulley. Attach the tool with the two bolts. Tighten the centre bolt and remove the pulley from the crankshaft.
- Collect the crankshaft pulley, locking ring and the special tool thrust button.
- Remove the special tool from the pulley.
- Remove and discard the O-ring seal from pulley.
- Remove the bolt that attaches the alternator idler pulley.
Parts & tools for this job For 2005 Aston Martin V8 Vantage
- PARTEngine gasket setSearch: Aston Martin V8 Vantage 2005 engine gasket set
- TOOLTorque wrenchSearch: 3/8 inch torque wrench
- TOOLFeeler gauge setSearch: feeler gauge set
Links open Amazon search results in a new tab. As an Amazon Associate I earn from qualifying purchases.