
Piston-Renew
- Make
- Aston Martin
- Model
- V8 Vantage Factory Workshop Manual
- Year
- 2005–2010
- Section
- Power Conversion › Piston-Renew
03 EnginePiston-Renew
- Install piston ring clamp to each piston in turn and install in its respective cylinder bore. Remove piston ring F1amp (see Figure 19).
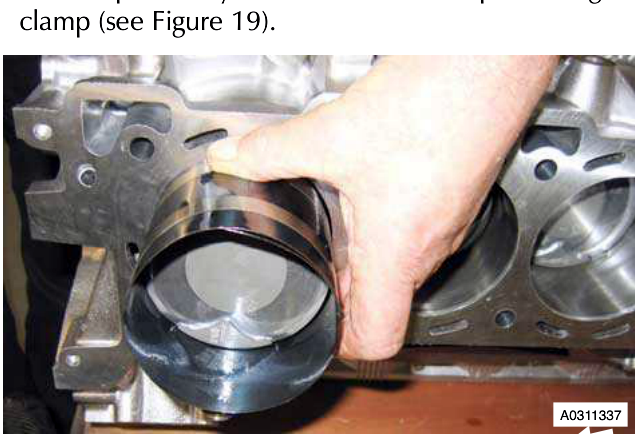
Figure 19
- Lubricate crankshaft journals with clean engine oil.
- Carefully pull each connecting rod into place on each crankshaft journal.
- Install bearing caps to their relevant connecting rods.
F2 Install and torque tighten retaining bolts (x16).
Caution When assembling connecting rods and connecting rod bearing caps it is imperative that bearing slots and tangs be located on the same side of the connecting rods.
- Clean windage tray.
- Install windage tray, install and torque tighten bolts (x8).
- Clean old sealant from sump flange and engine bedplate.
- Ensure that sump flange and mating face on engine bedplate are clean and dry.
- Apply a continuous 3mm diameter bead of RTV sealant to sump flange as recommended.
- Ensure that there are no gaps in sealant track.
- Install sump, install and torque tighten bolts (x16) in the correct sequence.
- Install A/C compressor mounting bracket, install and torque tighten Torx bolts (x4).
- Lubricate and install new O-ring seals to oil pipes.
- Install oil pipes in sump, install and torque tighten bolts (x2)
- Install compressor, install and torque tighten bolts (x4).
- Connect multiplug to A/C compressor.
- Install LH and RH HEGO sensor multiplug brackets to sump. Install and torque tighten bolts (x4).
- Secure harness clips (x6) in sump.
- Connect multiplug to crankshaft timing sensor.
- Connect multiplug to engine electric coolant temperature sensor.
- Connect multiplug to oil pressure sensor.
- Clean oil scavenge pump and mating face on sump.
- Install oil pump(s) drive sprocket.
- Install new oil scavenge pump gasket, align on dowels (x2).
- Install chain onto oil scavenge pump sprocket.
- Install oil scavenge pump, align to dowels (x2), Install and torque tighten bolts (x3).
- Install chain onto oil pump drive sprocket.
- Clean oil pressure pump and mating face on sump.
- Install new gasket to sump, align to dowels (x2).
- Position oil pressure pump, install chain on pump sprocket.
- Install oil pressure pump, align to dowels (x2), Install and torque tighten bolts (x3).
- Install chain tensioner, install and torque tighten bolt, remove guide pin.
- Install crankshaft timing sprocket.
- Install cylinder head gaskets - engine set (see Workshop Manual procedure 03.01.HW Gasket - Cylinder Head - Engine Set - Renew With Engine Removed).
Piston-Renew
| Repair Operation Time (ROT) | |
|---|---|
| Item | Code |
| Piston-Renew | 03.11.CH |
Removal
WARNING DO NOT GET USED ENGINE OIL ON YOUR SKIN. USED ENGINE OIL CAN BE HARMFUL.
- Remove cylinder head gaskets - engine set (see Workshop Manual procedure 03.01.HW Gasket Cylinder Head - Engine Set - Renew With Engine Removed).
- Remove crankshaft timing sprocket from crankshaft.
- Install guide pin through lower hole on chain tensioner.
- Remove bolt securing oil pressure pump chain tensioner assembly to engine bedplate (see Figure 1).
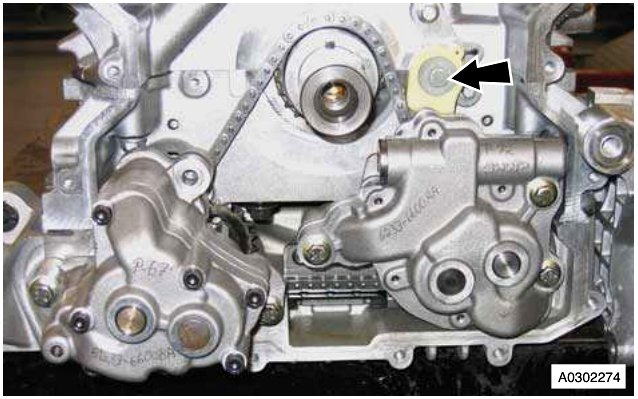
Figure 1
Parts & tools for this job For 2005 Aston Martin V8 Vantage
- PARTEngine gasket setSearch: Aston Martin V8 Vantage 2005 engine gasket set
- TOOLTorque wrenchSearch: 3/8 inch torque wrench
- TOOLFeeler gauge setSearch: feeler gauge set
Links open Amazon search results in a new tab. As an Amazon Associate I earn from qualifying purchases.