
Maintenance
- Make
- Aston Martin
- Model
- V8 Vantage Factory Workshop Manual
- Year
- 2005–2010
- Section
- Power Conversion › Maintenance
03 EngineMaintenance · page 1 of 2
Maintenance
Connecting Rod Bearing-Renew (Engine Set)
| Repair Operation Time (ROT) | |
|---|---|
| Item | Code |
| Connecting Rod Bearing-Renew | 03.11.AA |
Removal
DO NOT GET USED ENGINE OIL ON YOUR SKIN. USED ENGINE OIL CAN BE HARMFUL.
- Remove engine oil sump (see Workshop Manual procedure 03.02.BN Pan - Oil Sump - Remove and Re-seal).
- Remove spark plugs (see Workshop Manual procedure 03.07.DB Spark Plugs - Engine Set - Renew).
- Remove bolts (x8) securing windage tray to engine bedplate, remove windage tray.
Pistons, connecting rods and connecting rod bearings should be numbered to make sure they are reassembled in the same position.
- Mark bearing caps and connecting rods for correct installation.
- Rotate crankshaft clockwise to access number 1 cylinder connecting rod bolts.
Connecting rod bolts are torque tightened to yield and must be replaced.
- Remove bolts securing bearing cap to connecting rod, remove bearing cap (see Figure 1).
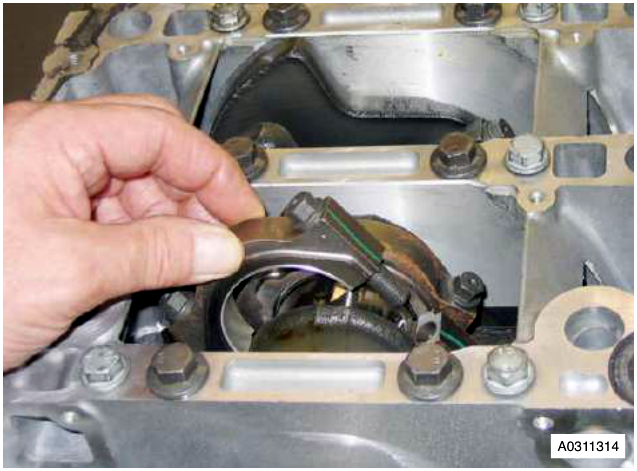
- Install special tools (303-535) to the connecting rod to prevent damage to crankshaft journal.
- Move connecting rod upwards, remove bearing shell.
- Record colour code on bearing shell edge.
Installation
Connecting rod bearings are a selective fit by colour code on edge of bearing shell.
- Select the correct colour coded bearing shells for each connecting rod crankshaft journal.
- Install new selective bearing shell in connecting rod.
- Lubricate crankshaft journal with clean engine oil.
- Install connecting rod on crankshaft journal.
- Remove special tools (303-535) from connecting rod.
- Install new selective bearing shell in bearing cap.
When assembling connecting rods and connecting rod bearing caps it is imperative that bearing slots and tangs be located on the same side of the connecting rods.
- Install bearing cap and new bolts (x2), torque tighten bearing cap bolts.
- Repeat procedure for remaining connecting rod bearings.
- Install windage tray to engine bedplate, install and torque tighten bolts (x8).
- Install spark plugs (see Workshop Manual procedure 03.07.DB Spark Plugs - Engine Set - Renew).
- Install engine oil sump (see Workshop Manual procedure 03.02.BN Pan - Oil Sump - Remove and re-seal).
Crankshaft Main Bearing-Renew (Engine Set)
| Repair Operation Time (ROT) | |
|---|---|
| Item | Code |
| Crankshaft Main Bearing-Renew | 03.11.AB |
Removal
- Remove bolts (x2), inspection cover to lower crankcase, remove cover.
- Install tool (303-1185) to restrain flywheel, install and tighten bolts (x2).
- Remove bolts (x6), clutch cover to flywheel.
- Release clutch cover from dowels (x3), remove clutch cover, collect drive plate.
- Remove and discard bolts (x8), flywheel to crankshaft flange.
- Remove bolts (x2), collect tool (303-1185).
Removal
- Remove and discard bearing shell from cap.
- Record colour code on bearing shell edge, discard bearing shell.
- Wipe crankshaft journal, connecting rod and bearing cap using a lint free cloth.
- Inspect crankshaft journal for damage.
- Check crankshaft journal for ovality using a micrometer and record journal diameters.
Parts & tools for this job For 2005 Aston Martin V8 Vantage
- PARTOil filterSearch: Aston Martin V8 Vantage 2005 oil filter
- TOOLOil filter wrenchSearch: oil filter wrench
- FLUIDEngine oilSearch: Aston Martin V8 Vantage engine oil
Links open Amazon search results in a new tab. As an Amazon Associate I earn from qualifying purchases.