
Warning and manoeuvring indicators
- Make
- Fiat
- Model
- Bravo Factory Service Manual
- Year
- 2007–2014
- Section
- General › Warning and manoeuvring indicators
WARNING AND MANOEUVRING INDICATORS
STEERING COLUMN SWITCH UNIT MODULE
Introduction
The steering column switch unit basically groups the following functions together:
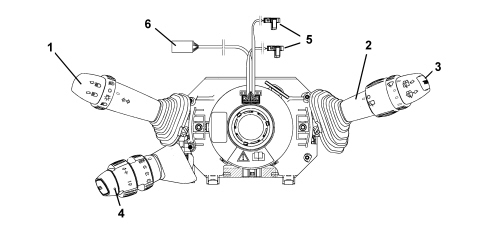
1. Lever for exterior lights and direction indicators
2. Lever for windscreen washing and wiping functions
3. TRIP function button
4. Cruise Control lever (if present)
5. Air Bag connectors
6. Horn connector and controls on the steering wheel
The steering column switch unit module is composed of a maximum of three levers (lights, wiper and Cruise Control), an electronic module (that manages the motor for the windscreen wipers and the windscreen washer pump) and a clock spring that produces the connection with the steering wheel.
The electronic module controls the wiping functions, in particular:
- windscreen wiper: sweep rate;
- rearscreen wiper: sweep rate and control during reversing;
- windscreen wiper function: smart washing;
- rearscreen washer function: smart washing;
- rain sensor: managed by a signal from the sensor (if present).
The clock spring has two functions:
- transmitting the rotation of the steering wheel to the automatic release mechanism located inside the casing;
- transferring the electrical signal for the controls on the steering wheel (horn, radio controls) and the Air Bag module
Operation
Left lever
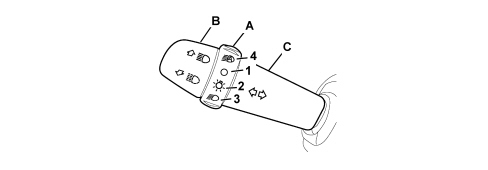
A - Lights selector
B - Lights flasher - main beam headlamps switch
C - Direction indicators
The light selector is a ring nut with 3 stable positions (4 if there is a dusk sensor) located at the end of the lever and activated by turning it along the axis of the lever:
- Pos. 1 = No circuit operated
- Pos. 2 = Side lights
- Pos. 3 = Dipped headlamps
- Pos. 4 = Auto function for side lights and dipped headlamps
DUSK SENSOR:
On some versions the side lights and the dipped headlamps are activated automatically by the dusk sensor.
This sensor, located in the windscreen under the interior rear view mirrors, detects variations in the brightness of the light outside the vehicle depending on the setting: the greater the sensitivity, the less external light is required to activate the exterior lights.
This dusk sensor sensitivity can be adjusted through the instrument panel setup menu.
By turning the ring nut in the opposite direction the side lights and the dipped headlamps automatically come on simultaneously depending on the outside brightness. With the sensor activated the flashing of the lights only is possible.
When the sensor gives the command to switch off, the main beam headlamps are deactivated and, about 10 seconds later, the side lights too.
If there is a fault with the dusk sensor, the "general failure" warning light is turned on and the information is shown simultaneously on the display.
Follow me home:
The "Follow me home" function allows the dipped headlamps and the side lights to remain on even after the engine has been switched off (key in OFF position) for a period of 30 seconds or multiples thereof. The side lights warning light in the instrument panel signals that the lights have remained on.
It is turned on using the lever in the same way as for activating the flasher within 2 minutes of the ignition being switched OFF: each time the lever is operated the length of time the lights remain on is increased by 30 seconds, up to a maximum of 210 seconds. Inserting the TEG or keeping the flasher lever pulled for more than 2 seconds eliminates the function.
CORNERING FUNCTION
With the dipped headlamps on and the speed between 10 and 40 km/h, if the steering wheel rotation angle is extensive or the direction indicators come on, the fog light on the relevant side comes on improving nightime visibility.
The "light flasher" control is operated by pulling the stalk from rest position towards the steering wheel; the operation is unstable i.e. the stalk returns to the rest position when released.
The fixed main beam headlamps control on the other hand is produced bypushing the lever towards the dashboard.
The command for the direction indicators is produced by moving the lever on the steering wheel plane in both directions, upwards for the right direction indicators and downwards for the left ones.
The lever has two distinct activating modes: one unstable one known as "changing lane" and one stable one known as "changing direction".
The stable activation has an automatic release device that returns the lever to the rest position when the manoeuvre is completed (rotation of the steering wheel in the same direction as the lever).
The unstable activation on the release of the lever reopens the electrical contact that has closed.
Lane change function:
To signal a lane change whilst driving, placing the left lever in an unstable position for less than half a second activates the direction indicator on the side selected flashing 3 times and it then goes off automatically.
Right lever
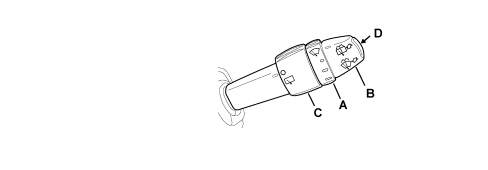
A - Windscreen wiper intermittent operation / rain sensor setting (if present) selector;
B - Windscreen washer / rearscreen washer;
C - Rearscreen wiper;
D - TRIP button.
The windscreen wiper is operated by moving the lever along the plane of the steering wheel.
There are 5 different activation positions, from the top, in this order:
- Temporary speed operation (unstable)
- OFF
- Intermittent/automatic operation
- Continuous slow operation
- Continuous fast operation
WINDSCREEN WIPER INTERMITTENT SELECTOR (RAIN SENSOR SETTING)
The adjustment takes place by turning the ring nut into 4 stable positions.
4 different pause times for the intermittent operation of the windscreen wiper correspond to these positions.
If a rain sensor is fitted, the positions correspond to the 4 rain sensor settings.
WINDSCREEN WASHER/REARSCREEN WASHER CONTROL
The control for activating the two-way pump for washing the front windscreen is produced by pulling the lever towards the steering wheel crown; the activation is unstable.
The control for activating the two-way pump for washing the rearscreen is produced by pulling the lever towards the dashboard; the activation is unstable.
REAR WIPER CONTROL
The rearscreen wiper is controlled by rotating a ring nut in 2 stable positions halfway along the lever.
TRIP BUTTON
By pressing the unstable TRIP button on the lever the relevant commands are sent to the instrument panel.
Cruise control lever
See
See descriptions 5580A CRUISE CONTROL SYSTEM
Components
Control electronics
The electronics for controlling the windscreen and rearscreen wiper and washer functions are housed inside the steering column switch unit and are capable of controlling the windscreen and rearscreen wiper motors and the two-way pump.
By means of the A-BUS interface it is capable of conversing with the rain sensor and, as a result, of controlling the windscreen wiper in automatic mode (refer to the A-BUS serial network and the rain sensor).
For more details on the wiping logic,
See descriptions 5050 SCREEN WASHERS AND HEADLAMP WASH/WIPE
Electrical connections
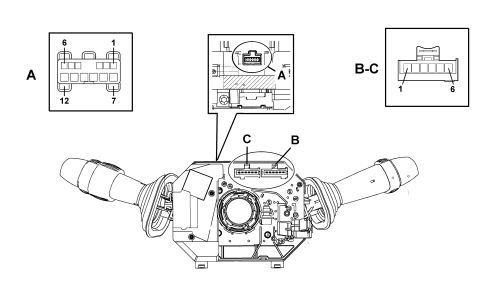
Steering column switch unit pin out
Connector A (front wiring)
| pin | function |
|---|---|
| 1 | n.c. |
| 2 | A-bus serial line (signal from rain sensor) |
| 3 | Positive signal from reverse gear |
| 4 | Negative signal from NC switch indicating rear window open |
| 5 | Headlamp washer / wish-wash signal enablement |
| 6 | Negative signal from windscreen wiper motor cam |
| 7 | Power earth |
| 8 | Second winscreen wiper speed |
| 9 | First windscreen wiper speed |
| 10 | Two-way pump (positive for rear washer) |
| 11 | Windscreen wiper/pump power supply |
| 12 | Two-way pump (positive for windscreen washer) |
Connector B (dashboard wiring)
| pin | function |
|---|---|
| 1 | Right branch direction indicator engagement negative signal |
| 2 | High beam negative control |
| 3 | Dipped beam negative control |
| 4 | Automatic operation engagement negative control |
| 5 | Side lights negative control |
| 6 | Earth |
Connector C (dashboard wiring)
| pin | function |
|---|---|
| 1 | Trip computer negative signal |
| 2 | Rear wiper power supply |
| 3 | Rearscreen wiper motor |
| 4 | Negative signal from rearscreen wiper motor cam |
| 5 | Earth |
| 6 | Left branch direction indicator engagement negative signal |
Parts & tools for this job For 2007 Fiat Bravo
- TOOLDigital multimeterSearch: automotive digital multimeter
- PARTAssorted fuse kitSearch: car fuse assortment kit
- TOOLWire crimper and connector kitSearch: wire crimper connector kit
Links open Amazon search results in a new tab. As an Amazon Associate I earn from qualifying purchases.