
Replacing auxiliary shaft belt
- Make
- Fiat
- Model
- Bravo /Brava (182) Factory Service Manual
- Year
- 1995–2001
- Section
- Replacing timing belt (1747 16v) › Replacing auxiliary shaft belt
Replacing auxiliary shaft belt
NOTE In order to refit the power unit simply reverse the order of the operations described for the removal.
- Prepare the engine compartment for the insertion of the power unit, taking care to position all the electrical cables, pipes, etc. so that there are no obstacles to the refitting;
- Pay due care when fitting the power unit to avoid damaging the individual components;
- When refitting the engine coolant pipes, it is necessary to ensure that the notch in the flexible (rubber) pipe coincides with the projection on the rigid coupling sleeve. To refill the engine cooling circuit, refer to the instructions in the chapter "Removing-refitting radiator".
Firstly fix the engine side support tightening the bolts fixing it to the bodyshell to the recommended torque, then fix the gearbox side support and lastly the differential side centre support. Make sure that the support points for the power unit are correctly fixed.
Clutch pedal height.
REMOVING-REFITTING AUXILIARY SHAFT DRIVE BELT
Position the vehicle on a lift, disconnect the negative battery lead, remove the right front wheel, then proceed aas described below:
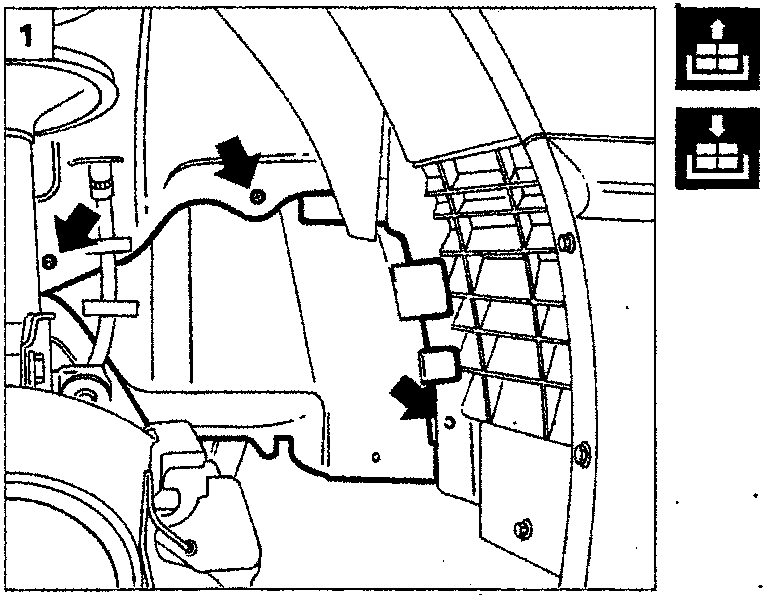
- Remove the right front wheel arch liner to gain access to the auxiliary shaft drive belt.
Check the condition and the tension of the auxiliary shaft drive belt and in particular that the following are not present: cracks, cuts, surface wear of the material (which appears smooth and shiny), dry or hard sections with a consequent loss of adhesion. If one of these above mentioned defects is present, replace the belt.
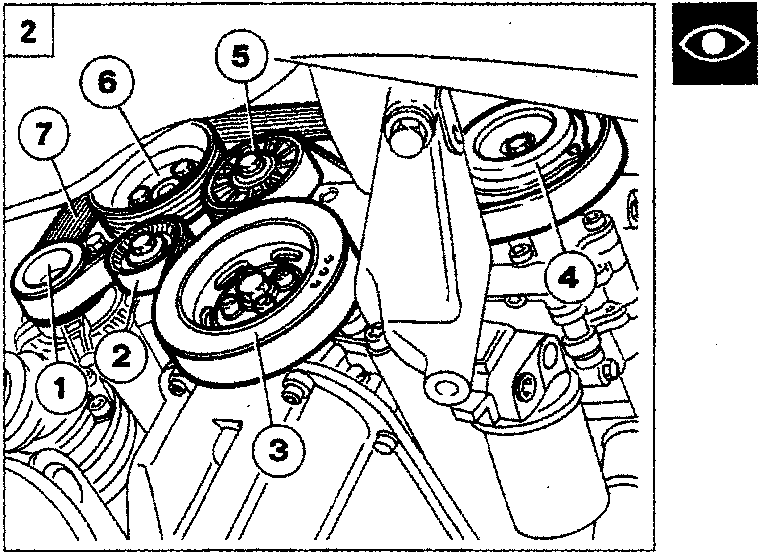
- View of auxiliary shaft belt fitted on vehicle:
- Alternator
- Automatic tensioning device
- Crankshaft pulley
- Air conditioning compressor pulley
- Fixed tensioner
- Power steering pump pulley
- Auxiliary shaft drive belt
Avoid the belt coming into contact with oil or solvents which could adversely affect the elasticity of the rubber with a consequent reduction in adhesion.
Parts & tools for this job For 1995 Fiat Bravo
- PARTTiming belt kitSearch: Fiat Bravo 1995 timing belt kit
- TOOLEngine timing tool setSearch: Fiat engine timing tool set
- TOOLTorque wrenchSearch: 3/8 inch torque wrench
Links open Amazon search results in a new tab. As an Amazon Associate I earn from qualifying purchases.