
Auxiliary unit, removed - dismantling and reassembly
- Make
- Fiat
- Model
- Ducato Factory Service Manual
- Year
- 2002–2006
- Section
- Crankcase sump and covers › Auxiliary unit, removed - dismantling and reassembly
AUXILIARY UNIT, REMOVED - DISMANTLING AND REASSEMBLY
Removing
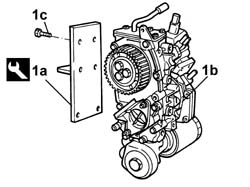
- Place the head on the workbench.1. Fit the tool (1a) on the auxiliary unit (1b) and fasten it using the bolts (1c).
| Description | Code | Function | |
|---|---|---|---|
| Support | 1.860.635.000 | Auxiliary shaft assembly support |
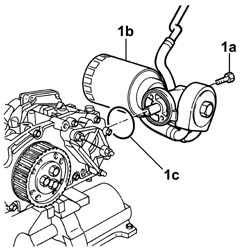
- Place the tool in the vice.1. Undo the centre fixing bolt (1a) and remove the heat exchanger/oil filter assembly (1b) complete with gasket (1c).
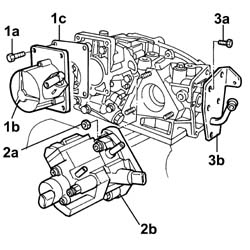
1. Undo the fixing bolts (1a) and remove the vacuum unit (1b) and the gasket (1c).2. Undo the fixing nuts (2a) and remove the pressure pump (2b).
Do not separate the spacer from the pump.
3. Undo the fixing bolts (3a) and remove the cover (3b).
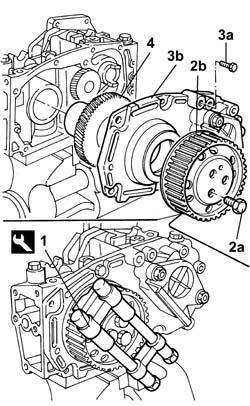
1. Fit the tool.
| Description | Code | Function | |
|---|---|---|---|
| 1 | Counter-torque | 1.860.765.001 | Loosen/tighten auxiliary shaft toothed drive pulley bolt |
2. Undo the fixing bolts (2a) and remove the driven timing pulley (2b).3. Undo the fixing bolts (3a) and remove the front cover (3b).4. Release the main gear.
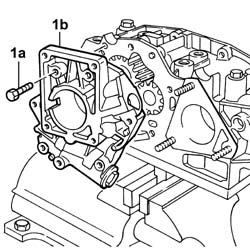
1. Undo the fixing bolts (1a) and remove the cover (1b).
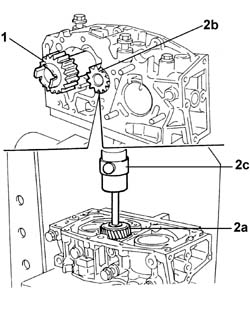
1. Release the oil pump driven gear.2. Remove the gear (2a) from the drive gear shaft (2b) for the oil pump using a hydraulic press (2c).
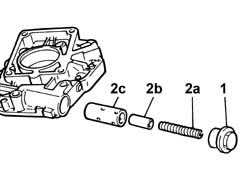
1. Undo the oil pressure relief valve cap.2. Release the spring (2a), the piston (2b) and the cylinder (2c).
Refitting
- Using a torque wrench, check that the specifications of the oil pressure relief valve spring correspond to the recommended figures; if this it not the case, replace it.
| Subject | Value | |
|---|---|---|
| Length | 39 mm | |
| Under a load of | 10.5 +- 0.4 daNm |
| Subject | Value | |
|---|---|---|
| Length | 32 mm | |
| Under a load of | 14.5 +-0.6 daNm |
- Fit the spring, the piston and the cylinder for the oil pressure relief valve.- Tighten the cap to the recommended torque.
| Value - daNm | Fastening | Component | Ø | |
|---|---|---|---|---|
| 6,5 | Plug | M24 |
1. Fit the gear (1a) on the drive gear shaft (2b) for the oil pump using a hydraulic press (1c).
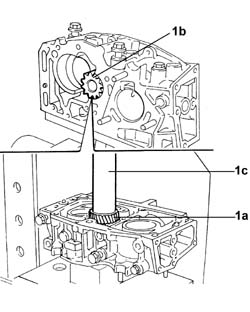
1. Fit the tool.
| Description | Code | Function | |
|---|---|---|---|
| 1 | Counter-torque | 1.860.637.000 | Oil pump drive gear fitting check |
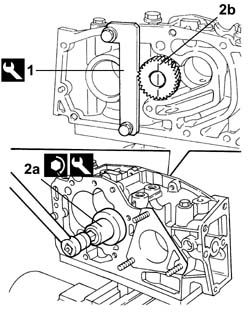
1. Fit the tool.
| Description | Code | Function | |
|---|---|---|---|
| 1 | Counter-torque | 1.860.637.000 | Oil pump drive gear fitting check |
2. Using the tool (2a), tighten the oil pump drive gear (2b) to the recommended torque to check that it is correctly fitted on the shaft.
Trace a straight vertical line and check that after applying the recommended torque the trace remains aligned.
| Description | Code | Function | |
|---|---|---|---|
| 2b | Counter-torque | 1.860.636.000 | Oil pump drive gear fitting check |
| Value - daNm | Fastening | Component | Ø | |
|---|---|---|---|---|
| 2b | 11,3 | oil pump drive gear |
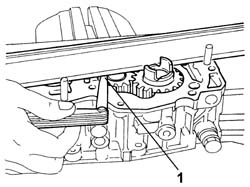
- Fit the oil pump driven gear.1. Check that the axial clearance between the gears and the pump casing plane is within the recommended limits.
| Subject | Value | |
|---|---|---|
| 1 | End float | 0.055 -0.099 mm |
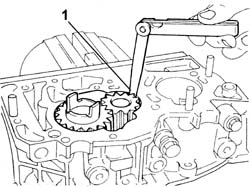
1. Check that the radial clearance between the gears and the pump casing is within the recommended limits.
| Subject | Value | |
|---|---|---|
| 1 | Radial clearance | 0.030 -0.085 mm |
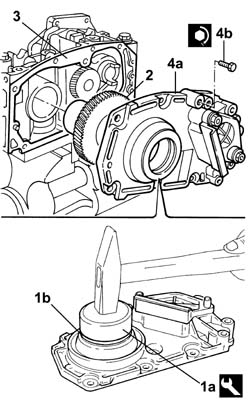
1. Using the tool (1a), fit the oil seal (1b) on the front cover.2. Fit the main gear.3. Fit the cover gasket.4. Fit the cover (4a) and tighten the fixing bolts (4b) to the recommended torque.
| Description | Code | Function | |
|---|---|---|---|
| 1a | Fitting tool | 1.860.627.000 | Fit oil seal |
| Value - daNm | Fastening | Component | Ø | |
|---|---|---|---|---|
| 4b | 2,3 | Bolt | M8 |
- Apply the sealant.
| Description | Qty. | Component | Type | Classification | |
|---|---|---|---|---|---|
| Silicone sealant | Dow Corning 7091 |
- Fit the oil pump cover and tighten the fixing bolts to the recommended torque.
| Value - daNm | Fastening | Component | Ø | |
|---|---|---|---|---|
| 1,8 | Bolt | M8 |
- Fit the pressure pump and tighten the fixing nuts to the recommended torque.
| Value - daNm | Fastening | Component | Ø | |
|---|---|---|---|---|
| 2,5 | Nut | M8 |
- Fit the side cover and tighten the fixing bolts to the recommended torque.
| Value - daNm | Fastening | Component | Ø | |
|---|---|---|---|---|
| 1,8 | Bolt | M8 |
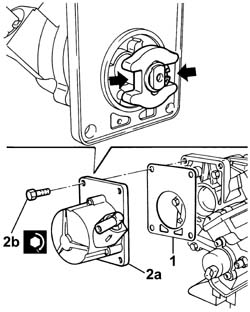
1. Fit the gasket.2. Fit the vacuum unit (2a) and tighten the fixing bolts (2b) to the recommended torque.
Fit the dog correctly on the teeth on the oil pump gear.
| Value - daNm | Fastening | Component | Ø | |
|---|---|---|---|---|
| 1,8 | Bolt | M8 |
- Fit the tool
| Description | Code | Function | |
|---|---|---|---|
| 1 | Counter-torque | 1.860.765.000 | Loosen/tighten auxiliary shaft toothed drive pulley bolt |
- Fit the toothed driven pulley and tighten the fixing bolts to the recommended torque.
| Value - daNm | Fastening | Component | Ø | |
|---|---|---|---|---|
| 2,5 | Bolt | M8 |
- Remove the tool.
| Description | Code | Function | |
|---|---|---|---|
| Counter-torque | 1.860.765.001 | Loosen/tighten auxiliary shaft toothed drive pulley bolt |
- Remove the auxiliary unit from the vice.- Remove the support tool from the auxiliary unit.
| Description | Code | Function | |
|---|---|---|---|
| Support | 1.860.635.001 | Auxiliary units support |
Parts & tools for this job For 2002 Fiat Ducato
- PARTEngine gasket setSearch: Fiat Ducato 2002 engine gasket set
- TOOLTorque wrenchSearch: 3/8 inch torque wrench
- TOOLFeeler gauge setSearch: feeler gauge set
Links open Amazon search results in a new tab. As an Amazon Associate I earn from qualifying purchases.