
Variable geometry turbocharger exhaust manifold assembly sleeveleading to exhaust pipe r r
- Make
- Fiat
- Model
- Ducato Factory Service Manual
- Year
- 2002–2006
- Section
- Turbo charging system › Variable geometry turbocharger exhaust manifold assembly sleeveleading to exhaust pipe r r
VARIABLE GEOMETRY TURBOCHARGER EXHAUST MANIFOLD ASSEMBLY SLEEVELEADING TO EXHAUST PIPE R R
Removing
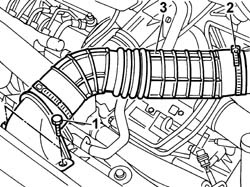
- Disconnect the negative battery terminal.- Position the vehicle on the lift.1. Undo the bolts fixing the cold air intake to the crossmember.2. Open the band securing the hose to the air filter.3. Remove the cold air intake and hose.
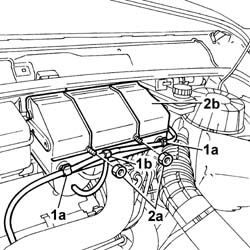
1. Open the retaining clips (1a) and move pipe (1b) out of the way.2. Undo the fixing nuts (2a) and remove the protective cover (2b).
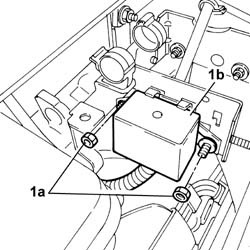
1. Undo the fixing nuts (1a) and move the control unit (1b) away from the work area.
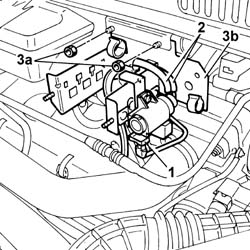
1. Disonnect the electrical connection for the waste gate valve.2. Disconnect the vacuum pipes.3. Undo the fixing nuts (3a) and remove the bracket (3b).
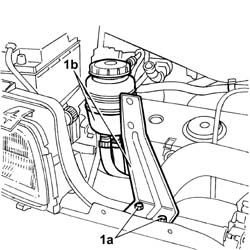
1. Undo the fixing bolts (1a) and move the fluid reservoir (1b) and mounting bracket outside of the work area.
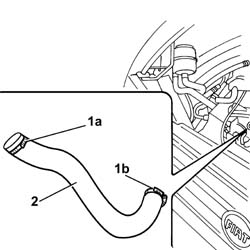
1. Undo the fixing bands (1a) and (1b).2. Remove the turbocharger intercooler air hose.
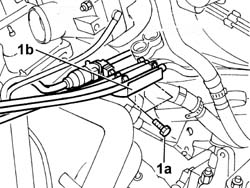
1. Undo the fixing bolts (1a) and move the fuel pipe mounting bracket (1b) aside.
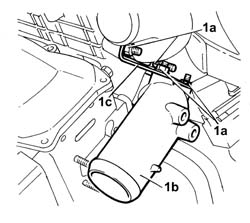
1. Undo the fixing nuts (1a) and remove the hose (1b) and the mounting bracket (1c).
1. Open the fastening bands (1a) and remove the air hose (1b).
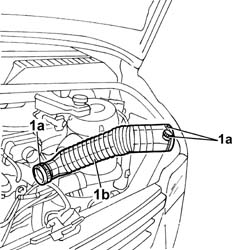
1. Undo the fixing nuts (1a) and move the front section (1b) of the exhaust pipe aside.
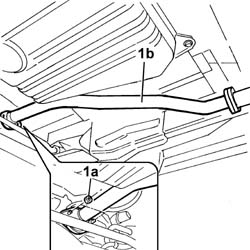
1. Undo the fixing bolts (1a) and disconnect the turbocharger oil outlet pipe (1b).
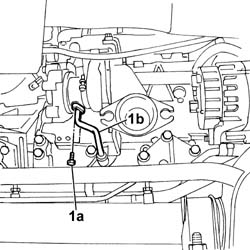
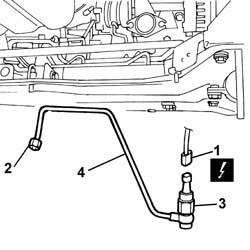
- Undo the bolt fixing the oil pipe to the turbocharger mounting bracket.1. Disconnect the electrical connection for the engine oil pressure sensor.
| Description | Connector | |
|---|---|---|
| 1 | Engine oil pressure sensor | K028 |
2. Undo the connector for the oil pipe.3. Undo the sensor and remove it.4. Remove the oil pipe.
1. Undo the fixing bolts (1a) and remove the turbochrger mounting bracket (1b).
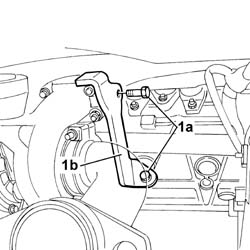
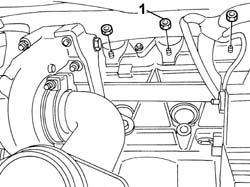
1. Undo the bolts fixing the exhaust manifold.
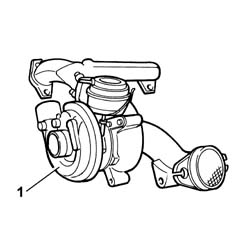
1. Remove the turbocharger and exhaust manifold assembly.
Refitting
- Fit the exhaust manifold and turbocharger assembly in place and tighten the nuts to torque.
| Value - daNm | Fastening | Component | Ø | |
|---|---|---|---|---|
| 2,5 | Nut | M8x1.25 |
- Fit the mounting bracket for the turbocharger and tighten the fixing bolts.- Connect the oil return pipe to the turbine and tighten the fixing bolts.- Fit the rigid oil pipe and tighten the connector to the turbine.- Fit the engine oil pressure sensor in place and connect the electrical connection.
| Description | Connector | |
|---|---|---|
| Engine oil pressure sensor | K028 |
- Fit the front section of the exhaust pipe in place and tighten the fixing nuts.- Fit the rigid section of the air pipe to the turbine and the mounting bracket in place and tighten the fixing nuts. - Fit the air hose and restore the retaining bands.- Tighten the fuel pipe mounting bracket fixing bolts.- Fit the air hose from the turbocharger to the air/air heat exchanger.- Position the fluid reservoir and mounting bracket and tighten the fixing bolts.- Place the waste gate valve mounting bracket in position and tighten the fixing nuts.- Connect the waste gate valve vacuum pipes.- Place the control unit in position and tighten the fixing nuts.- Fit the protective cover and tighten the fixing nuts and fit the pipe in place on the cover.- Fit the cold air intake and hose and tighten the fixing bolts and renew the hose fastening band.- Connect the negative battery terminal.- Remove the vehicle from the lift.
Parts & tools for this job For 2002 Fiat Ducato
- PARTExhaust gasketSearch: Fiat Ducato 2002 exhaust gasket
- TOOLPenetrating oilSearch: penetrating oil
- TOOLOBD2 scannerSearch: OBD2 scanner
Links open Amazon search results in a new tab. As an Amazon Associate I earn from qualifying purchases.