
Supplementary pressure pump - r r
- Make
- Fiat
- Model
- Multipla Factory Service Manual
- Year
- 1998–2010
- Section
- Diesel fuel injection › Supplementary pressure pump - r r
Supplementary pressure pump - r r
Removing
- 4450B10 Front WHEEL (one) - R.R.
- 7055B42 Additional FRONT WHEEL ARCH (one), left or right - R.R.
- 1092G10 single engine belt r r
- 1092A12 crankshaft pulley - r+r for versions with air conditioner
- 1032D12 timing system protective cover(s) - r + r
- 1016A10 sound-proofing cover - r + r
- 1008C10 power unit upper reaction link r r
- 1008C14 engine link bracket - r r
- 1060E30 pressure pump pulley - r r
- 1060F50 fuel return manifold - r r
- 1060F20 pressure pump/manifold pipe - r r
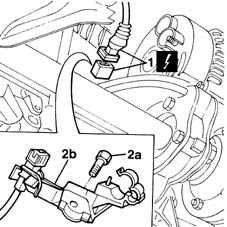
1. Disconnect the electrical connection for the rpm sensor.
| Name | Connector | |
|---|---|---|
| 1 | RPM sensor | K46 |
2. Unscrew retaining bolts (2a) and move wiring bracket (2b) out of the way.
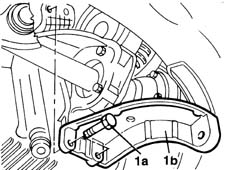
1. Undo bolts (1a) and remove rear alternator mounting bracket (1b).
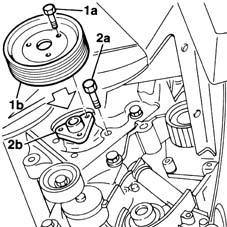
1. Undo bolts (1a) and remove power steering pump pulley (1b).
2. Undo bolts (2a) and move power steering pump (2b) back out of the way.
Lower the vehicle.
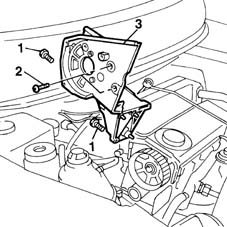
1. Undo the bolts securing the mounting to the crankcase.
2. Undo the bolts securing the mounting to the intake manifold.
3. Remove the pressure pump mounting.
Refitting
Fit the pressure pump mount.
Tighten the bolts securing the mount to the intake manifold.
| Fastening | Component | Ø | Value (daNm) | |
|---|---|---|---|---|
| Bolt | INJECTION PRESSURE PUMP MOUNT | M8 | 2.5 |
Tighten the bolts securing the mount to the crankcase.
| Fastening | Component | Ø | Value (daNm) | |
|---|---|---|---|---|
| Bolt | INJECTION PRESSURE PUMP MOUNT | M8 | 2.5 |
Raise the car.
Fit the power steering pump and tighten the bolts securing it to the mount to torque.
| Fastening | Component | Ø | Value (daNm) | |
|---|---|---|---|---|
| Bolt | POWER STEERING PUMP | M8 | 2.5 |
Fit the power steering pump pulley.
Fit the alternator rear mounting bracket and tighten the bolts to torque.
| Fastening | Component | Ø | Value (daNm) | |
|---|---|---|---|---|
| Bolt | ALTERNATOR ASSEMBLY | M8 | 2.5 |
Fit the electrical wiring bracket and tighten the retaining nut.
Connect the electrical connection for the rpm sensor.
| Name | Connector | |
|---|---|---|
| RPM sensor | K46 |
- 1060F20 pressure pump/manifold pipe - r r
- 1060F50 fuel return manifold - r r
- 1060E30 pressure pump pulley - r r
- 1008C14 engine link bracket - r r
- 1008C10 power unit upper reaction link r r
- 1016A10 sound-proofing cover - r + r
- 1032D12 timing system protective cover(s) - r + r
- 1092A12 crankshaft pulley - r+r for versions with air conditioner
- 1092G10 single engine belt r r
- 7055B42 Additional FRONT WHEEL ARCH (one), left or right - R.R.
Parts & tools for this job For 1998 Fiat Multipla
- PARTGlow plugsSearch: Fiat Multipla 1998 glow plugs
- TOOLGlow plug socketSearch: glow plug socket
- TOOLDiesel compression testerSearch: diesel compression tester
Links open Amazon search results in a new tab. As an Amazon Associate I earn from qualifying purchases.