
Lines to injectors - r r
- Make
- Fiat
- Model
- Ulysse Factory Service Manual
- Year
- 2002–2010
- Section
- Diesel injection system › Lines to injectors - r r
LINES TO INJECTORS - R R
Removing
Op. 5530B56 BATTERY DRIP TRAY COVER - R.R.
Op. 5010B18 CLIMATE CONTROL UNIT AIR INTAKE - R.R.
Op. 5050B34 WINDSCREEN WIPER ARM/S COMPLETE WITH BLADE - R+R
Op. 7055A18 L/H OR R/H SIDE RUBBING STRIP DECORATIVE SEAL - R+R
Op. 5050B38 WINDSCREEN WIPER ASSEMBLY - R+R OR REPAIR
See in Op. 1048A10
See in Op. 1080C54
See in Op. 1044B10
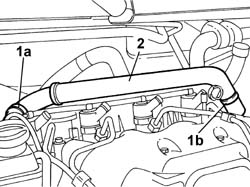
1. Open the retaining band (1a) using special pliers and the disposable band (1b).
2. Remove the oil vapour pipe.
| Description | Code | Function | |
|---|---|---|---|
| Caliper | 1.881.138.000 | Open the retaining bands |
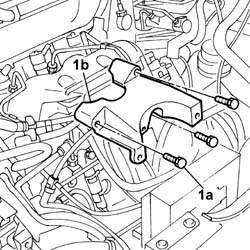
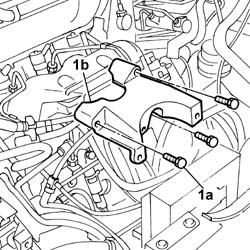
1. Undo the fixing bolts (1a) and remove the fuel filter mounting (1b).
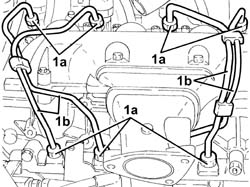
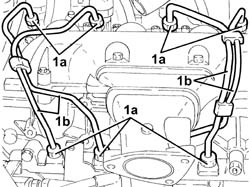
1. Undo the connectors (1a) and remove the rigid fuel supply pipes from the single fuel pipe to the injectors (1b).
Refitting
- Fit the new rigid fuel supply pipes from the single fuel manifold pipe to the individual injectors in place and tighten the connectors to the recommended torque.
- Place the fuel filter mounting in position and tighten the fixing bolts.
- Fit the oil vapour pipes in place and renew the retaining bands.
| Description | Code | Function | |
|---|---|---|---|
| Caliper | 1.881.138.000 | Open the retaining bands |
- Connect the electrical connections for the injectors
See in Op. 1044B10
See in Op. 1080C54
See in Op. 1048A10
Op. 5050B38 WINDSCREEN WIPER ASSEMBLY - R+R OR REPAIR
Op. 7055A18 L/H OR R/H SIDE RUBBING STRIP DECORATIVE SEAL - R+R
Op. 5050B34 WINDSCREEN WIPER ARM/S COMPLETE WITH BLADE - R+R
Op. 5010B18 CLIMATE CONTROL UNIT AIR INTAKE - R.R.
Op. 5530B56 BATTERY DRIP TRAY COVER - R.R.
- If necessary, top up the coolant fluid level.
Removing
Op. 5530B56 BATTERY DRIP TRAY COVER - R.R.
Op. 5010B18 CLIMATE CONTROL UNIT AIR INTAKE - R.R.
Op. 5050B34 WINDSCREEN WIPER ARM/S COMPLETE WITH BLADE - R+R
- < R1 > [both]
Op. 7055A18 L/H OR R/H SIDE RUBBING STRIP DECORATIVE SEAL - R+R
Op. 5050B38 WINDSCREEN WIPER ASSEMBLY - R+R OR REPAIR
See in Op. 1048A10
See in Op. 1080C54
See in Op. 1044B10
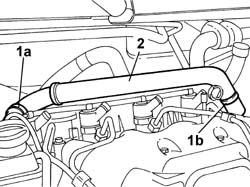
1. Open the retaining band (1a) using special pliers and the disposable band (1b).
2. Remove the oil vapour pipe.
| Description | Code | Function | |
|---|---|---|---|
| Caliper | 1.881.138.000 | Open the retaining bands |
1. Undo the fixing bolts (1a) and remove the fuel filter mounting (1b).
1. Undo the connectors (1a) and remove the rigid fuel supply pipes from the single fuel manifold to the injectors (1b).
Refitting
- Fit the new rigid fuel supply pipes from the single fuel manifold to the individual injectors in place and tighten the connectors to the recommended torque.
- Place the fuel filter mounting in position and tighten the fixing bolts.
- Fit the oil vapour pipes in place and renew the retaining bands.
| Description | Code | Function | |
|---|---|---|---|
| Caliper | 1.881.138.000 | Open the retaining bands |
- Connect the electrical connections for the injectors.
See in Op. 1044B10
See in Op. 1080C54
See in Op. 1048A10
Op. 5050B38 WINDSCREEN WIPER ASSEMBLY - R+R OR REPAIR
Op. 7055A18 L/H OR R/H SIDE RUBBING STRIP DECORATIVE SEAL - R+R
Op. 5050B34 WINDSCREEN WIPER ARM/S COMPLETE WITH BLADE - R+R
Op. 5010B18 CLIMATE CONTROL UNIT AIR INTAKE - R.R.
Op. 5530B56 BATTERY DRIP TRAY COVER - R.R.
- If necessary, top up the coolant fluid level.
Parts & tools for this job For 2002 Fiat Ulysse
- PARTFuel filterSearch: Fiat Ulysse 2002 fuel filter
- TOOLFuel pressure test kitSearch: fuel pressure test kit
- TOOLFuel line disconnect toolSearch: fuel line disconnect tool
Links open Amazon search results in a new tab. As an Amazon Associate I earn from qualifying purchases.