
ENGINE - PRE-HEATING SYSTEM – Malfunction - Diagnostic Procedure
- Make
- Lancia
- Model
- Thesis Factory Service Manual
- Year
- 2002–2009
- Section
- Engine › ENGINE - PRE-HEATING SYSTEM – Malfunction - Diagnostic Procedure
ENGINE - PRE-HEATING SYSTEM – Malfunction - Diagnostic Procedure
ENGINE - PRE-HEATING SYSTEM
Malfunction - Diagnostic Procedure
OPERATIONS IN NETWORK
In addition to the instructions in the Service Manuals in your possession, we are enclosing the diagnostic procedure for determining the causes of the pre-heating system malfunction.
When carrying out the diagnostic procedure, at the end of each operation check whether the action taken has solved the problem and whether the symptom is no longer present. In this case the diagnostic procedure is over and has led to the problem being identified and solved. If this is not the case, the fault is still present and it is therefore necessary to continue with the diagnostic procedure starting again from the Step indicated in "All OK".
Diagnostic Procedure 10 037 | 1.9 JTD - 2.4 JTD Engines: engine failure signal and heater plugs warning light on intermittently |
| Symptom/Conditions: once the engine has been started, at the end of the pre-heating period, the heater plugs warning light flashes for around 30 seconds |
| Procedure | ||||
|---|---|---|---|---|
| Results of the tests | ||||
| Step | Operation to be carried out | |||
| 0 | PRELIMINARY CHECKS | All OK | Problems found | Operation |
That the engine wiring negative lead and the negative battery lead are correctly earthed The correct fixing of positive battery terminal and that all leads are connected to it | Move on to Step 1 | Fastenings slack and oxidized | Restore electrical continuity and correct fastening of cables and connections for wiring concerned | |
Pre-heating control unit supply voltage measured at the appropriate connector Supply voltage measured at the individual heater plugs Pre-heating control unit (power) supply fuse continuity | Pre-heating control unit not activated | Restore electrical continuity of supply leads and activation cable coming from the engine management control unit and the correct fastening of the leads and connections for the wiring involved | ||
Continuity of lead from engine management control unit to pre-heating control unit Continuity of return lead from pre-heating control unit to engine management control unit | Heater plugs do not heat up | Restore electrical continuity and correct fastening of cables and connections for wiring concerned | ||
| 1 | HEATER PLUGS CHECK | All OK | Problems found | Operation |
| Check that the resistance value for each individual heater plug (with the engine at ambient temperature) is between 0.5 and 1 Ohm | Move on to Step 2 | Resistance values higher or lower than the set limits | Replace the heater plugs and carry out procedure 1 for restoring correct operation | |
| 2 | CHECK ON PRE-HEATING CONTROL UNIT ACTIVATION COMMAND FROM ENGINE MANAGEMENT CONTROL UNIT | All OK | Problems found | Operation |
| Check that at the key on the signal at pin K (for 4 cylinder engines) or at pin ST (for 5 cylinder engines) for the pre-heating control unit switches from 12v to 0v or returns to 12v at the end of the heater plugs supply period (pre-heating plus post-heating) as illustrated in the graph in Fig. 2 | Move on to Step 3 | No pre-heating control unit activation signal | Replace the engine management control unit and carry out procedure 1 to restore correct operation | |
| 3 | PRE-HEATING CONTROL UNIT CHECK | All OK | Problems found | Operation |
| Check that the supply voltage reaches the individual heater plugs correctly | Move on to Step 4 | No heater plugs supply | Replace the pre-heating control unit and carry out procedure 1 to restore correct operation | |
| 4 | CHECK ON PRE-HEATING CONTROL UNIT RETURN SIGNAL TO ENGINE MANAGEMENT CONTROL UNIT | All OK | Problems found | Operation |
| Check that at the key on the signal at pin DI for the pre-heating control unit switches from 0v to 12v and returns to 0v at the end of the heater plugs supply period (pre-heating plus post-heating) as illustrated in the graph in Fig. 2 | End of diagnosis | The voltage at pin DI always stays at 0v or 12v | Replace the pre-heating control unit and carry out procedure 1 to restore correct operation If the fault persists, notify TE.SE.O. Market Product | |
Fig. 1 - Pre-heating system circuit
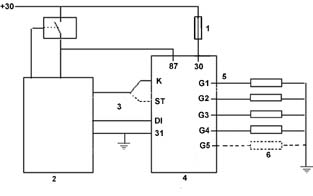
- Power supply fuse
- Engine management control unit
- Connection activation (pin K for 4 cylinders or pin ST for 5 cylinders) and fault diagnosis (pin DI) with engine management control unit
- Heater plugs control unit
- Heater plugs connection
- Heater plugs
- K - Heater plugs
K Pin used for 4 cylinder vehicles
ST Pin used for 5 cylinder vehicles
Fig. 2 - Progress of pre-heating system activation/fault diagnosis signals
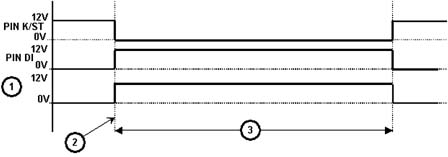
- Heater plugs upply
- Key on
- Heater plugs supply time
PROCEDURE 1 - RESTORING PRE-HEATING SYSTEM CORRECT OPERATION
Introduction:
Each time any of the pre-heating system components is replaced/repaired (pre-heating control unit, heater plugs, engine management control unit, wiring), a complete heater plugs activation cycle plus heater plugs warning light flashing (described below) must be carried out in order to allow the error in the engine management control unit to be correctly deleted and prevent the heater plugs warning light from continuing to flash in the instrument panel when there is no fault in the pre-heating system.
OPERATING CYCLE
Carry out the following operations in the order given:
- Turn the ignition key ON and wait for the heater plugs warning light to go out (pre-heating stage).
- Start up the engine and wait for the pre-heating control unit to be deactivated (the heater plugs warning light should be off during this stage)
- (If there is a problem in the pre-heating system) the heater plugs warning light will start to flash for about 30 seconds.
- At the end of this stage, turn the ignition key OFF and repeat the starting procedure.
- If, at the end of the pre-heating control unit activation, the heater plugs warning light does not flash any more (defect no longer present), delete the error in the memory using the diagnostic equipment (Examiner or Examiner Plus), or else proceed carrying out the other checks described in the diagnostic procedure (defect still present).
Parts & tools for this job For 2002 Lancia Thesis
- TOOLOBD2 scannerSearch: OBD2 scanner
- TOOLDigital multimeterSearch: automotive digital multimeter
- TOOLBack-probe test leadsSearch: back probe test leads
Links open Amazon search results in a new tab. As an Amazon Associate I earn from qualifying purchases.