
Windscreen (page 4 of 4)
- Make
- Rover
- Model
- 200 Body Repair Manual
- Year
- 1995–1999
- Section
- Screens
BodyWindscreen · page 4 of 4
- Apply primer (red top) to screen aperture.
NOTE: At this point, sealant re-activator (blue top) may be applied to old sealant band around screen aperture.
- Fit pre-cut nozzle to sealer cartridge, remove lid and shake out crystals. Install in applicator gun.
NOTE: Nozzle will need modification to achieve required bead section.
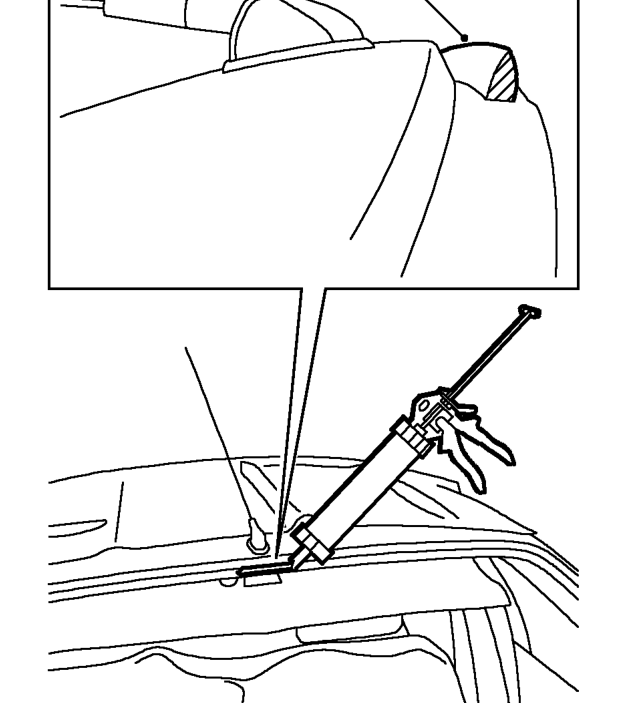
- Apply a continuous bead of sealant around aperture as shown. Make bead slightly thicker at each corner.
- Check for breaks or air bubbles in sealant.
- With assistance, lift screen into place and align to tape. Lightly press glass to seat sealer.
- Fit and tighten screws to spacers.
- Remove protective covers and tape.
- Test screen for leaks and apply additional sealant if necessary. If water is used, allow sealant to dry before testing.
- Fit plenum air intake. See HEATING & VENTILATION, Repairs.
- Fit trim studs securing headlining to roof.
- Fit sunroof aperture finisher.
- Fit sunroof switch escutcheon.
- Fit sun visor catches to headlining and secure with screws.
- Fit sun visors to headlining and secure with screws.
- Fit both ’A’ post upper trim casings. See Interior trim components.
- Fit rear view mirror to windscreen.
CAUTION: Vehicles fitted with drivers or passenger airbags should NOT be driven for 24 hours. During this time leave a window open and do not slam the doors.
Parts & tools for this job For 1995 Rover 200
- TOOLTrim removal tool kitSearch: trim removal tool kit
- PARTTouch-up paintSearch: Rover touch up paint
- PARTPanel clip assortmentSearch: Rover panel clips assortment
Links open Amazon search results in a new tab. As an Amazon Associate I earn from qualifying purchases.