
Camshaft rear oil seal
- Make
- Rover
- Model
- 400 Workshop Manual Supplement
- Year
- 1999
- Section
- Repairs › Camshaft rear oil seal
Engine - K SeriesCamshaft rear oil seal
CAMSHAFT REAR OIL SEAL
Service repair no - 12.13.06
Remove
- Disconnect battery earth lead.
- Remove air cleaner assembly. See WORKSHOP MANUAL - ENGINE MANAGEMENT - MEMS, Repairs.
- Remove distributor cap and rotor arm. See WORKSHOP MANUAL - ENGINE MANAGEMENT - MEMS, Repairs.
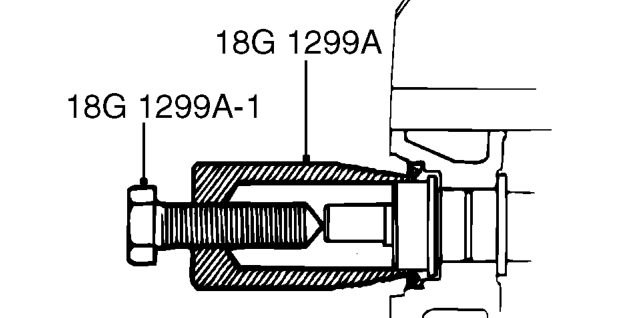
- Screw tool 18G 1299A into camshaft rear oil seal.
- Tighten centre bolt, tool 18G 1299A-1, to remove seal.
- Remove camshaft oil seal.
Refit
- Clean sealing area of cylinder head and camshaft carrier, ensuring all traces of rubber are removed. DO NOT use a scraper as this may damage sealing surfaces.
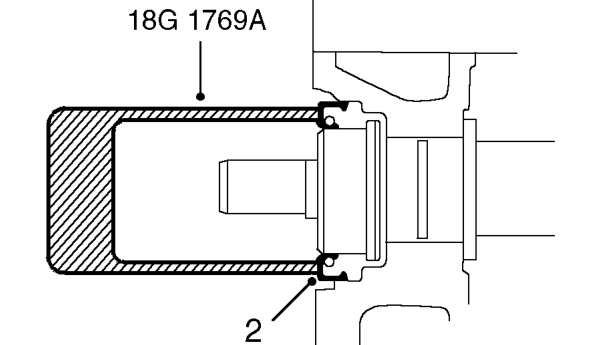
- Using tool 18G 1769A, fit new camshaft oil seal.
NOTE: This oil seal is coloured RED.
CAUTION: Oil seal must be fitted dry. Do not use tool 18G 1769.
- Fit rotor arm and distributor cap. See WORKSHOP MANUAL - ENGINE MANAGEMENT - MEMS, Repairs.
- Fit air cleaner assembly. See WORKSHOP MANUAL - ENGINE MANAGEMENT - MEMS, Repairs.
- Connect battery earth lead.
Parts & tools for this job For 1999 Rover 400
- PARTEngine gasket setSearch: Rover 400 1999 engine gasket set
- TOOLTorque wrenchSearch: 3/8 inch torque wrench
- TOOLFeeler gauge setSearch: feeler gauge set
Links open Amazon search results in a new tab. As an Amazon Associate I earn from qualifying purchases.