
All models
- Make
- Rover
- Model
- 400 Workshop Manual
- Year
- 1995–2000
- Section
- Repairs › All models
Drive shaftsAll models
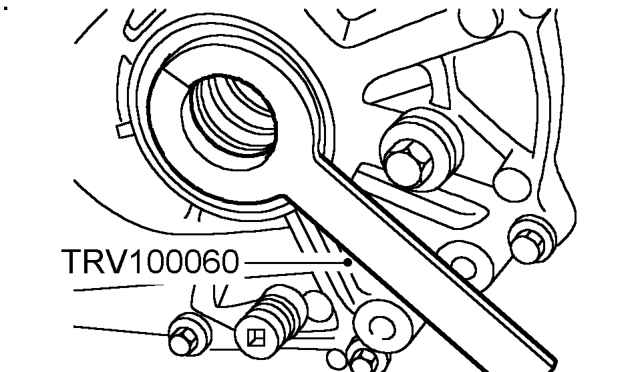
- Fully insert oil seal protector tool (Unipart TRV 100060) into differential oil seal so that oil seal lip is protected, ensure split end is butted correctly.
- Fit NEW circlip to groove in drive shaft and lubricate oil seal running surfaces.
- Ensuring drive shaft is kept horizontal, insert drive shaft through the seal protector until the drive shaft begins to engage the differential splines.
- Remove seal protector by pulling carefully on the seal protector tail.
- Push drive shaft fully home until circlip locks in differential groove. Pull on inner housing to ensure circlip is fully engaged.
All models
- Clean lower ball joint taper and seat
- Pull hub outwards, connect drive shaft to hub and engage ball joint to lower arm.
- Tighten lower ball joint nut to 50 Nm and fit new split pin.
NOTE: If necessary, tighten nut only to align next split pin hole.
- Fit damper fork over lower arm then align to damper.
- Fit clamp bolt and tighten to 43 Nm.
- Fit bolt and nut securing fork to lower arm but do not tighten.
NOTE: Bolt to be tightened with vehicle weight on damper.
- Fit drive shaft nut, tighten to 181 Nm and stake nut to shaft.
- Fit road wheel(s) and tighten nuts to correct torque. See INFORMATION, Torque wrench settings.
- Remove stand(s) and lower vehicle.
- Tighten bolt and nut securing fork to lower arm to 64 Nm.
- Check and top up gearbox oil. See MAINTENANCEMaintenance.
Parts & tools for this job For 1995 Rover 400
- PARTWheel bearingSearch: Rover 400 1995 wheel bearing
- TOOLBearing puller kitSearch: wheel bearing puller kit
- PARTCV boot kitSearch: Rover 400 1995 cv boot kit
Links open Amazon search results in a new tab. As an Amazon Associate I earn from qualifying purchases.