
Inspect (page 3 of 3)
- Make
- Rover
- Model
- Coupé, Cabriolet & Tourer 200/400 Coupé, Cabriolet & Tourer Workshop Manual
- Section
- Maintenance
MaintenanceInspect · page 3 of 3
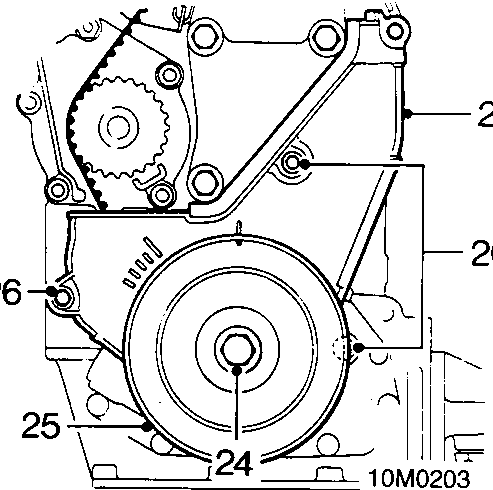
- Remove crankshaft pulley bolt and washer.
- Remove crankshaft pulley.
- Remove 3 bolts securing timing belt lower cover.
- Remove lower cover and rubber seals.
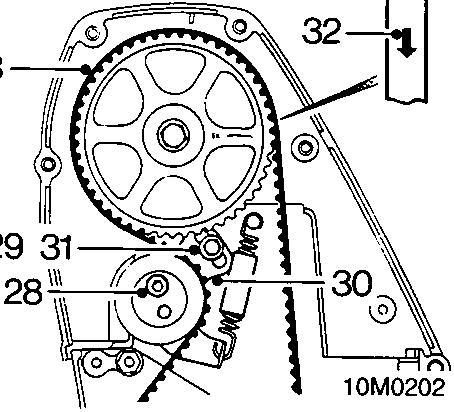
- Slacken tensioner pulley bolt ½ turn.
- Slacken tensioner backplate screw ½ turn.
- Push tensioner pulley down to fully OFF position.
- Tighten screw to 10 Nm.
- Ease timing belt from gears; discard belt.
CAUTION: Do not rotate crankshaft or camshaft with timing belt removed and cylinder head fitted.
- Clean timing gears and pulleys.
- Check correct alignment of timing marks for 90° B.T.D.C.
Note: Crankshaft gear dots are aligned with flange on oil pump; camshaft gear mark to right aligns with top face of cylinder head.
- Fit timing belt over crankshaft gear and then over camshaft gear keeping belt taut from crankshaft to camshaft gears.
- Using fingers only, ease timing belt over tensioner pulley and coolant pump drive gear ensuring belt is positioned centrally around gears and pulley.
- Ensure inserts are fitted in timing belt lower cover.
- Fit timing belt lower cover, ensuring correct position of seals; tighten screws to 10 Nm.
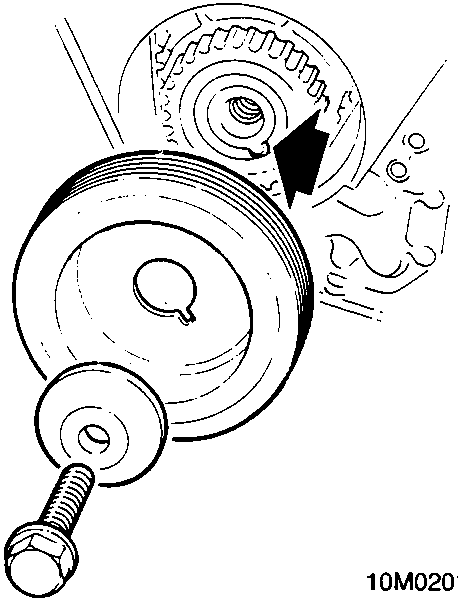
- Fit crankshaft pulley to crankshaft gear ensuring that indent on pulley locates over gear lug (arrowed).
- Fit crankshaft pulley bolt and washer, tighten bolt to 160 Nm.
- Remove tool 18G 1571.
- Position starter motor to flywheel housing, position earth lead; fit bolts and tighten to 45 Nm.
- Position starter motor bracket to studs on engine, fit but do not tighten washers and nuts.
- Fit bolt and washer securing bracket to starter motor.
- Tighten starter motor bracket bolt to 45 Nm and nuts to 25 Nm.
- Fit terminal lead; tighten nut.
- Connect Lucars to starter motor.
- Position rubber washers, fit engine R.H. mounting; fit but do not tighten mounting to body bolt.
- Fit but do not tighten mounting to engine nuts.
- Tighten mounting bolt to 100 Nm and nuts to 82 Nm.
- Remove jack.
- Slacken but do not remove tensioner backplate screw.
- Rotate crankshaft clockwise 2 complete revolutions and align camshaft gear timing gear with top face of cylinder head.
- Tighten tensioner backplate screw to 10 Nm.
- Tighten tensioner pulley bolt to 45 Nm.
- Ensure inserts are fitted in timing belt upper front cover.
Parts & tools for this job For Rover Coupé, Cabriolet & Tourer
- PARTOil filterSearch: Rover Coupé, Cabriolet & Tourer oil filter
- TOOLOil filter wrenchSearch: oil filter wrench
- FLUIDEngine oilSearch: Rover Coupé, Cabriolet & Tourer engine oil
Links open Amazon search results in a new tab. As an Amazon Associate I earn from qualifying purchases.