
4.REMOVE CONNECTING ROD BEARING - Toyota Hilux AN120/AN130 2015-2018 Workshop Manual
- Make
- Toyota
- Model
- Hilux Toyota Hilux AN120/AN130 2015-2018 Workshop Manual
- Section
- DISASSEMBLY › 4.REMOVE CONNECTING ROD BEARING - Toyota Hilux AN120/AN130 2015-2018 Workshop Manual
‹ Prev 3.REMOVE PISTON AND CONNECTING ROD SUB-ASSEMBLY - Toyota Hilux AN120/AN130 2015-2018 Workshop ManualNext › 7.INSPECT CRANKSHAFT THRUST CLEARANCE - Toyota Hilux AN120/AN130 2015-2018 Workshop Manual
CYLINDER BLOCK4.REMOVE CONNECTING ROD BEARING - Toyota Hilux AN120/AN130 2015-2018 Workshop Manual
4.REMOVE CONNECTING ROD BEARING
13041
4.REMOVE CONNECTING ROD BEARING
a. Remove the No. 1 connecting rod bearings and No. 2 connecting rod bearings from the connecting rod sub- assemblies and connecting rod caps.
HINT: Arrange the removed parts in the correct order.
13011
5.REMOVE PISTON RING SET
HINT: Arrange the piston rings in the correct order.
a.
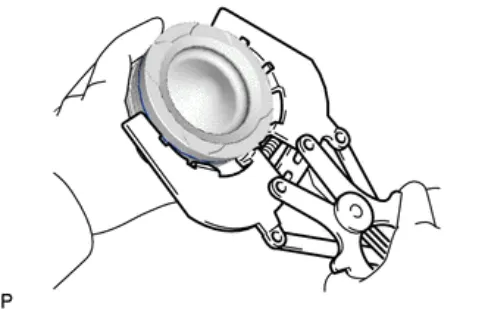
Using a piston ring expander, remove the No. 1 compression ring and No. 2 compression ring from the piston.
b. Using a piston ring expander, remove the oil ring rail from the piston.
c. Remove the oil ring expander from the piston by hand.
13101
6.REMOVE PISTON WITH PIN SUB-ASSEMBLY
a.
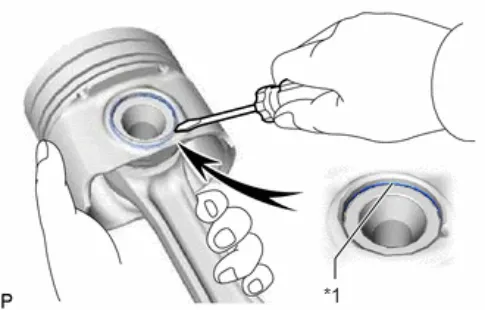
*1 Piston Pin Hole Snap Ring
Using a small screwdriver, pry out the front side piston pin hole snap ring from the piston.
b. Gradually heat the piston to approximately 80°C (176°F).
‹ Prev 3.REMOVE PISTON AND CONNECTING ROD SUB-ASSEMBLY - Toyota Hilux AN120/AN130 2015-2018 Workshop ManualNext › 7.INSPECT CRANKSHAFT THRUST CLEARANCE - Toyota Hilux AN120/AN130 2015-2018 Workshop Manual
Parts & tools for this job For Toyota Hilux
- TOOLTorque wrenchSearch: 3/8 inch torque wrench
- TOOLSocket setSearch: socket set metric
- BOOKHaynes manualSearch: Haynes manual Toyota Hilux
As an Amazon Associate we earn from qualifying purchases.