
Front suspension beam - r r
- Make
- Alfa Romeo
- Model
- 147 Factory Service Manual
- Year
- 2000–2004
- Section
- Front suspension › Front suspension beam - r r
Front suspension beam - r r
Removing
Position the vehicle on the ramp.
Proceed with removal - 1016A40 ignition coil cover on cylinder head- r+r.
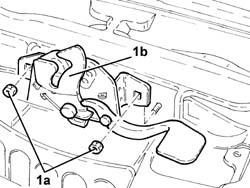
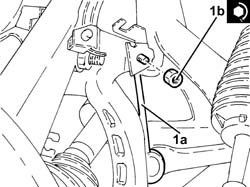
1. Undo nuts (1a) and move bonnet lid catch (1b) aside without disconnecting the bonnet opening cable.
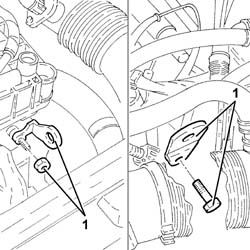
1. Fit two brackets to the engine to support the power unit the power unit safely as shown in the figure.
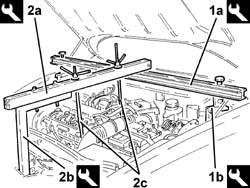
1. Fit the tool (1a), complete with support mountings (1b).
| Name | Country | |
|---|---|---|
| 1a | Crossmember | 1.820.581.000 |
| Name | Country | |
|---|---|---|
| 1b | Support mountings | 1.870.650.000 |
2. Fit the tools (2a) and (2b), then connect them using links (2c) to the brackets fitted previously.
| Name | Country | |
|---|---|---|
| 2a | Crossmember | 1.860.851.003 |
| Name | Country | |
|---|---|---|
| 2b | Vertical support | 1.870.748.000 |
Proceed with removal - 1072C44 exhaust manifold heat shield on bulkhead - r+r.
Proceed with removal - 4450B12 front or rear wheels (two) - r+r.
Proceed with the removal - 7055B64 Engine compartment DUST shield in front wheel arch (one), left or right - R.R. (Right and left sides).
Proceed with removal - 7055B54 under-engine guard - r r.
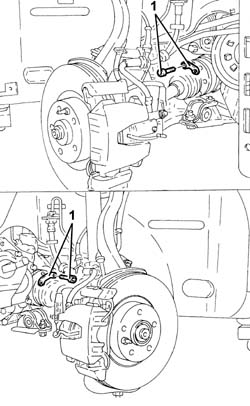
1. Unscrew the bolts securing the drive shafts to the internal differential/drive shaft.
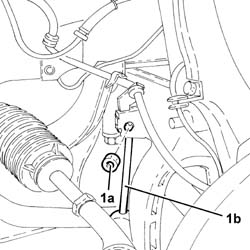
1. Undo the nuts (1a) and disconnect the front anti-roll bar joints (1b) from the front damper forks.
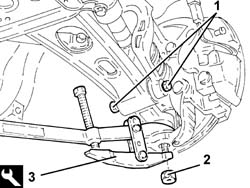
1. Undo the bolts fixing the front shock absorber forks to the lower track control arms. 2 Undo the nut for the bolts securing the fronts suspension lower wishbones to the knuckles.
3. Use the tool to disconnect the front suspension lower wishbone from the steering knuckles.
| Name | Country | |
|---|---|---|
| 3 | Extractor | 1.821.169.000 |
Proceed with removal - 1080B62 catalytic converter - r + r.
Proceed with removal - 1080B40 catalytic pre-converter - r r.
Proceed with removal - 1080B40 catalytic pre-converter - r r.
Proceed with removal - 1080B40 catalytic pre-converter - r r.
Proceed with removal - 1008A44 rear rigid mount - r r.
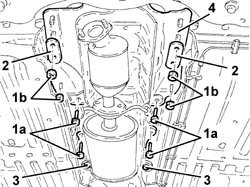
1. Undo bolts (1a) and nuts (1b) fixing the manual gear lever mounting.
2. Recover the plates.
3. Slacken the rear bolts fixing the manual gear lever mounting.
4. Lower the gearlever mount as necessary.
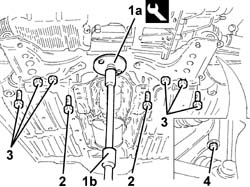
1. Fit the tool (1a) on the hydraulic jack (1b) to support the front suspension frame.
| Name | Country | |
|---|---|---|
| 1a | Flange | 1.860.978.000 |
2. Undo the bolts securing the power steering box to the front suspension crossmember.
3. Undo the rear bolts fixing the front suspension crossmember to the bodyshell.
4. Undo the side bolts fixing the front suspension crossmember to the bodyshell.
1. Release the power assisted steering system pipes from the front suspension beam bracket.
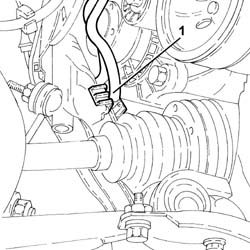
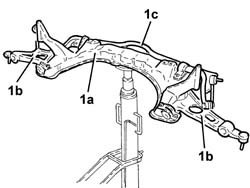
1. Slowly lower the hydraulic jack and remove the front suspension crossmember (1a) complete with lower track control arms (1b) and anti-roll bar (1c).
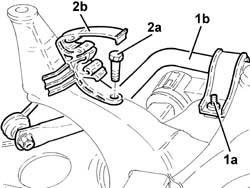
1. Working at the bench, undo the bolts (1a) and remove the anti-roll bar (1b) with joints.
2. Undo bolts (2a) and remove power steering system pipe bracket (2b).
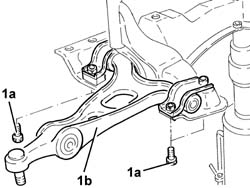
1. Undo the bolts (1a) and remove the front suspension lower wishbones (1b).
Refitting
1. Refit the front suspension lower wishbones (1a) and secure to the front suspension beam by tightening bolts (1b) to the specified torque.
| Fastening | Component | Ø | Value (daNm) | |
|---|---|---|---|---|
| 1b | Bolt | FRONT SUSPENSION LOWER LEVER | M10 | (Front suspension crossmember side) 7.1 ÷ 7.9 |
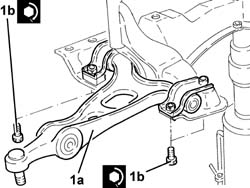
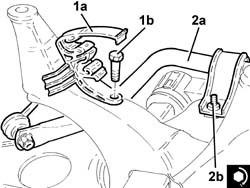
1. Refit power steering system pipe bracket (1a) and secure to the front suspension beam with bolt (1b).
2. Refit antiroll bar (2a) with joints and secure to the front suspension beam by tightening bolts (2b) to the specified torque.
| Fastening | Component | Ø | Value (daNm) | |
|---|---|---|---|---|
| 2b | Bolt | FRONT ANTI-ROLL BAR | M8 | (Front suspension crossmember side) 3.6 ÷ 4.4 |
Use a hydraulic jack with mounting tool to refit the front suspension beam with lower wishbones and anti-roll bar.
| Name | Country | |
|---|---|---|
| Flange | 1.860.978.000 |
Secure the power steering system pipes to the bracket on the front suspension beam.
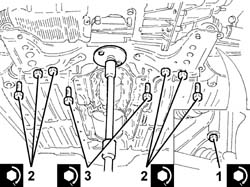
1. Tighten the side bolts securing the front suspension crossmember to the bodyshell to the recommended torque.
| Fastening | Component | Ø | Value (daNm) | |
|---|---|---|---|---|
| 1 | Side bolt | ENGINE OR ROD ANCHORAGE BEAM | M12 | (Bodyshell side) 10.8 ÷ 13.2 |
2. Tighten the rear bolts securing the front suspension crossmember to the bodyshell to the recommended torque.
| Fastening | Component | Ø | Value (daNm) | |
|---|---|---|---|---|
| 2 | Rear bolts | ENGINE OR ROD ANCHORAGE BEAM | M12 | (Bodyshell side) 10.8 ÷ 13.2 |
| Fastening | Component | Ø | Value (daNm) | |
|---|---|---|---|---|
| 2 | Rear bolt | ENGINE OR ROD ANCHORAGE BEAM | M10 | (Bodyshell side) 7.2 ÷ 8.8 |
3. Tighten the bolts securing the power steering box to the front suspension crossmember to the specified torque.
| Fastening | Component | Ø | Value (daNm) | |
|---|---|---|---|---|
| 3 | Bolt | POWER STEERING BOX | M14 | (Front suspension crossmember side) 11.7 ÷ 14.3 |
Remove the hydraulic jack with mounting tool from the front suspension beam.
Refit the handbrake control mount and secure with bolts and nuts.
Proceed with refitting - 1008A44 rear rigid mount - r r.
Proceed with refitting - 1080B40 catalytic pre-converter - r r.
Proceed with refitting - 1080B40 catalytic pre-converter - r r.
Proceed with refitting - 1080B62 catalytic converter - r + r.
Connect the front suspension lower wishbones to the knuckles.
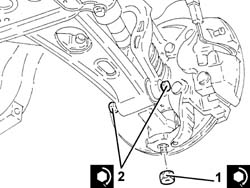
1. Connect the front suspension lower wishbones to the knuckles and secure by tightening the nuts to the required torque.
| Fastening | Component | Ø | Value (daNm) | |
|---|---|---|---|---|
| 1 | Nut | FRONT SUSPENSION LOWER LEVER | M14 | (Steering knuckle side) 8.6 ÷ 9.5 |
2. Tighten the bolts securing the front damper forks to the lower wishbones to the specified torque.
| Fastening | Component | Ø | Value (daNm) | |
|---|---|---|---|---|
| 2 | Bolt | FRONT DAMPER FORK ON WISHBONE | M12 | (Lower track control arm side) 10.8 ÷ 13.2 |
1. Connect the front anti-roll bar joints (1a) to the front damper brackets and secure them by tightening the nuts (1b) to the specified torque.
| Fastening | Component | Ø | Value (daNm) | |
|---|---|---|---|---|
| 1b | Nut | FRONT ANTI-ROLL BAR JOINTS | M10 | (Front shock absorber fork side) 4.1 ÷ 5.0 |
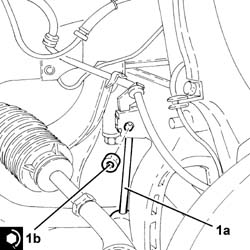
1. Tighten the bolts securing the drive shafts to the intermediate differential/drive shaft internal drive shaft to the specified torque.
| Fastening | Component | Ø | Value (daNm) | |
|---|---|---|---|---|
| 1 | Bolt | DRIVESHAFT | M8 | (Differential. internal. driveshaft./side..) 3.5 ÷ 4.3 |
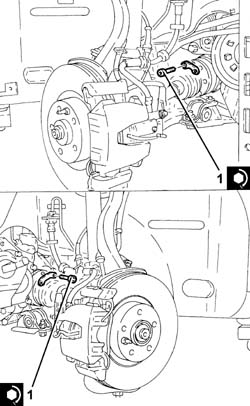
Proceed with refitting - 7055B54 under-engine guard - r r.
Proceed with the refitting - 7055B64 Engine compartment DUST shield in front wheel arch (one), left or right - R.R. (Right and left sides).
Proceed with refitting - 4450B12 front or rear wheels (two) - r+r.
Proceed with refitting - 1072C44 exhaust manifold heat shield on bulkhead - r+r.
Remove the safety tools used for supporting the power unit.
| Name | Country | |
|---|---|---|
| Crossmember | 1.860.851.003 |
| Name | Country | |
|---|---|---|
| Vertical support | 1.870.748.000 |
| Name | Country | |
|---|---|---|
| Crossmember | 1.820.581.000 |
| Name | Country | |
|---|---|---|
| Support mountings | 1.870.650.000 |
Refit the bonnet lid catch and secure with nuts.
Proceed with refitting - 1016A40 ignition coil cover on cylinder head- r+r.
Remove the car from the ramps.
Proceed with refitting - 4450A10 front wheel geometry - check using optical equipment - includes front wheel tow-in adjustment if necessary.
Removing
Position the vehicle on the ramp.
Proceed with removal - 1016A10 sound-proofing cover - r + r.
1. Undo nuts (1a) and move bonnet lid catch (1b) aside without disconnecting the bonnet opening cable.
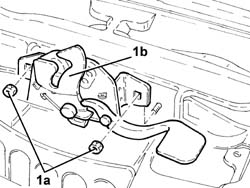
1. Fit a suitable bracket for supporting the power unit.
2. Fit the tool (2a), complete with support mountings (2b).
| Name | Country | |
|---|---|---|
| 2a | Crossmember | 1.820.581.000 |
| Name | Country | |
|---|---|---|
| 2b | Support mountings | 1.870.650.000 |
3. Fit the tools (3a) and (3b), then connect them using the rod (3c) to the bracket fitted previously.
| Name | Country | |
|---|---|---|
| 3a | Crossmember | 1.860.851.003 |
| Name | Country | |
|---|---|---|
| 3b | Vertical support | 1.870.748.000 |
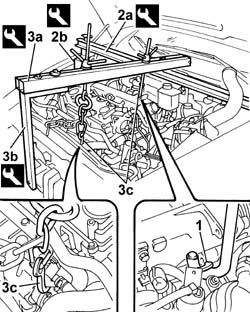
Proceed with removal - 4450B12 front or rear wheels (two) - r+r.
Proceed with removal - 7055B65 Engine compartment DUST PROTECTION in left front wheel arch - R.R..
Proceed with removal - 7055B66 Engine compartment DUST SHIELD protection in right front wheel arch - R.R..
Proceed with removal - 7055B54 under-engine guard - r r.
1. Unscrew the bolts securing the drive shafts to the internal differential/drive shaft.
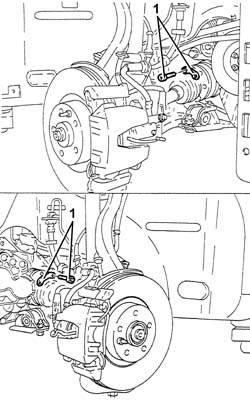
1. Undo the nuts (1a) and disconnect the front anti-roll bar joints (1b) from the front damper forks.
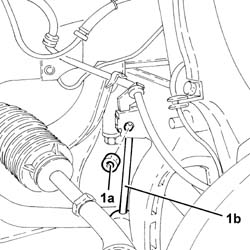
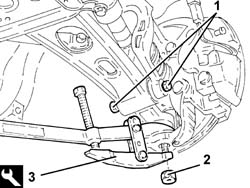
1. Undo the bolts fixing the front shock absorber forks to the lower track control arms. 2 Undo the nut for the bolts securing the fronts suspension lower wishbones to the knuckles.
3. Use the tool to disconnect the front suspension lower wishbone from the steering knuckles.
| Name | Country | |
|---|---|---|
| 3 | Extractor | 1.821.169.000 |
Proceed with removal - 1076B50 exhaust pipe attachment to engine - r + r.
Proceed with removal - 1008A44 rear rigid mount - r r.
Undo the bolts and remove the flexible mounting for the power unit rear support.
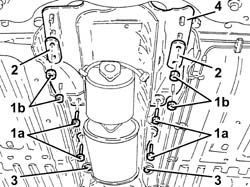
1. Undo bolts (1a) and nuts (1b) fixing the manual gear lever mounting.
2. Recover the plates.
3. Slacken the rear bolts fixing the manual gear lever mounting.
4. Lower the gearlever mount as necessary.
1. Fit the tool (1a) on the hydraulic jack (1b) to support the front suspension frame.
| Name | Country | |
|---|---|---|
| 1a | Flange | 1.860.978.000 |
2. Undo the bolts securing the power steering box to the front suspension crossmember.
3. Undo the rear bolts fixing the front suspension crossmember to the bodyshell.
4. Undo the side bolts fixing the front suspension crossmember to the bodyshell.
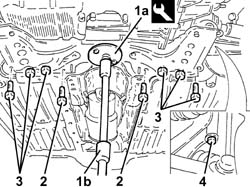
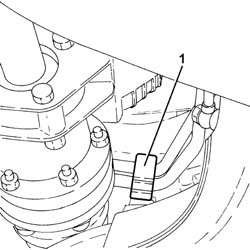
1. Release the power assisted steering system pipes from the front suspension beam bracket.
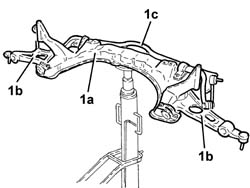
1. Slowly lower the hydraulic jack and remove the front suspension crossmember (1a) complete with lower track control arms (1b) and anti-roll bar (1c).
1. Working at the bench, undo the bolts (1a) and remove the anti-roll bar (1b) with joints.
2. Undo bolts (2a) and remove power steering system pipe bracket (2b).
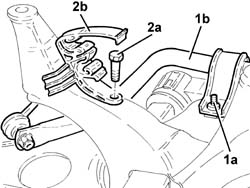
1. Undo the bolts (1a) and remove the front suspension lower wishbones (1b).
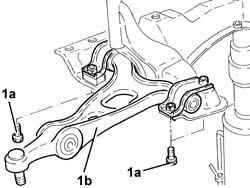
Refitting
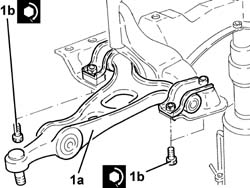
1. Refit the front suspension lower wishbones (1a) and secure to the front suspension beam by tightening bolts (1b) to the specified torque.
| Fastening | Component | Ø | Value (daNm) | |
|---|---|---|---|---|
| 1b | Bolt | FRONT SUSPENSION LOWER LEVER | M10 | (Front suspension crossmember side) 7.1 ÷ 7.9 |
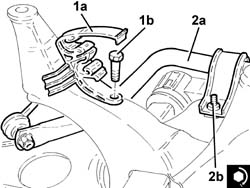
1. Refit power steering system pipe bracket (1a) and secure to the front suspension beam with bolt (1b).
2. Refit antiroll bar (2a) with joints and secure to the front suspension beam by tightening bolts (2b) to the specified torque.
| Fastening | Component | Ø | Value (daNm) | |
|---|---|---|---|---|
| 2b | Bolt | FRONT ANTI-ROLL BAR | M8 | (Front suspension crossmember side) 3.6 ÷ 4.4 |
Use a hydraulic jack with mounting tool to refit the front suspension beam with lower wishbones and anti-roll bar.
| Name | Country | |
|---|---|---|
| Flange | 1.860.978.000 |
Secure the power steering system pipes to the bracket on the front suspension beam.
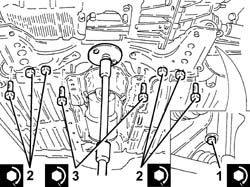
1. Tighten the side bolts securing the front suspension crossmember to the bodyshell to the recommended torque.
| Fastening | Component | Ø | Value (daNm) | |
|---|---|---|---|---|
| 1 | Side bolt | ENGINE OR ROD ANCHORAGE BEAM | M12 | (Bodyshell side) 10.8 ÷ 13.2 |
2. Tighten the rear bolts securing the front suspension crossmember to the bodyshell to the recommended torque.
| Fastening | Component | Ø | Value (daNm) | |
|---|---|---|---|---|
| 2 | Rear bolts | ENGINE OR ROD ANCHORAGE BEAM | M12 | (Bodyshell side) 10.8 ÷ 13.2 |
| Fastening | Component | Ø | Value (daNm) | |
|---|---|---|---|---|
| 2 | Rear bolt | ENGINE OR ROD ANCHORAGE BEAM | M10 | (Bodyshell side) 7.2 ÷ 8.8 |
3. Tighten the bolts securing the power steering box to the front suspension crossmember to the specified torque.
| Fastening | Component | Ø | Value (daNm) | |
|---|---|---|---|---|
| 3 | Bolt | POWER STEERING BOX | M14 | (Front suspension crossmember side) 11.7 ÷ 14.3 |
Remove the hydraulic jack with mounting tool from the front suspension beam.
Refit the handbrake control mount and secure with bolts and nuts.
Fit the flexible mounting for the power unit rear support and fix it tightening the bolts to the recommended torque.
| Fastening | Component | Ø | Value (daNm) | |
|---|---|---|---|---|
| Bolt | INTERM RUBBER MOUNT | M8 | (Front suspension crossmember side) 3.2 ÷ 3.9 |
Proceed with refitting - 1008A44 rear rigid mount - r r.
Proceed with refitting - 1076B50 exhaust pipe attachment to engine - r + r.
Connect the front suspension lower wishbones to the knuckles.
1. Connect the front suspension lower wishbones to the knuckles and secure by tightening the nuts to the required torque.
| Fastening | Component | Ø | Value (daNm) | |
|---|---|---|---|---|
| 1 | Nut | FRONT SUSPENSION LOWER LEVER | M14 | (Steering knuckle side) 8.6 ÷ 9.5 |
2. Tighten the bolts securing the front damper forks to the lower wishbones to the specified torque.
| Fastening | Component | Ø | Value (daNm) | |
|---|---|---|---|---|
| 2 | Bolt | MANUAL GEARBOX | M10 | (Crankcase sump side) 5.0 ÷ 6.0 |
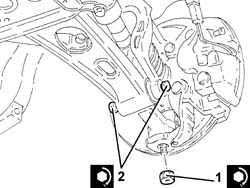
1. Connect the front anti-roll bar joints (1a) to the front damper brackets and secure them by tightening the nuts (1b) to the specified torque.
| Fastening | Component | Ø | Value (daNm) | |
|---|---|---|---|---|
| 1b | Nut | FRONT ANTI-ROLL BAR JOINTS | M10 | (Front shock absorber fork side) 4.1 ÷ 5.0 |
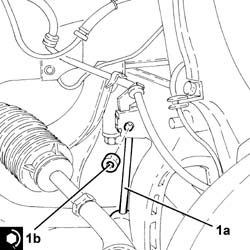
1. Tighten the bolts securing the drive shafts to the intermediate differential/drive shaft internal drive shaft to the specified torque.
| Fastening | Component | Ø | Value (daNm) | |
|---|---|---|---|---|
| 1 | Bolt | DRIVESHAFT | M8 | (Differential. internal. driveshaft./side..) 3.5 ÷ 4.3 |
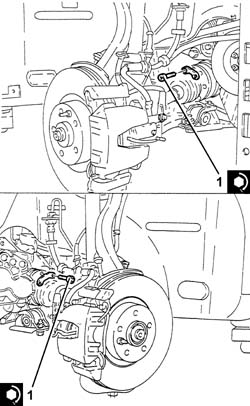
Proceed with removal - 7055B54 under-engine guard - r r.
Proceed with removal - 7055B66 Engine compartment DUST SHIELD protection in right front wheel arch - R.R..
Proceed with removal - 7055B65 Engine compartment DUST PROTECTION in left front wheel arch - R.R..
Proceed with removal - 4450B12 front or rear wheels (two) - r+r.
Remove the safety tools used for supporting the power unit.
| Name | Country | |
|---|---|---|
| Crossmember | 1.860.851.003 |
| Name | Country | |
|---|---|---|
| Vertical support | 1.870.748.000 |
| Name | Country | |
|---|---|---|
| Crossmember | 1.820.581.000 |
| Name | Country | |
|---|---|---|
| Support mountings | 1.870.650.000 |
Refit the bonnet lid catch and secure with nuts.
Proceed with refitting - 1016A10 sound-proofing cover - r + r.
Remove the car from the ramps.
Proceed with refitting - 4450A10 front wheel geometry - check using optical equipment - includes front wheel tow-in adjustment if necessary.
Removing
Position the vehicle on the ramp.
Proceed with removal - 7025A12 Engine front sound insulation COVER - R.R..
Proceed with removal - 7025A14 Bonnet LID - R.R..
Proceed with removal - 1016A10 sound-proofing cover - r + r.
Proceed with removal - 7055B54 under-engine guard - r r.
Proceed with removal - 1088D24 rigid pipe for coolant inlet to water pump - r + r.
Proceed with removal - 1076B70 exhaust pipe between pre-catalytic converter and catalytic converter - r r.
1. Undo the bolts (1a) and remove the exhaust manifold heat shield (1b).
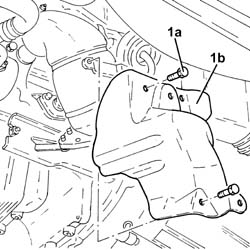
1. Undo the nuts (1a) and remove the upper exhaust manifold heat shield (1b).
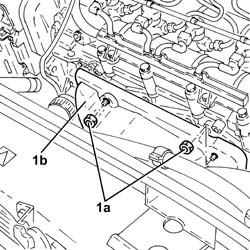
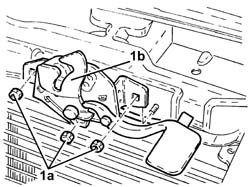
1. Undo nuts (1a) and move bonnet lid catch (1b) aside without disconnecting the bonnet opening cable.
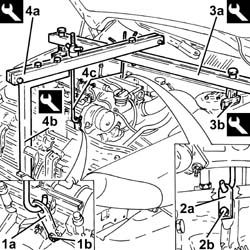
1. Fit the bracket (1a) on the exhaust manifold and secure it using the nut (1b).
2. Fit the bracket (2a) on the crankcase sump and fasten it using the bolt (2b).
3. Fit the tool (3a) complete with support mountings (3b).
| Name | Country | |
|---|---|---|
| 3a | Crossmember | 1.820.581.000 |
| Name | Country | |
|---|---|---|
| 3b | Support mountings | 1.870.650.000 |
4. Fit the tools (4a) and (4b), then connect them using the rods (4c) to the brackets fitted previously.
| Name | Country | |
|---|---|---|
| 4a | Crossmember | 1.860.851.003 |
| Name | Country | |
|---|---|---|
| 4b | Vertical support | 1.870.748.000 |
Proceed with removal - 4450B12 front or rear wheels (two) - r+r.
Proceed with removal - 7055B65 Engine compartment DUST PROTECTION in left front wheel arch - R.R..
Proceed with removal - 7055B66 Engine compartment DUST SHIELD protection in right front wheel arch - R.R..
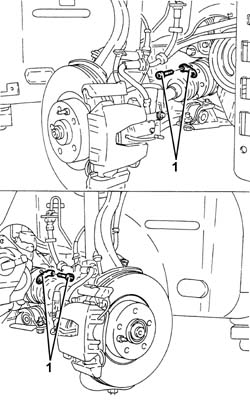
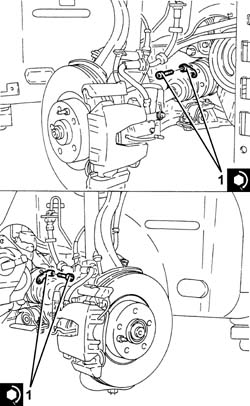
1. Unscrew the bolts securing the drive shafts to the internal differential/drive shaft.
1. Undo the nuts (1a) and disconnect the front anti-roll bar joints (1b) from the front damper forks.
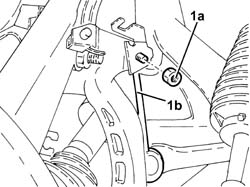
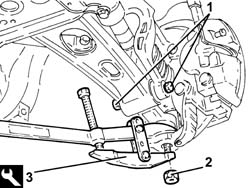
1. Undo the bolts fixing the front shock absorber forks to the lower track control arms. 2 Undo the nut for the bolts securing the suspension lower to the knuckles.
3. Use the tool to disconnect the front suspension lower wishbone from the steering knuckles.
| Name | Country | |
|---|---|---|
| 3 | Extractor | 1.821.169.000 |
Proceed with removal - 1008A44 rear rigid mount - r r.
Undo the bolts and remove the flexible mounting for the power unit rear support.
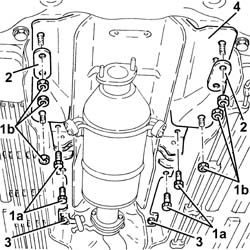
1. Undo bolts (1a) and nuts (1b) fixing the manual gear lever mounting.
2. Recover the plates.
3. Slacken the rear bolts fixing the manual gear lever mounting.
4. Lower the gearlever mount as necessary.
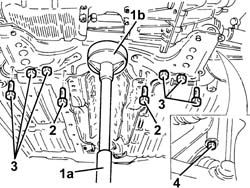
1. Position a hydraulic jack (1a) complete with adequate tool (1b) to hold up the front suspension beam.
2. Undo the bolts securing the power steering box to the front suspension crossmember.
3. Undo the rear bolts fixing the front suspension crossmember to the bodyshell.
4. Undo the side bolts fixing the front suspension crossmember to the bodyshell.
1. Release the power assisted steering system pipes from the front suspension beam bracket.
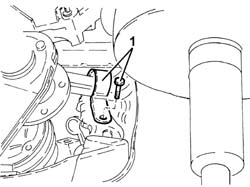
1. Slowly lower the hydraulic jack and remove the front suspension crossmember (1a) complete with lower track control arms (1b) and anti-roll bar.
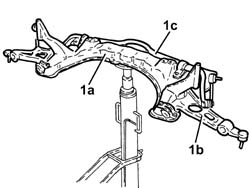
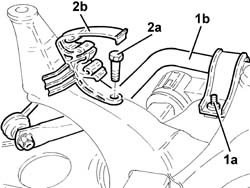
1. Working at the bench, undo the bolts (1a) and remove the anti-roll bar (1b) with joints.
2. Undo bolts (2a) and remove power steering system pipe bracket (2b).
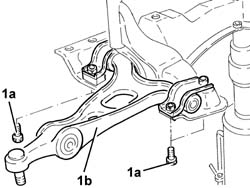
1. Undo the bolts (1a) and remove the front suspension lower wishbones (1b).
Refitting
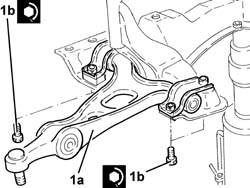
1. Refit the front suspension lower wishbones (1a) and secure to the front suspension beam by tightening bolts (1b) to the specified torque.
| Fastening | Component | Ø | Value (daNm) | |
|---|---|---|---|---|
| 1b | Bolt | FRONT SUSPENSION LOWER LEVER | M10 | (Front suspension crossmember side) 7.1 ÷ 7.9 |
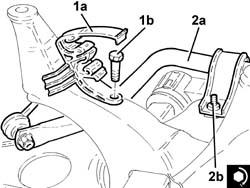
1. Refit power steering system pipe bracket (1a) and secure to the front suspension beam with bolt (1b).
2. Refit antiroll bar (2a) with joints and secure to the front suspension beam by tightening bolts (2b) to the specified torque.
| Fastening | Component | Ø | Value (daNm) | |
|---|---|---|---|---|
| 2b | Bolt | FRONT ANTI-ROLL BAR | M8 | Front suspension crossmember side) 3.4 - 4.2 |
Use a hydraulic jack with mounting tool to refit the front suspension beam with lower wishbones and anti-roll bar.
Secure the power steering system pipes to the bracket on the front suspension beam.
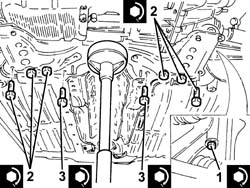
1. Tighten the side bolts securing the front suspension crossmember to the bodyshell to the recommended torque.
| Fastening | Component | Ø | Value (daNm) | |
|---|---|---|---|---|
| 1 | Bolt | POWER UNIT RIGID REAR MOUNT | M8 | (Engine crankcase side) 2.7 - 3.4 |
2. Tighten the rear bolts securing the front suspension crossmember to the bodyshell to the recommended torque.
| Fastening | Component | Ø | Value (daNm) | |
|---|---|---|---|---|
| 2 | Bolt | POWER UNIT RIGID REAR MOUNT | M8 | (Engine crankcase side) 2.7 - 3.4 |
| Fastening | Component | Ø | Value (daNm) | |
|---|---|---|---|---|
| 2 | Rear bolt | ENGINE OR ROD ANCHORAGE BEAM | M10 | (Bodyshell side) 8.1 ÷ 9.9 |
3. Tighten the bolts securing the power steering box to the front suspension crossmember to the specified torque.
| Fastening | Component | Ø | Value (daNm) | |
|---|---|---|---|---|
| 3 | Bolt | POWER STEERING BOX | M14 | (Front suspension crossmember side) 11.7 ÷ 14.3 |
Remove the hydraulic jack with mounting tool from the front suspension beam.
Refit the handbrake control mount and secure with bolts and nuts.
Fit the flexible mounting for the power unit rear support and fix it tightening the bolts to the recommended torque.
| Fastening | Component | Ø | Value (daNm) | |
|---|---|---|---|---|
| Bolt | INTERM RUBBER MOUNT | M8 | (Front suspension crossmember side) 3.2 ÷ 3.9 |
Proceed with refitting - 1008A44 rear rigid mount - r r.
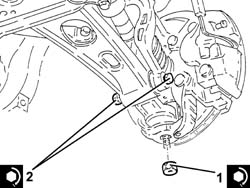
1. Connect the front suspension lower wishbones to the knuckles and secure by tightening the nuts to the required torque.
| Fastening | Component | Ø | Value (daNm) | |
|---|---|---|---|---|
| 1 | Nut | FRONT SUSPENSION LOWER LEVER | M14 | (Steering knuckle side) 8.1 ÷ 9.9 |
2. Tighten the bolts securing the front damper forks to the lower wishbones to the specified torque.
| Fastening | Component | Ø | Value (daNm) | |
|---|---|---|---|---|
| 2 | Bolt | FRONT DAMPER FORK ON WISHBONE | M12 | (Lower track control arm side) 10.8 ÷ 13.2 |
1. Connect the front anti-roll bar joints (1a) to the front damper brackets and secure them by tightening the nuts (1b) to the specified torque.
| Fastening | Component | Ø | Value (daNm) | |
|---|---|---|---|---|
| 1b | Nut | FRONT ANTI-ROLL BAR JOINTS | M10 | (Front shock absorber fork side) 4.1 ÷ 5.0 |
1. Tighten the bolts securing the drive shafts to the intermediate differential/drive shaft internal drive shaft to the specified torque.
| Fastening | Component | Ø | Value (daNm) | |
|---|---|---|---|---|
| 1 | Bolt | DRIVESHAFT | M10 | (Differential internal driveshaft/intermediate driveshaft side) 5.8 ÷ 7.0 |
Proceed with refitting - 7055B66 Engine compartment DUST SHIELD protection in right front wheel arch - R.R..
Proceed with refitting - 7055B65 Engine compartment DUST PROTECTION in left front wheel arch - R.R..
Proceed with refitting - 4450B12 front or rear wheels (two) - r+r.
Remove the safety tools used for supporting the power unit.
Refit the bonnet lid catch and secure with nuts.
Place the upper exhaust manifold heat shield back in its housing and fix it using the nuts.
Place the lower exhaust manifold heat shield back in its housing and fix it using the bolts.
Proceed with refitting - 1076B70 exhaust pipe between pre-catalytic converter and catalytic converter - r r.
Proceed with refitting - 1088D24 rigid pipe for coolant inlet to water pump - r + r.
Proceed with refitting - 7055B54 under-engine guard - r r.
Refill the engine cooling system with coolant - 0010T20 coolant change.
Proceed with refitting - 1016A10 sound-proofing cover - r + r.
Proceed with refitting - 7025A14 Bonnet LID - R.R..
Proceed with refitting - 7025A12 Engine front sound insulation COVER - R.R..
Remove the car from the ramps.
Proceed with refitting - 4450A10 front wheel geometry - check using optical equipment - includes front wheel tow-in adjustment if necessary.
Removing
Position the vehicle on the ramp.
Proceed with removal - 7055B54 under-engine guard - r r.
Proceed with removal - 1076B82 left exhasust pipe between catalytic preconverter and converter r r.
Proceed with removal - 1076B84 right exhaust pipe between caralytic preconverter and converter r r.
Proceed with removal - 4450B12 front or rear wheels (two) - r+r.
Proceed with removal - 7055B65 Engine compartment DUST PROTECTION in left front wheel arch - R.R..
Proceed with removal - 7055B66 Engine compartment DUST SHIELD protection in right front wheel arch - R.R..
1. Unscrew the bolts securing the right drive shaft to the intermediate shaft.
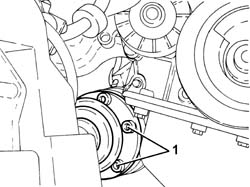
1. Undo the bolts securing the left driveshaft to the differential internal driveshaft.
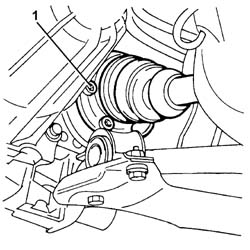
1. Undo the nuts (1a) and disconnect the front anti-roll bar joints (1b) from the front damper forks.
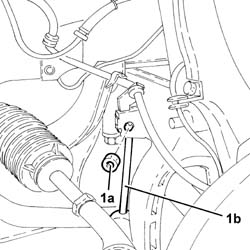
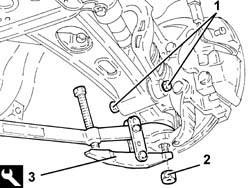
1. Undo the bolts fixing the front shock absorber forks to the lower track control arms. 2 Undo the nut for the bolts securing the fronts suspension lower wishbones to the knuckles.
3. Use the tool to disconnect the front suspension lower wishbone from the steering knuckles.
| Name | Country | |
|---|---|---|
| 3 | Extractor | 1.821.169.000 |
Proceed with removal - 1008A44 rear rigid mount - r r.
Proceed with removal - 1008B20 power unit intermediate mount flexible block - replace.
1. Undo the bolts (1a) and remove the underbody reinforcements (1b).
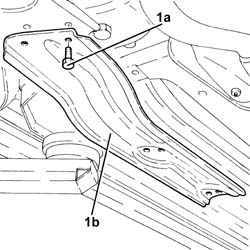
1. Undo front bolts (1a) and nuts (1b) fixing the manual gear lever mounting.
2. Recover the plates.
3. Slacken the rear bolts fixing the manual gear lever mounting.
4. Lower the manual gear lever mounting at the front.
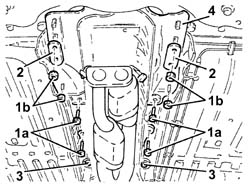
1. Position a hydraulic jack (1a) complete with adequate tool (1b) to hold up the front suspension beam.
2. Undo the bolts securing the power steering box to the front suspension crossmember.
3. Undo the rear bolts fixing the front suspension crossmember to the bodyshell.
4. Undo the side bolts fixing the front suspension crossmember to the bodyshell.
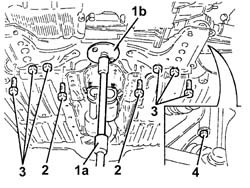
Release the power assisted steering system pipes from the front suspension beam bracket.
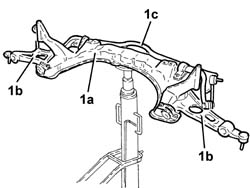
1. Slowly lower the hydraulic jack and remove the front suspension crossmember (1a) complete with lower track control arms (1b) and anti-roll bar (1c).
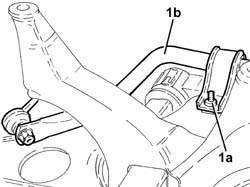
1. Working at the bench, undo the bolts (1a) and remove the anti-roll bar (1b) with joints.
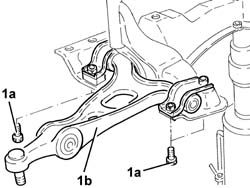
1. Undo the bolts (1a) and remove the front suspension lower wishbones (1b).
Refitting
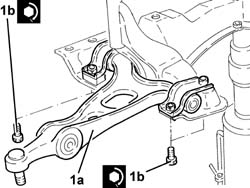
1. Refit the front suspension lower wishbones (1a) and secure to the front suspension beam by tightening bolts (1b) to the specified torque.
| Fastening | Component | Ø | Value (daNm) | |
|---|---|---|---|---|
| 1b | Bolt | FRONT SUSPENSION LOWER LEVER | M10 | (Front suspension crossmember side) 7.1 ÷ 7.9 |
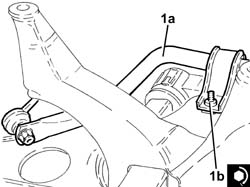
1. Refit antiroll bar (1a) with joints and secure to the front suspension beam by tightening bolts (1b) to the specified torque.
| Fastening | Component | Ø | Value (daNm) | |
|---|---|---|---|---|
| 1b | Bolt | FRONT ANTI-ROLL BAR | M8 | (Front suspension crossmember side) 3.6 ÷ 4.4 |
Use a hydraulic jack with mounting tool to refit the front suspension beam with lower wishbones and anti-roll bar.
Secure the power steering system pipes to the bracket on the front suspension beam.
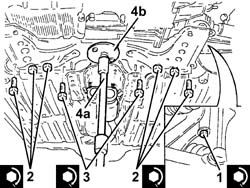
1. Tighten the side bolts securing the front suspension crossmember to the bodyshell to the recommended torque.
| Fastening | Component | Ø | Value (daNm) | |
|---|---|---|---|---|
| 1 | Side bolt | ENGINE OR ROD ANCHORAGE BEAM | M12 | (Bodyshell side) 10.8 ÷ 13.2 |
2. Tighten the rear bolts securing the front suspension crossmember to the bodyshell to the recommended torque.
| Fastening | Component | Ø | Value (daNm) | |
|---|---|---|---|---|
| 2 | Rear bolt | ENGINE OR ROD ANCHORAGE BEAM | M12 | (Bodyshell side) 10.8 ÷ 13.2 |
| Fastening | Component | Ø | Value (daNm) | |
|---|---|---|---|---|
| 2 | Rear bolt | ENGINE OR ROD ANCHORAGE BEAM | M10 | (Bodyshell side) 8.1 ÷ 9.9 |
3. Tighten the bolts securing the power steering box to the front suspension crossmember to the specified torque.
| Fastening | Component | Ø | Value (daNm) | |
|---|---|---|---|---|
| 3 | Bolt | POWER STEERING BOX | M14 | (Front suspension crossmember side) 11.7 ÷ 14.3 |
4. Remove the hydraulic jack (4a) fitted with a suitable flange (4b) for supporting the front suspension crossmember.
Remove the hydraulic jack with mounting tool from the front suspension beam.
Refit the handbrake control mount and secure with bolts and nuts.
Place the underbody reinforcements back in their housings and secure them with the bolts.
Proceed with refitting - 1008B20 power unit intermediate mount flexible block - replace.
Proceed with refitting - 1008A44 rear rigid mount - r r.
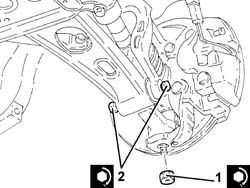
1. Connect the front suspension lower wishbones to the knuckles and secure by tightening the nuts to the required torque.
| Fastening | Component | Ø | Value (daNm) | |
|---|---|---|---|---|
| 1 | Nut | FRONT SUSPENSION LOWER LEVER | M14 | (Steering knuckle side) 8.1 ÷ 9.9 |
2. Tighten the bolts securing the front damper forks to the lower wishbones to the specified torque.
| Fastening | Component | Ø | Value (daNm) | |
|---|---|---|---|---|
| 2 | Bolt | FRONT DAMPER FORK ON WISHBONE | M12 | (Lower track control arm side) 10.8 ÷ 13.2 |
1. Connect the front anti-roll bar joints (1a) to the front damper brackets and secure them by tightening the nuts (1b) to the specified torque.
| Fastening | Component | Ø | Value (daNm) | |
|---|---|---|---|---|
| 1b | Nut | FRONT ANTI-ROLL BAR JOINTS | M10 | (Front shock absorber fork side) 4.1 ÷ 5.0 |
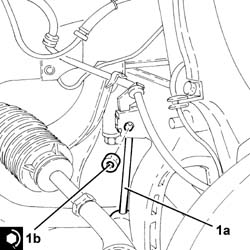
1. Tighten the bolts fixing the left driveshaft to the differential internal driveshaft to the recommended torque.
| Fastening | Component | Ø | Value (daNm) | |
|---|---|---|---|---|
| 1 |
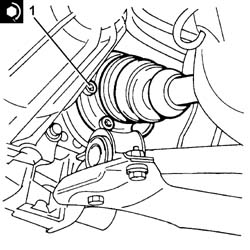
1. Tighten the bolts securing the right drive shaft to the intermediate drive shaft to the specified torque.
| Fastening | Component | Ø | Value (daNm) | |
|---|---|---|---|---|
| 1 |
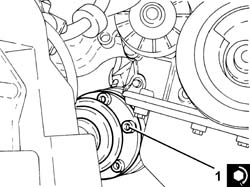
Proceed with refitting - 7055B66 Engine compartment DUST SHIELD protection in right front wheel arch - R.R..
Proceed with refitting - 7055B65 Engine compartment DUST PROTECTION in left front wheel arch - R.R..
Proceed with refitting - 4450B12 front or rear wheels (two) - r+r.
Proceed with refitting - 1076B84 right exhaust pipe between caralytic preconverter and converter r r.
Proceed with refitting - 1076B82 left exhasust pipe between catalytic preconverter and converter r r.
Proceed with refitting - 7055B54 under-engine guard - r r.
Remove the car from the ramps.
Parts & tools for this job For 2000 Alfa Romeo 147
- TOOLCoil spring compressorSearch: coil spring compressor
- TOOLBall joint separatorSearch: ball joint separator
- PARTFront shock absorbersSearch: Alfa Romeo 147 2000 front shock absorbers
Links open Amazon search results in a new tab. As an Amazon Associate I earn from qualifying purchases.