
Electrical junction unit - r+r
- Make
- Alfa Romeo
- Model
- 147 Factory Service Manual
- Year
- 2000–2002
- Section
- Instrument/guage electrical wiring › Electrical junction unit - r+r
Electrical junction unit - r+r
Removal
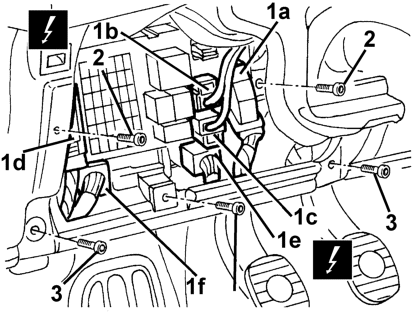
See Op. 7040A37 Fuse box cover - r r
1 Disconnect the electrical connections at the front (1a, 1b, 1c, 1d, 1e, 1f).
Component B2A Junction unit under dashboard 1a
Component B2B Junction unit under dashboard 1b
Component B2C Junction unit under dashboard 1c
Component B2D Junction unit under dashboard 1d
Component M1A Body computer 1e
Component M1E Body computer 1f
2 Undo the bolts fixing the control unit.
3 Undo the bolts shown fixing the dashboard cover.
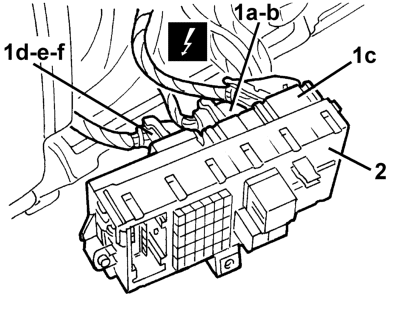
1 Move the control unit/body computer assembly slightly and disconnect the electrical connections at the rear (1a, 1b, 1c, 1d, 1e, 1f).
Component B2F Junction unit under dashboard 1a
Component B2G Junction unit under dashboard 1b
Component B2H Junction unit under dashboard 1c
Component M1B Body computer 1d
Component M1C Body computer 1e
Component M1D Body computer 1f
2 Recover the control unit/body computer assembly.
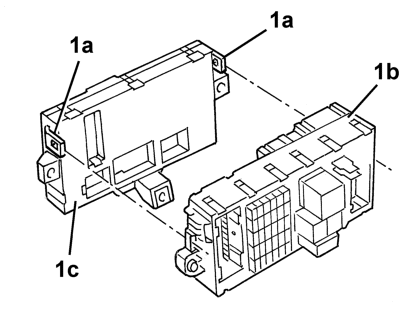
1 Work at the bench and release the retainers 1a , separate the junction unit 1b from the body computer.
Refitting
Check that the junction unit is not damaged and, if necessary, check the internal connections.
At the bench, connect the junction unit from the body computer and attach the retainers.
Connect the rear electrical connections.
Position the junction unit.
Tighten the screws.
Connect the front electrical connections.
See Op. 7040A37 Fuse box cover - r r
Test the electrical system.
Parts & tools for this job For 2000 Alfa Romeo 147
- TOOLDigital multimeterSearch: automotive digital multimeter
- PARTAssorted fuse kitSearch: car fuse assortment kit
- TOOLWire crimper and connector kitSearch: wire crimper connector kit
Links open Amazon search results in a new tab. As an Amazon Associate I earn from qualifying purchases.