
Engine - position on stand and remove
- Make
- Fiat
- Model
- Bravo Factory Service Manual
- Year
- 2007–2014
- Section
- Engine and power unit › Engine - position on stand and remove
ENGINE - POSITION ON STAND AND REMOVE
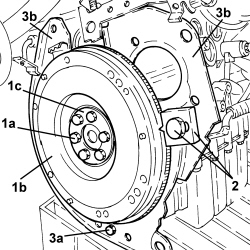
1. Undo the bolts (1a) and remove the engine flywheel (1b) complete with safety plate (1c).
2. Undo the bolt and remove the flywheel lock.
3. Undo the bolt (3a) and remove the guards (3b).
1. Using the tool and a hydraulic lift, place the engine on the overhaul stand.
| Tool | Description | Function | Validity |
|---|---|---|---|
| 1871000000 | Overhaul stand | Engine overhaul |
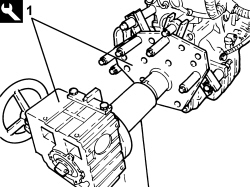
- Support the engine using the tools and a hydraulic lift.
- Undo the bolts fixing the engine block to the overhaul stand support.
- Place the engine on a suitable board.
- Place the engine flywheel guards in position and tighten the lower guard fixing bolt.
- Place the flywheel in position complete with safety plate taking care over the centering bush and screw in the new bolts without tightening to torque.
- Fit the flywheel lock.
- Tighten the new bolts securing the engine flywheel to the recommended torque.
| Component | Fastening | dia | Value (daNm) | Validity |
|---|---|---|---|---|
| Engine flywheel | Bolt (to be replaced) | M8 | 1.4 ÷ 1.6 + 45° | 1.4 16v |
Op. 1810A24 CLUTCH - R + R WITH GEARBOX REMOVED
Op. 1024B22 ENGINE FLYWHEEL - R.R WITH CLUTCH REMOVED FOR VERSIONS WITH MANUAL GEARBOX
1. Undo the bolts (1a) and remove the flywheel guard (1b).
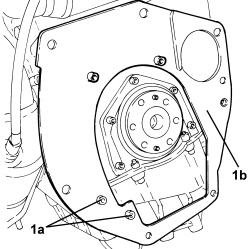
1. Fit the support (1a) on the engine block (1b).
| Tool | Description | Function | Validity |
|---|---|---|---|
| 1871000000 | Overhaul stand | Engine overhaul |
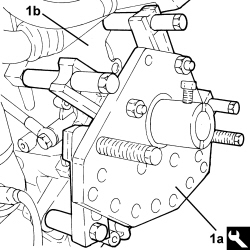
1. Using the tool and a hydraulic lift, place the engine on the overhaul stand.
| Tool | Description | Function | Validity |
|---|---|---|---|
| 1871000000 | Overhaul stand | Engine overhaul |
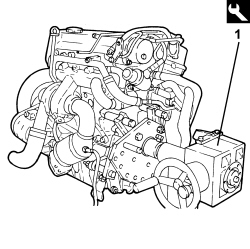
- Support the engine using the mounting tools and a hydraulic lift.
- Undo the bolts fixing the engine block to the overhaul stand support.
- Fit the flywheel guard and secure it using the bolts.
Op. 1024B22 ENGINE FLYWHEEL - R.R WITH CLUTCH REMOVED FOR VERSIONS WITH MANUAL GEARBOX
Op. 1810A24 CLUTCH - R + R WITH GEARBOX REMOVED
Rest the engine on the stand
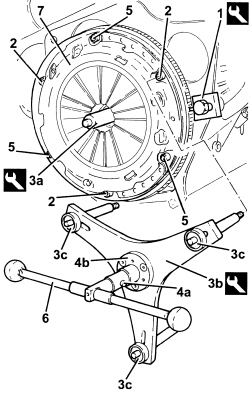
1. Fit the flywheel lock.
| Tool | Description | Function | Validity |
|---|---|---|---|
| 1860846000 | Counter-torque | Flywheel lock |
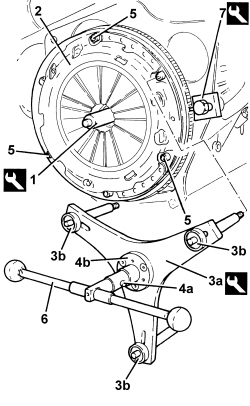
2. Unscrew the three bolts securing the clutch mechanism at 120 degrees.
3. Fit tool (3a) and tool (3b) tightening bolts (3c) in the seats of the bolts removed previously.
| Tool | Description | Function | Validity |
|---|---|---|---|
| 1871003100 | Extractor/ fitting tool | Removing-refitting clutch mechanism | 1.4 16v TJet |
| Tool | Description | Function | Validity |
|---|---|---|---|
| 2000024900 | Clutch centering kit | Removing-refitting clutch mechanism | 1.4 16v TJet |
4. Turn the tool handwheel until pins (4a) are in contact with disc (4b).
5. Undo the remaining bolts securing the clutch mechanism.
6. Undo the tool handwheel to discharge the clutch mechanism diaphragm spring.
- Remove the tools fitted previously.
7. Remove the clutch mechanism.
- Remove the clutch plate.
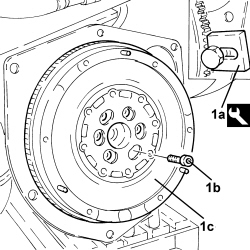
1. With flywheel lock (1a) fitted, undo bolts (1b) and remove engine flywheel (1c).
| Tool | Description | Function | Validity |
|---|---|---|---|
| 1860846000 | Counter-torque | Flywheel lock |
The bolts fixing the flywheel are pre-treated with sealant, therefore they should be replaced each time they are removed.
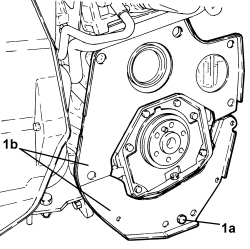
1. Undo bolt (1a) and remove flywheel guard (1b).
1. Disconnect the electrical connection for the upper Lambda sensor.
| Description | Connector | |
|---|---|---|
| 1 | Lambda sensor on preconverter | See K015 LAMBDA SENSOR ON PRE-CATALYZER |
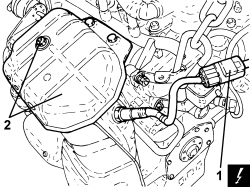
2. Undo the fastenings and remove the turbocharger heat shield.
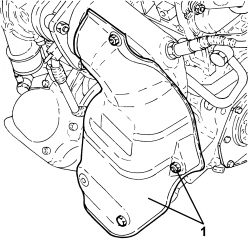
1. Undo the fastenings and remove the catalytic converter heat shield.
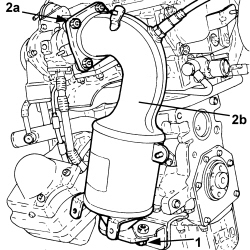
1. Undo the bolts securing the catalytic converter to the bracket on the crankcase.
2. Undo nuts (2a) and remove catalytic converter (2b) complete with Lambda sensor.
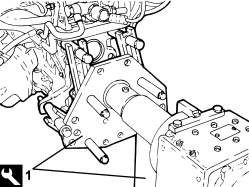
1. Fit the support to the engine block and place the engine on the overhaul stand using the hydraulic lift.
| Tool | Description | Function | Validity |
|---|---|---|---|
| 1871000000 | Bracket | Positioning engine on overhaul stand |
Removal of engine from the stand
- Support the engine using the mounting tools and a hydraulic lift.
- Undo the fastenings securing the engine block to the overhaul stand support.
- Place the engine on a suitable board.
- Place the catalytic converter in position complete with lambda sensor and tighten the nuts.
- Tighten the bolts securing the catalytic converter to the bracket on the crankcase.
- Place the catalytic converter heat shield back in its housing and tighten it using the fastenings.
- Place the turbocharger heat shield back in its housing and tighten it using the fastenings.
- Connect the electrical connection for the upper Lambda sensor.
- Place the two engine flywheel guards in position and tighten the bolt securing them to the engine oil sump.
- Place the flywheel in its housing, fit the flywheel lock and tighten the new bolts inserted previously to the recommended torque.
| Tool | Description | Function | Validity |
|---|---|---|---|
| 1860846000 | Counter-torque | Flywheel lock |
| Component | Fastening | dia | Value (daNm) | Validity |
|---|---|---|---|---|
| Engine flywheel | Bolt (to be replaced) | M9 | 1.9 ÷ 2.1 + 50° +/- 2° | 1.4 16v TJet |
1. Fit the tool on the crankshaft.
| Tool | Description | Function | Validity |
|---|---|---|---|
| 2000024900 | Clutch centering kit | Removing-refitting clutch mechanism | 1.4 16v TJet |
- Refit the clutch plate in position.
When fitting the clutch plate the correct position is shown by the words "engine side" and "gearbox side".
Handle the clutch plate carefully. Do not touch the surface of the friction linings with your hands.
2. Refit the clutch mechanism in position.
Clean any anti-corrosion protection or detergents from the friction surface of the clutch mechanism.
3. Fit tool (3a) using bolts (3b).
| Tool | Description | Function | Validity |
|---|---|---|---|
| 1871003100 | Extractor/ fitting tool | Removing-refitting clutch mechanism | 1.4 16v TJet |
4. Turn the tool handwheel until pins (4a) are in contact with disc (4b).
5. Tighten the remaining free clutch fixing bolts by hand.
6. Undo the tool handwheel to discharge the clutch mechanism diaphragm spring.
- Remove the tools fitted previously.
- Tighten the remaining clutch retaining bolts by hand.
- Gradually tighten the bolts securing the clutch diagonally until the recommended torque is reached.
| Component | Fastening | dia | Value (daNm) | Validity |
|---|---|---|---|---|
| Clutch mechanism | Bolt | M6 | 1.2 ÷ 1.5 | 1.4 16v |
7. Remove the flywheel lock.
Parts & tools for this job For 2007 Fiat Bravo
- PARTEngine gasket setSearch: Fiat Bravo 2007 engine gasket set
- TOOLTorque wrenchSearch: 3/8 inch torque wrench
- TOOLFeeler gauge setSearch: feeler gauge set
Links open Amazon search results in a new tab. As an Amazon Associate I earn from qualifying purchases.