
Single cylinder head extension - change gasket
- Make
- Fiat
- Model
- Ducato Factory Service Manual
- Year
- 2002–2006
- Section
- Cylinder head/s › Single cylinder head extension - change gasket
SINGLE CYLINDER HEAD EXTENSION - CHANGE GASKET
Removing
- Position the vehicle on the lift.
Op. 7055B54 UNDER-ENGINE GUARD - R R
1. Undo the bolts fixing the cold air intake to the upper crossmember.
2. Disconnect the intake hose from the air filter casing.
3. Remove the cold intake and intake hose assembly from the engine compartment.
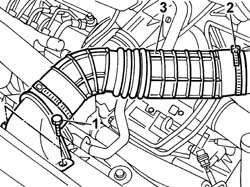
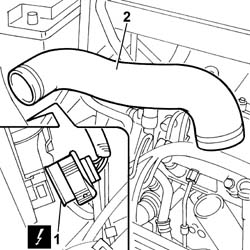
1. Remove the air delivery sleeve to the air-air heat exchanger (intercooler).
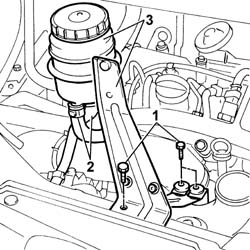
- Draw off the fluid inside the power steering fluid reservoir with a syringe.
1. Undo the bolts securing the power steering fluid reservoir bracket.
2. Disconnect both fluid pipes from the reservoir and plug with plugs of appropriate size.
3. Remove the power assisted steering fluid reservoir, complete with bracket, from the housing.
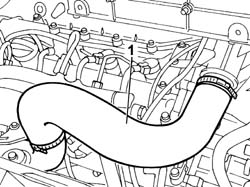
1. Remove the second section of the air delivery sleeve to the air-air heat exchanger (intercooler).
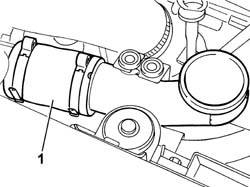
1. Disconnect the right front light cluster electrical connection.
| Description | Connector | |
|---|---|---|
| 1 | Right headlamp | F011 |
2. Disconnect the collars at both ends and remove the air hose from intercooler to intake manifold.
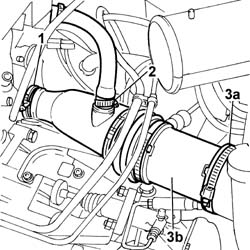
1. Disconnect the band fastening the air supply hose to the turbocharger.
2. Disconnect the vapour recovery pipe from the air supply hose to the turbocharger.
3. Disconnect the collar from turbocharger (3a) and remove the air delivery sleeve to turbocharger (3b).
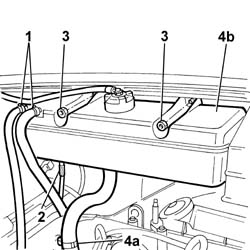
1. Disconnect the bands retaining the coolant pipe to the reservoir.
2. Disconnect the electrical connection from the coolant reservoir.
3. Undo the nuts fixing the expansion tank.
4. Disconnect pipe (4a) carrying fluid to the coolant pump and remove expansion tank (4b).
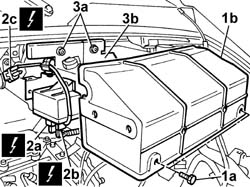
1. Undo the fixing bolts (1a) and remove the protective cover (1b) for the heater plugs control unit.
2. Disconnect the electrical connections for the heater plugs control unit (2a) and (2b) and the control unit positive electrical connection (2c).
| Description | Connector | |
|---|---|---|
| 2a | Heater plugs control unit | M015A |
| Description | Connector | |
|---|---|---|
| 2b | Heater plugs control unit | M015B |
| Description | Connector | |
|---|---|---|
| 2c | Heater plugs control unit | M015C |
3. Undo the fixing nuts (3a) and remove the mounting bracket (3b) complete with heater plugs control unit.
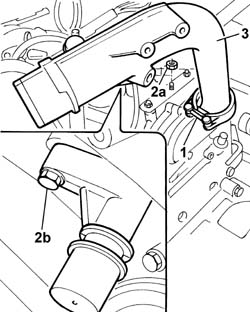
1. Loosen the bolt fixing the collar joining the rigid section of the intake pipe to the turbocharger.
2. Undo the nuts (2a) fixing the pipe to the bracket on the cylinder head and the bolt (2b) fixing the connector for the engine oil vapour pipe.
3. Remove the rigid section of the air pipe from the turbocharger.
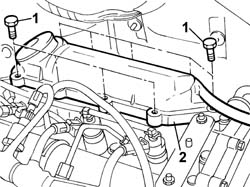
1. Undo the retaining bolts.
2. Remove the engine oil vapour separator.
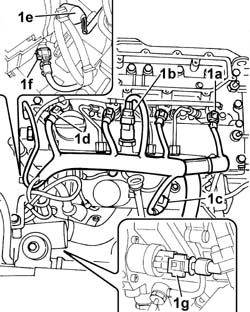
1. Disconnect the electrical connections:
| Description | Connector | |
|---|---|---|
| 1a | Injector | N070A |
| Description | Connector | |
|---|---|---|
| 1a | Injector | N070B |
| Description | Connector | |
|---|---|---|
| 1a | Injector | N070C |
| Description | Connector | |
|---|---|---|
| 1a | Injector | N070D |
| Description | Connector | |
|---|---|---|
| 1b | Fuel pressure sensor | K083 |
| Description | Connector | |
|---|---|---|
| 1c | Air pressure - temperature sensor | K044 |
| Description | Connector | |
|---|---|---|
| Heater plugs | A040A |
| Description | Connector | |
|---|---|---|
| Heater plugs | A040B |
| Description | Connector | |
|---|---|---|
| Heater plugs | A040C |
| Description | Connector | |
|---|---|---|
| Heater plugs | A040D |
| Description | Connector | |
|---|---|---|
| 1d | Timing sensor | K047 |
| Description | Connector | |
|---|---|---|
| 1e | Coolant temperature sending unit (for instrument panel) | K035 |
| Description | Connector | |
|---|---|---|
| 1f | Engine coolant temperature sensor/sender unit | K036 |
| Description | Connector | |
|---|---|---|
| 1g | Fuel pressure regulator | N077 |
- Release the wiring from the bands and move it to the side.
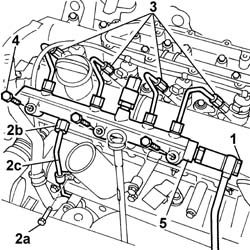
1. Unscrew the fitting of the return pipe to the return manifold.
2. Undo the fixing bolt (2a), undo the connector (2b) and disconnect the supply pipe (2c) from the pump to the fuel manifold.
3. Undo the connectors for the supply pipes from the manifold to the injectors.
4. Undo the bolts fixing the fuel manifold to the camshaft housing.
5. Remove the fuel manifold complete with supply pipes to the injectors.
1. Press the fastening springs (1a) and disconnect the fuel recirculation pipe (1b) from the injectors.
2. Undo the bolts fixing the brackets.
3. Use the extractor and driver to remove the injectors from their seats on the cylinder head extension.
| Description | Code | Function | |
|---|---|---|---|
| Mallet | 1.840.206.001 | Injector removal |
| Description | Code | Function | |
|---|---|---|---|
| Extractor | 1.870.850.000 | Injector removal |
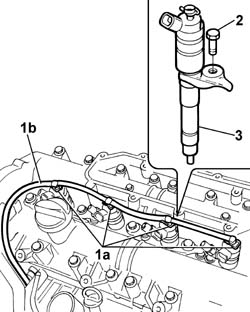
- Raise the vehicle.
Op. 4450B04 RIGHT FRONT WHEEL R R
Op. 1092B72 POWER STEERING PUMP DRIVE BELT - ALTERNATOR - R&R
See in Op. 1092A10
See in Op. 1032D12
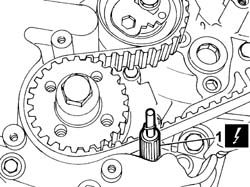
1. Undo the plug in the crankcase and, rotating the crankshaft using small movements, position the tool for detecting T.D.C. and then locking the crankshaft in the housing for the actual plug.
| Description | Code | Function | |
|---|---|---|---|
| 1 | Pin | 99360615 | TDC positioning |
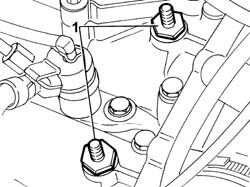
1. Undo the studs on the camshaft housing and remove them.
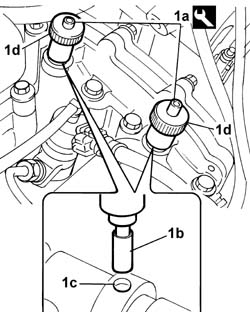
1. Fit camshaft timing tools (1a) and insert until the cylindrical part of the tool is fully fitted into hole (1c) on the camshaft. Secure the tool in place tightening the tool ring nuts (1d).
| Description | Code | Function | |
|---|---|---|---|
| 1a | Templates | 99360614 | Camshaft timing adjustment |
If the crankshaft is at TDC, the grooves on the camshafts are already in the correct position to house the timing tools.
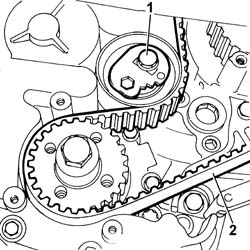
1. Undo the nut fixing the timing drive belt tensioner.
2. Remove the timing belt.
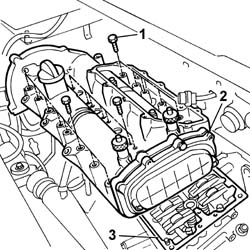
1. Undo the retaining bolts.
2. Remove the cylinder head extension complete with camshafts.
3. Remove the underlying gasket.
Refitting
- Fit a new gasket to the cylinder head.
- Fit the cylinder head extension complete with camshafts and camshaft timing tools.
When fitting the cylinder head extension, take particular care to ensure that the tappet rockers do not move while fitting the cylinder head extension to the cylinder head.
- Tighten the bolts securing the cylinder head extension to the cylinder head to torque.
| Value - daNm | Fastening | Component | Ø | |
|---|---|---|---|---|
| 11,5 | Bolt | CYLINDER HEAD EXTENSION | M12X1.25 |
| Value - daNm | Fastening | Component | Ø | |
|---|---|---|---|---|
| 1 | Bolt | CYLINDER HEAD EXTENSION | M6 |
| Value - daNm | Fastening | Component | Ø | |
|---|---|---|---|---|
| 2.5 | Bolt | CYLINDER HEAD EXTENSION | M8X1.25 |
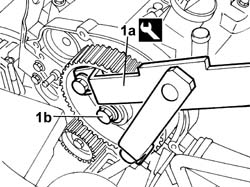
1. Use reaction tool (1a) fitted with pins to unscrew timing pulley bolt (1b).
| Description | Code | Function | |
|---|---|---|---|
| 1a | Counter-torque | 1.870.815.000 | Timing pulley lock |
| Description | Code | Function | |
|---|---|---|---|
| 1a | Pins for counter-torque | 1.870.836.000 | Timing pulley lock |
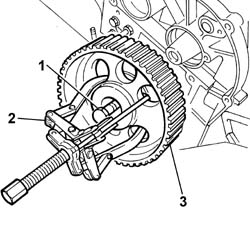
1. Position a hexagonal bolt in the housing for the pulley fixing bolt.
2. Position the USAG 452/1 universal extractor and tighten the extractor pin until it is in contact with the bolt positioned previously.
3. Continue tightening the tool pin until the camshaft pulley is extraected.
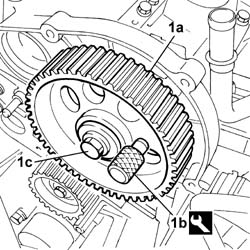
1. Refit the timing pulley (1a) in the housing on the shaft, position the pin (1b) for timing the pulley in relation to the timing sensor, then lock the bolt (1c) fixing the pulley to the shaft.
| Description | Code | Function | |
|---|---|---|---|
| 1b | Pin for timing adjustment | 1.860.617.000 | Positioning of timing pulley with timing sensor |
Before fitting the pulley timing pin, check that the pulley can move freely on the shaft.
1. Rotate the moving tensioner to the position illustrated to facilitate the fitting of the timing belt.
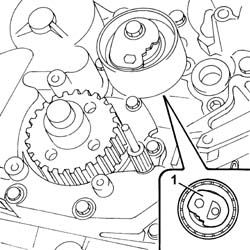
If the mileage of the belt is more than 25,000 km, it must be replaced irrespective of its appearance or wear. If it is not being replaced, it should be remembered that the replacement interval for timing belt and automatic tensioner set out in the maintenance programme is every 240,000 km or 5 years.
1. Fit the timing belt onto the pulleys and gears.
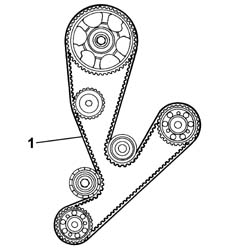
- Remove the timing pin for the timing pulley in relation to the timing sensor.
| Description | Code | Function | |
|---|---|---|---|
| Pin for timing adjustment | 1.860.617.000 | Positioning of timing pulley with timing sensor |
This operation allows the timing belt to be settled on the pulley.
1. Using the reaction tool (1a) fitted with pins, tighten the bolt fixing the timing drive pulley (1a) to torque.
| Description | Code | Function | |
|---|---|---|---|
| 1a | Counter-torque | 1.870.815.000 | Timing pulley lock |
| Description | Code | Function | |
|---|---|---|---|
| 1a | Pins for counter-torque | 1.870.836.000 | Timing pulley lock |
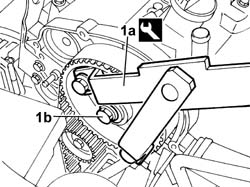
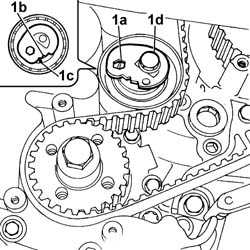
1. Acting on the hexagonal bolt (1a), rotate the semi-automatic tensioner in an anti-clockwise direction, placing the tensioner (1b) moving reference in the position illustrated, i.e. about 20°-22° to the right of the position indicated by the reference (1c), then lock the fixing nut (1d).
- Tighten the bolt fixing the automatic tensioner.
- Remove the tools used for timing the camshafts and for positioning the crankshaft at T.D.C.
| Description | Code | Function | |
|---|---|---|---|
| Templates | 99360614 | Camshaft timing adjustment |
| Description | Code | Function | |
|---|---|---|---|
| Pin | 99360615 | TDC positioning |
- Rotate the crankshaft through eight revolutions in its direction of rotation.
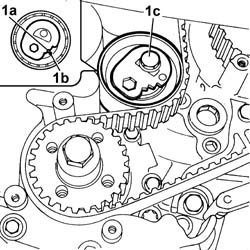
1. Loosen the bolt fixing the tensioner and, working carefully, position the tensioner (1a) reference in line with the reference opening (1b), then tighten the nut (1c) fixing the belt tensioner to torque.
| Value - daNm | Fastening | Component | Ø | |
|---|---|---|---|---|
| 1c | 3.6 | Bolt | MOBILE TIMING TENSIONER | M8 |
- Rotate the crankshaft through two further revolutions in its direction of rotation.
- Check that the position of the references remains unchanged, then temporarily refit the tools for timing the camshafts and the crankshaft for a final check.
- If the tools do not fit perfectly in the housings or the references on the tensioner have moved, carry out the belt tension adjustment procedure again.
- Fit the studs on the head extension.
See in Op. 1032D12
See in Op. 1092A10
Op. 1092B72 POWER STEERING PUMP DRIVE BELT - ALTERNATOR - R&R
Op. 4450B04 RIGHT FRONT WHEEL R R
- Lower the vehicle.
- Fit the injectors in the seats in the camshaft housing.
- Tighten the bolts fixing the brackets.
| Value - daNm | Fastening | Component | Ø | |
|---|---|---|---|---|
| 2.5 | Bolt | INJECTORS(DIESEL) | M8 |
- Fasten the recirculation pipe on the injectors using securing bands.
- Fit the fuel manifold complete with supply pipes to the injectors.
Whenever work is carried out on the fuel pipes from manifold to injector and from manifold to pressure pump, replace with new pipes to prevent oil leaks from the fittings.
- Tighten the bolts fixing the fuel manifold to torque.
| Value - daNm | Fastening | Component | Ø | |
|---|---|---|---|---|
| 2.5 | Bolt | INJECTOR FUEL MANIFOLD (DIESEL) | M8 |
- Tighten the connectors for the pipes on the injectors to torque.
| Value - daNm | Fastening | Component | Ø | |
|---|---|---|---|---|
| 2.3 | Connectors | INJECTOR FUEL MANIFOLD PIPE | M12X1.5 |
- Tighten the connector for the fuel supply pipe from the pressure pump to torque.
| Value - daNm | Fastening | Component | Ø | |
|---|---|---|---|---|
| 2.3 | Connector | PRESSURE PUMP LINE TO FUEL MANIFOLD | M14 |
- Tighten the bolt fixing the fuel supply pipe from the pressure pump to the bracket.
- Screw in the connector for the return pipe from the single fuel manifold to the return manifold and tighten it to torque.
| Value - daNm | Fastening | Component | Ø | |
|---|---|---|---|---|
| 4 | Connector | INJECTOR FUEL MANIFOLD (DIESEL) | M16 |
- Position the injection wiring and connect the electrical connections disconnected previously.
| Description | Connector | |
|---|---|---|
| Injector | N070A |
| Description | Connector | |
|---|---|---|
| Injector | N070B |
| Description | Connector | |
|---|---|---|
| Injector | N070C |
| Description | Connector | |
|---|---|---|
| Injector | N070D |
| Description | Connector | |
|---|---|---|
| Fuel pressure sensor | K083 |
| Description | Connector | |
|---|---|---|
| Air pressure - temperature sensor | K044 |
| Description | Connector | |
|---|---|---|
| Heater plugs | A040A |
| Description | Connector | |
|---|---|---|
| Heater plugs | A040B |
| Description | Connector | |
|---|---|---|
| Heater plugs | A040C |
| Description | Connector | |
|---|---|---|
| Heater plugs | A040D |
| Description | Connector | |
|---|---|---|
| Timing sensor | K047 |
| Description | Connector | |
|---|---|---|
| Coolant temperature sending unit (for instrument panel) | K035 |
| Description | Connector | |
|---|---|---|
| Engine coolant temperature sensor/sender unit | K036 |
| Description | Connector | |
|---|---|---|
| Fuel pressure regulator | N077 |
- Fit the vapour separator in the seat in the camshaft housing and tighten the fixing bolts.
| Value - daNm | Fastening | Component | Ø | |
|---|---|---|---|---|
| 1 | Bolts | ENGINE OIL VAPOUR SEPARATOR | M6 |
- Fit the rigid section of the air pipe from the turbocharger and tighten the bolt fixing the collar.
- Tighten the bolts fixing it to the cylinder head.
- Tighten the bolt fixing the engine oil vapour pipe.
- Fit the mounting bracket complete with heater plugs control unit.
- Tighten the nuts fixing the control unit to the bodyshell.
- Connect the electrical connections for the heater plugs control unit.
| Description | Connector | |
|---|---|---|
| Heater plugs control unit | M015A |
| Description | Connector | |
|---|---|---|
| Heater plugs control unit | M015B |
| Description | Connector | |
|---|---|---|
| Heater plugs control unit | M015C |
- Fit the protective cover for the heater plugs control unit and tighten the bolts fixing it to the mounting bracket underneath.
- Fit the engine coolant reservoir and tighten the nuts fixing it to the bodyshell.
- Connect the coolant delivery pipe to the pump.
- Fasten the electrical connection in the housing on the tank.
- Connect the bands retaining the coolant pipes to the cylinder head and the radiator.
- Fit the air delivery sleeve to the turbocharger to the air cleaner case.
- Connect to the turbocharger and air cleaner case.
- Connect the engine oil vapour separator pipe to the fitting.
- Fit the air hose from intercooler to intake manifold.
- Connect the right front light cluster electrical connection.
| Description | Connector | |
|---|---|---|
| Right headlamp | F011 |
- Fit the second section of the air delivery sleeve to the air-air heat exchanger (intercooler).
- Fit the power steering fluid reservoir complete with bracket.
- Connect the oil hoses to the reservoir and tighten the power steering fluid reservoir bracket bolts to the beam.
- Fit the air delivery sleeve to the air-air heat exchanger (intercooler).
- Fit the cold intake and intake hose assembly in the engine compartment and tighten the bolts fixing the cold air intake to the upper headlamp holder crossmember.
- Connect the intake hose to the air filter casing.
Parts & tools for this job For 2002 Fiat Ducato
- PARTEngine gasket setSearch: Fiat Ducato 2002 engine gasket set
- TOOLTorque wrenchSearch: 3/8 inch torque wrench
- TOOLFeeler gauge setSearch: feeler gauge set
Links open Amazon search results in a new tab. As an Amazon Associate I earn from qualifying purchases.