
Single cylinder head, removed - overhaul
- Make
- Fiat
- Model
- Ducato Factory Service Manual
- Year
- 2002–2006
- Section
- Cylinder head/s › Single cylinder head, removed - overhaul
SINGLE CYLINDER HEAD, REMOVED - OVERHAUL
Removing
Op. 7055B54 UNDER-ENGINE GUARD - R R
Op. 4450B04 RIGHT FRONT WHEEL R R
Op. 1092B72 POWER STEERING PUMP DRIVE BELT - ALTERNATOR - R&R
Characteristic of working principle
Characteristic of working principle
Op. 1016B10 SINGLE CYLINDER HEAD EXTENSION - CHANGE GASKET
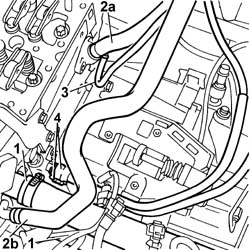
Position a container underneath the engine to collect the engine coolant.
1. Disconnect the pipes from the rigid coolant delivery pipe sections.
2. Disconnect coolant delivery and return pipes (2a) and (2b) from the heater.
3. Disconnect the brake servo vacuum pipe from the vacuum unit
4. Disconnect both fuel delivery and return pipes from the quick-release fittings.
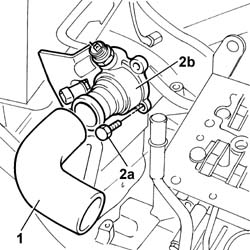
1. Disconnect the sleeve from the thermostat and from the rigid pipe, then remove.
2. Undo retaining bolts (2a) and remove thermostat (2b).
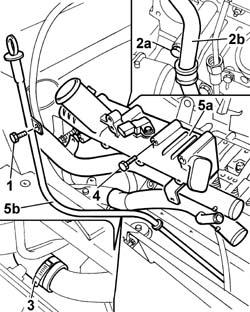
1. Undo the bolt securing the engine oil dipstick tube.
2. Undo bolt (2a) securing the rigid outlet pipe to pump (2b).
3. Disconnect the coolant outlet sleeve to the engine oil heat exchanger.
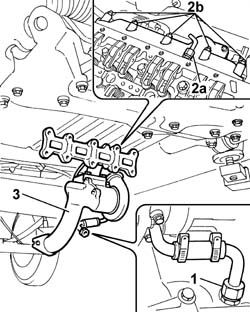
4. Undo the bolts securing the exhaust manifold to the cylinder head.
5. Remove intake manifold (5a) together with the engine oil dipstick pipe (5b).
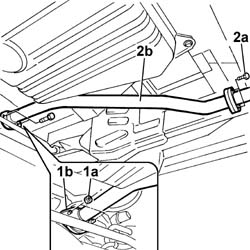
Raise the vehicle.
1. Undo retaining nuts (1a) and separate rigid intermediate section (1b) of the exhaust pipe from the turbocharger sleeve flange.
2. Undo the bolts fixing the rear flange (2a) and remove the rigid middle section (2b) of the exhaust pipe.
1. Disconnect the connector for the turbocharger sump oil return pipe.
Lower the vehicle.
2. Undo fitting (2a) and disconnecft the rigid oil delivery pipe to the turbocharger. Also unscrew nuts (2b) securing the exhaust manifold to the cylinder head.
3. Remove the exhaust manifold complete with turbocharger from the lower part of the vehicle from the compartment between the suspension beam and body.
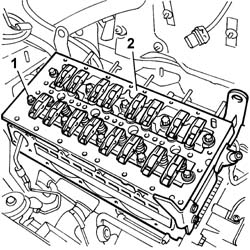
1. Undo the retaining bolts.
2. Remove the cylinder head from its seat on the engine block.
Recover the cylinder head gasket on the engine block.
Refitting
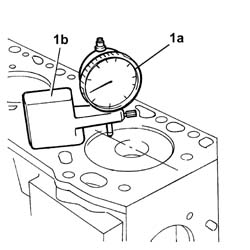
1. Measure piston protrusion from the upper engine block surface in order to determine the thickness of gasket to be used. For this purpose, use dial gauge (1a) supported by magnetic base (1b), previously zeroed on the engine block surface. Measure piston protrusion by taking a measurement at the piston pin centre line.
After checking piston recess or protrusion from the upper engine block surface, fit an appropriate gasket to maintain the compression ratio within permitted tolerances.
Keep the gasket sealed in its plastic bag and do not remove from its protection until ready to fit.
Do not lubricate the gasket or contaminate with oil or grease.
The cylinder head gasket is metal and the old gasket should be replaced with one of the same type.
Position the cylinder head on the cylinder block/crankcase.
Undo the support clips and remove the bracket.
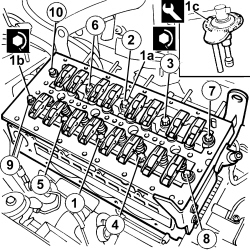
1. Tighten bolts (1a) and (1b) retaining the cylinder head to the engine block to the specified torque in the sequence shown in the figure and using tool (1c) for angular tightening.
- For positions numbered from 1 to 6, tighten to the torque values indicated below:
| Value daNm | Fastening | Component | Ø | |
|---|---|---|---|---|
| 1a | 10±0,5+90°±5°+90°±5° | Bolt | CYLINDER HEAD | M14 |
- For positions numbered from 7 to 10, tighten to the torque values indicated below:
| Value daNm | Fastening | Component | Ø | |
|---|---|---|---|---|
| 1b | 5±0,25+60°±3°+60°±3° | Bolts | CYLINDER HEAD | M14 |
| Description | Code | Function | |
|---|---|---|---|
| 1c | Torque wrench | 1.860.942.000 | Cylinder head bolts angular tightening |
Lift the vehicle and fit the exhaust manifold complete with turbocharger.
Tighten the nuts securing the exhaust manifold to the cylinder head to torque.
| Value daNm | Fastening | Component | Ø | |
|---|---|---|---|---|
| 2.2 | Nut | EXHAUST MANIFOLD/S | M8 |
Connect the rigid oil supply pipe to the turbocharger to the crankcase and tighten the connector.
Lower the vehicle.
Connect the rigid oil supply pipe to the turbocharger to the crankcase and tighten the connector.
Connect the connector for the turbocharger sump oil return pipe.
Fit the exhaust pipe intermediate rigid pipe section.
Tighten the retaining nuts on the turbocharger flange to torque.
| Value daNm | Fastening | Component | Ø | |
|---|---|---|---|---|
| 2.6 | Nuts | EXHAUST PIPE TO ENGINE | M8 |
Tighten the exhaust pipe intermediate section retaining bolts to the rear flange.
| Value daNm | Fastening | Component | Ø | |
|---|---|---|---|---|
| 2.6 | Bolt | REAR SILENCER EXHAUST | M8 |
Lower the lift.
Fit the intake manifold and the engine oil dipstick tube.
Tighten the bolts fixing the intake manifold to the cylinder head to torque.
| Value daNm | Fastening | Component | Ø | |
|---|---|---|---|---|
| 2.5 | Bolts | INLET MANIFOLD | M8 |
Connect the coolant outlet sleeve to the engine oil heat exchanger.
Tighten the rigid coolant outlet pipe to the pump to the intake manifold.
Tighten the bolt fixing the engine oil dipstick pipe.
Op. 1016B10 SINGLE CYLINDER HEAD EXTENSION - CHANGE GASKET
Characteristic of working principle
Characteristic of working principle
Op. 1092B72 POWER STEERING PUMP DRIVE BELT - ALTERNATOR - R&R
Op. 4450B04 RIGHT FRONT WHEEL R R
Op. 0010T20 COOLANT CHECK DENSITY AND TOP UP IF NECESSARY
Op. 0010T21 COOLANT CHECK DENSITY AND TOP UP IF NECESSARY
Op. 7055B54 UNDER-ENGINE GUARD - R R
Removing
Op. 7055B54 UNDER-ENGINE GUARD - R R
- Arrange a container beneath the engine to recover the engine oil.
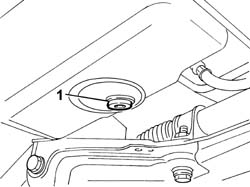
1. Undo the plug on the oil sump and drain the oil.
Op. 4130B10 POWER STEERING FLUID RESEVOIR R R
Characteristic of working principle
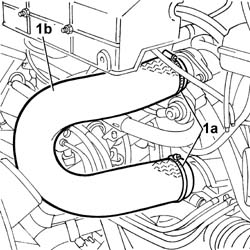
1. Open the retaining band (1a) and disconnect the pipe (1b) joining the turbocharger to the ntake manifold.
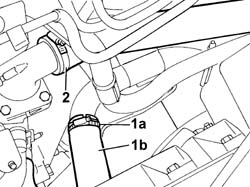
- Arrange a container beneath the engine to recover the engine coolant.
1. Disconnect band (1a) and disconnnect the lower radiator pipe from rigid section (1b).
2. Disconnect the upper pipe from the thermostat.
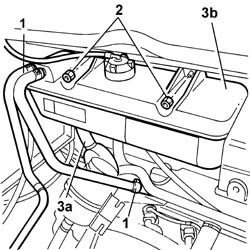
1. Disconnect the band retaining the coolant pipe to the cylinder head.
2. Undo the nuts securing the reservoir to the bodyshell.
3. Disconnect sleeve (3a) from the rigid pipe and remove expansion tank (3b).
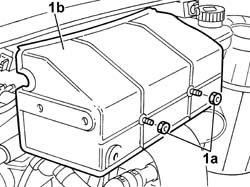
1. Undo bolts (1a) and remove the protective cover (1b) for the glow plug control unit.
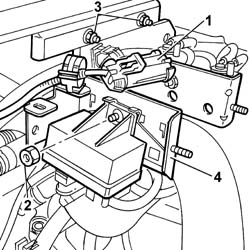
1. Disconnect the electrical connection for the glow plug control unit.
| Description | Connector | |
|---|---|---|
| 1 | Heater plugs control unit | M015C |
2. Undo the nut securing the glow plug control unit to the bracket.
- Release the wiring from the bands and replace the control unit on the engine.
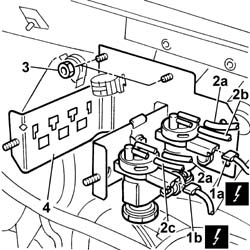
1. Disconnect the electrical connections of the exhaust gas recirculation regulation solenoid (1a) and the throttle body solenoid (1b).
| Description | Connector | |
|---|---|---|
| 1a | EGR solenoid valve | L030 |
| Description | Connector | |
|---|---|---|
| 1b | Throttle body solenoid valve | L062 |
2. Remove vacuum pipes (2a), vacuum pipe to the EGR (2b) and the vacuum pipe to the pneumatic valve on the throttle body (2c) from the solenoids.
3. Undo the retaining nuts.
-. Remove the bracket from the engine compartment.
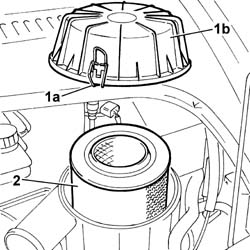
1. Open retaining clips (1a) and remove protective cover (1b) from the filter element.
2. Remove the filter element from the filter casing.
1. Disconnect the electrical connection for the air flow meter.
| Description | Connector | |
|---|---|---|
| 1 | Air flow meter | K041 |
2. Undo the nuts securing the filter casing to the bracket.
3. Disconnect the band securing the air flow meter to the air delivery pipe to the turbo.
4. Remove the air filter casing.
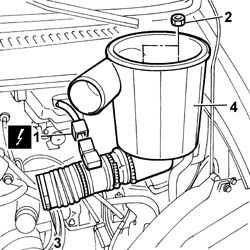
1. Press the retaining spring (1a) and disconnect the electrical connection (1b) for the engine oil vapour pipe.
| Description | Connector | |
|---|---|---|
| 1b | Oil vapour heating resistance | O007A |
2. Disconnect the engine oil vapour pipe from the air intake pipe between the filter and the turbocharger.
3. Remove the oil vapour pipe.
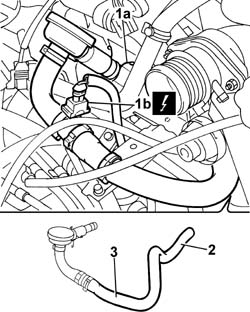
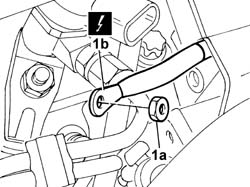
1. Undo the retaining nut (1a) and disconnect the supply lead from the glow plugs (1b).
| Description | Connector | |
|---|---|---|
| 1b | Heater plugs | A040 |
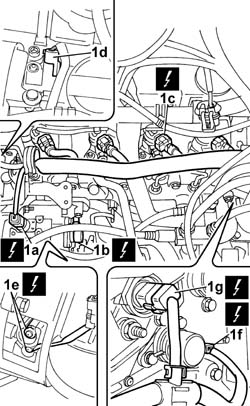
1. Disconnect the electrical connections:
| Description | Connector | |
|---|---|---|
| 1a | Injection pump third piston deactivation solenoid valve | L005 |
| Description | Connector | |
|---|---|---|
| 1b | Fuel pressure regulator | N077 |
| Description | Connector | |
|---|---|---|
| Fuel pressure sensor | K083 |
| Description | Connector | |
|---|---|---|
| 1c | Injector | N070A |
| Description | Connector | |
|---|---|---|
| 1c | Injector | N070B |
| Description | Connector | |
|---|---|---|
| 1c | Injector | N070C |
| Description | Connector | |
|---|---|---|
| 1c | Injector | N070D |
| Description | Connector | |
|---|---|---|
| 1d | Timing sensor | K047 |
| Description | Connector | |
|---|---|---|
| Engine oil pressure sensor | K028 |
| Description | Connector | |
|---|---|---|
| 1e | Alternator | A010A |
| Description | Connector | |
|---|---|---|
| 1e | Alternator | A010B |
| Description | Connector | |
|---|---|---|
| 1f | Rpm sensor | K046 |
| Description | Connector | |
|---|---|---|
| 1g | Engine coolant temperature sensor/sender unit | K036 |
| Description | Connector | |
|---|---|---|
| Starter motor | A020A |
| Description | Connector | |
|---|---|---|
| Starter motor | A020B |
- Release the wiring from the bands and move it to the side.
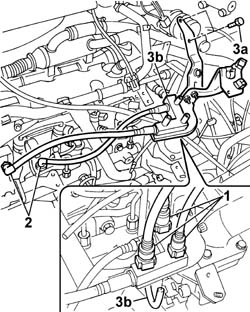
1. Disconnect the three quick-release connectors on the fuel lines from the fuel return manifold.
2. Disconnect the quick-release connectors on both fuel lines from the pressure pump.
3. Undo retaining bolt (I3a), disconnect injector recirculation pipe (3b) and remove return manifold (3c) complete with pipes.
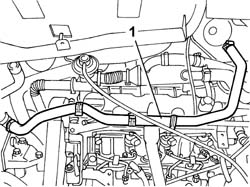
1. Remove the water supply pipe from the heater.
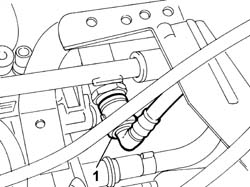
1. Disconnect the quick-release connector from the vacuum pump.
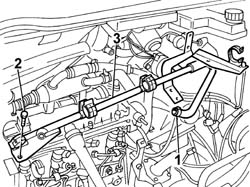
1. Disconnect the recirculation hose from the thermostat.
2. Undo the retaining bolt.
3. Remove the rigid section of the water recirculation pipe from the cylinder head.
1. Use tool (1a) to open undo band (1b) and disconnect the water pipe (1c) to the thermostat.
| Description | Code | Function | |
|---|---|---|---|
| Spanner | 1.881.138.000 | cylinder head - r + r and replace gasket |
2. Open band (2a) and disconnect pipe (1b) from the EGR exhaust gas heat exchanger.
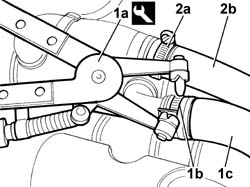
1. Use an appropriate wrench to open the bands and disconnect both coolant delivery and return pipes to the engine oil heat exchanger.
| Description | Code | Function | |
|---|---|---|---|
| Spanner | 1.881.138.000 | cylinder head - r + r and replace gasket |
2. Remove the rubber hose from the cam cover to the engine oil vapour separator.
3. Remove the flexible section of the lower engine coolant pipe.
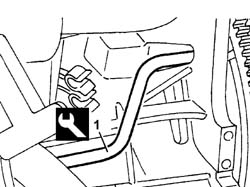
1. Undo retaining bolts (1a) and remove bracket (1b).
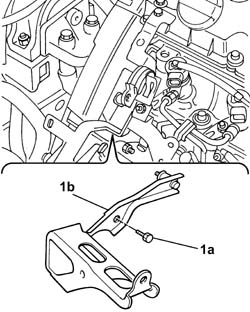
1. Undo the upper bolts securing the engine oil dipstick tube.
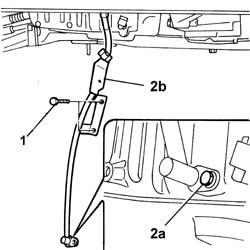
2. Undo the lower bolt (2a) and remove the engine oil dipstick tube (2b).
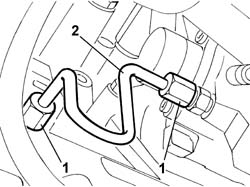
1. Undo the connectors on the fuel manifold and pressure pump.
2. Remove the fuel delivery pipe from pressure pump to fuel manifold.
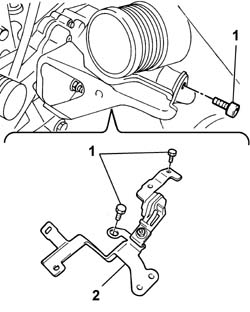
1. Undo the retaining bolts.
2. Remove the bracket on the thermostat.
- Raise the vehicle.
Characteristic of working principle
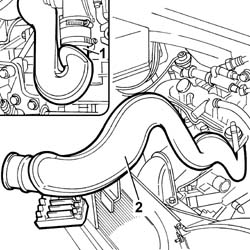
1. Open the band securing the pipe to the turbocharger.
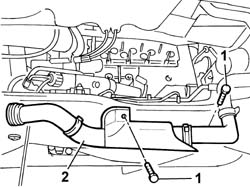
2. Remove the rigid pipe from the upper part of the engine bay.
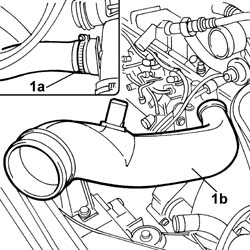
1. Open retaining band (1a) and remove rigid pipe (1b) from the upper part of the engine bay.
1. Remve the press-fitted EGR pipe heat shield.
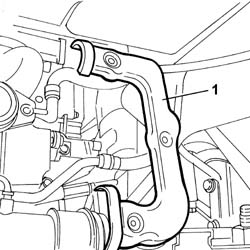
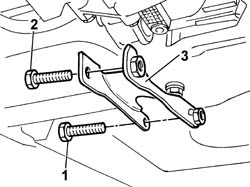
1. Undo the bolt securing the lower reaction rod to the suspension crossmember.
2. Undo the bolt securing the lower reaction rod to the mounting bracket on the gearbox.
- Move the power unit slightly forward to make enough room to remove the reaction link.
- Remove the lower reaction link.
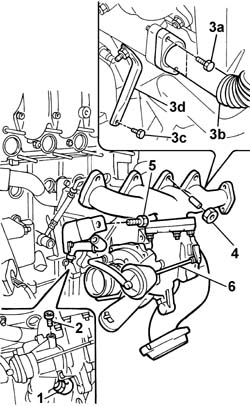
1. Disconnect the band for the turbocharger sump oil return pipe.
2. Undo the connector and disconnect the turbocharger rigid oil supply pipe.
3. Undo retaining bolts (3a) and disconnect the EGR exhaust gas delivery pipe from the turbocharger (3B).
4. Undo the nuts securing the exhaust manifold to the cylinder head.
5. Undo the bolt securing the turbocharger to the mounting bracket.
- Move the power unit forward.
6. Remove the exhaust manifold complete with turbocharger from the lower part of the vehicle from the compartment between the suspension beam and body.
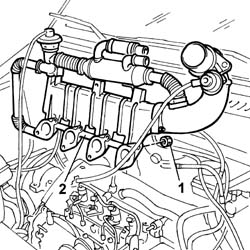
1. Unscrew the lower and upper bolts securing the intake manifold to the cylinder head.
- Lower the lift.
2. Remove the intake manifold from the upper part of the engine compartment.
- Refit the reaction link in its seat and screw in the retaining bolts without tightening.
1. Undo the bolts securing the rigid water inlet pipe to the pump.
2. Remove the rigid water intake pipe to the pump.
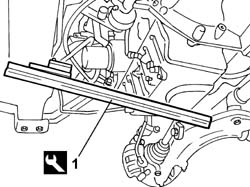
1. Position the tool for supporting the power unit fastened to the crossmember for the suspension and to the lower crossmember under the engine oil sump.
| Description | Code | Function | |
|---|---|---|---|
| 1 | Crossmember | 1.870.735.000 | Lower engine mounting beam |
Op. 1092G10 SINGLE ENGINE BELT R R
- Disconnect the electrical connection for the rpm sensor.
| Description | Connector | |
|---|---|---|
| Rpm sensor | K046 |
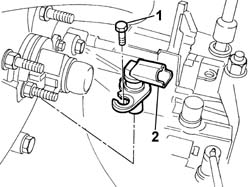
1. Undo the retaining bolt.
2. Remove the rpm sensor.
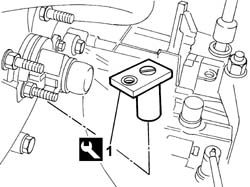
1. Fit the flyhwheel lock into its seat on the rpm sensor.
| Description | Code | Function | |
|---|---|---|---|
| 1 | Flywheel lock | 1.870.765.001 | Prevent flywheel rotation |
1. Undo bolts (1a) and remove the auxiliary shaft drive pulley (1b).
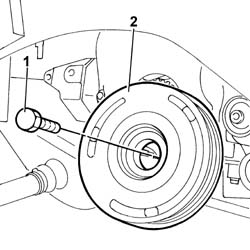
- Remove the flywheel lock fitted previously.
| Description | Code | Function | |
|---|---|---|---|
| Flywheel lock | 1.870.765.001 | Prevent flywheel rotation |
1. Undo the nuts securing the block to the bodyshell.
2. Undo the bolts securing the flexible block to the rigid mounting on the engine.
3. Remove the flexible mounting from the engine compartment.
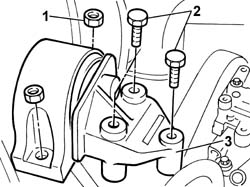
1. Undo the retaining bolts.
2. Remove the timing belt upper guard.
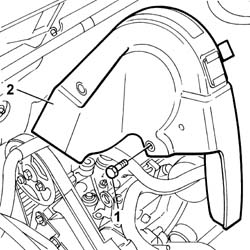
1. Undo the retaining bolts.
2. Remove the timing belt side guard.
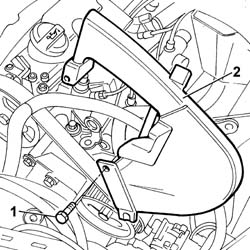
- Raise the lift.
1. Undo the retaining bolts.
2. Remove the timing belt lower guard.
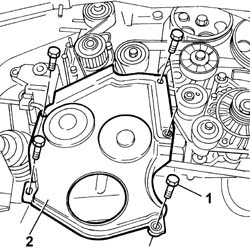
1. Slowly turn the crankshaft until the TDC positioning tool fits into the seat on the flywheel.
| Description | Code | Function | |
|---|---|---|---|
| 1 | Pin | 1.860.863.000 | Positioning engine at TDC |
- Lower the vehicle.
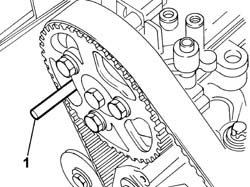
1. Fit an 8 mm diameter camshaft timing adjustment pin nto its seat on the cylinder head.
The pin must be able to enter the hole on the head without the need to turn the crankshaft. If the pulley hole is in the diametrically opposite position, withdraw the TDC tool and turn the crankshaft through one revolution. Then re-fit the TDC tool and then insert the timing adjustment tool.
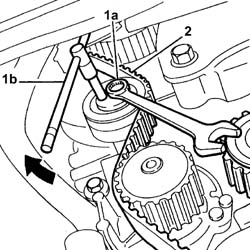
1. Loosen bolt (1a) and use a ¼" box wrench (1b) to slacken belt tension. Then tighten the nut unscrewed previously.
2. Remove the timing belt.
1. Unscrew the power unit rigid lower mount bolts.
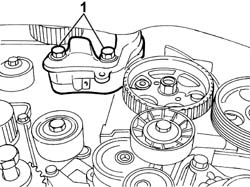
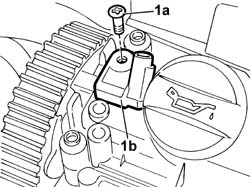
1. Undo the bolt (1a) and remove the timing sensor (1b)
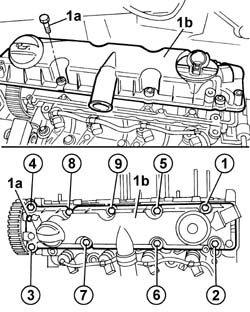
1. Undo bolts (1a) in the order shown and remove cam cover (1b).
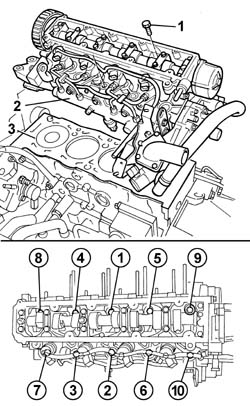
1. Undo the bolts securing the cylinder head to the crankase in the order shown.
2. Remove the cylinder head assembly.
3. Recover the underlying gasket.
Refitting
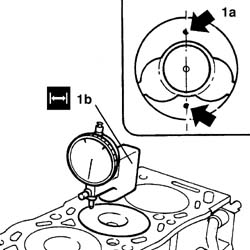
1. Measure piston projection (1a) in two places 180° apart on the piston pin centre line using tool (1b) and take the average of the two values measured for each piston.
| Description | Code | Function | |
|---|---|---|---|
| 1b | Dial gauge support | 1.870.404.000 | Injector projection from cylinder head plane measurement |
1. Select the correct size cylinder head gasket depending on the maximum average protrusions for each individual piston.
the difference between the minimum and maximum values should not be more than 0.07 mm.
| Subject | Value | |
|---|---|---|
| 1 | CYLINDER HEAD GASKET | mm |
| Size | 1,30 | |
| Average protrusion | 0,470 - 0,605 |
| Subject | Value | |
|---|---|---|
| 1 | CYLINDER HEAD GASKET | mm |
| Size | 1,35 | |
| Average protrusion | 0,605 - 0,655 |
| Subject | Value | |
|---|---|---|
| 1 | CYLINDER HEAD GASKET | mm |
| Size | 1,40 | |
| Average protrusion | 0,655 - 0,705 |
| Subject | Value | |
|---|---|---|
| 1 | CYLINDER HEAD GASKET | mm |
| Size | 1,45 | |
| Average protrusion | 0,705 - 0,755 |
| Subject | Value | |
|---|---|---|
| 1 | CYLINDER HEAD GASKET | mm |
| Size | 1,50 | |
| Average protrusion | 0,755 - 0,830 |
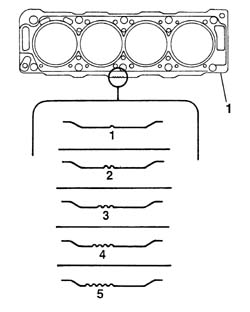
- Keep the gasket sealed in its plastic bag and do not remove from its protection until ready to fit.
- Do not lubricate the gasket or contaminate with oil or grease.
- Position the cylinder head on the cylinder block/crankcase.
- Undo the support clips and remove the bracket.
1. Tighten the bolts fixing the cylinder head to the cylinder block to the recommended torque following the order illustrated and using the angular tightening tool.
| Value - daNm | Fastening | Component | Ø | |
|---|---|---|---|---|
| 2+6+220° | Bolts | CYLINDER HEAD |
| Description | Code | Function | |
|---|---|---|---|
| Torque wrench | 1.860.942.000 | Connecting rod cap bolt tightening |
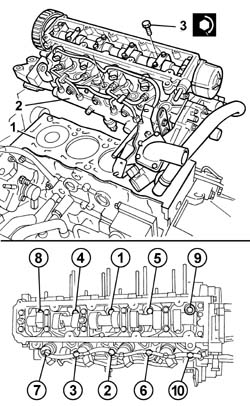
- Fit the tappet cover in its housing on the cylinder head.
1. Tighten the bolts fixing the tappet cover to torque in the order given below.
| Value - daNm | Fastening | Component | Ø | |
|---|---|---|---|---|
| 1,0 | Bolt | CAM COVER |
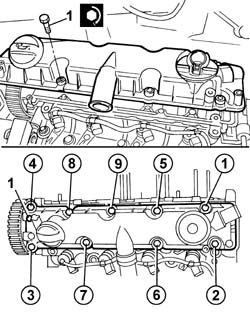
- Fit the timing sensor into its housing in the cam cover.
- Tighten the power unit rigid mount lower bolts.
1. Loosen bolts (1a) securing the camshaft pulley (1b).
2. Fit the timing belt over the pulleys in order.
- Check that the engine is at TDC and the camshaft reference is aligned.
3. Fit the C-TRONIC - 105.5 tool facing downward.
4. Unscrew bolt (4a) securing tensioner (4b) and use a ¼" box wrench to tension the belt to the specified value.
| Subject | Value | |
|---|---|---|
| Timing belt/s | unità seem | |
| Timing belt tension | 108 |
- Tighten the tensioner bolt and the pulley bolts.
- Remove the C-TRONIC - 105.5 tool.
- Fit the timing belt pulley bolt provisionally so that the crankshaft can be turned.
- Crank the engine through 8 revolutions without going backward.
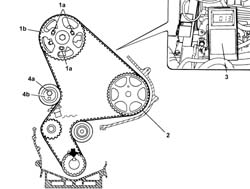
- Turn the engine clockwise without going back until the TDC reference tool fits into its seat on the flywheel.
| Description | Code | Function | |
|---|---|---|---|
| Pin | 1.860.863.000 | Crankshaft TDC reference |
1. Loosen bolts (1a) securing the pulley (1b), then position the 8 mm timing reference pin (1c) through the pulley into its seat on the cylinder head.
2. Fit the C-TRONIC - 105.5 tool facing downward.
3. Unscrew bolt (3a) securing tensioner (3b) and use a ¼" box wrench to tension the belt to the specified value.
| Subject | Value | |
|---|---|---|
| Timing belt/s | unità seem | |
| Timing belt tension | 54 |
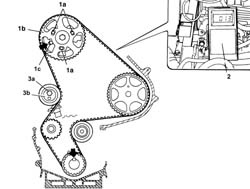
- Tighten the tensioner bolt and the timing pulley bolts.
- Remove the C-TRONIC - 105.5 tool.
- Refit the C-TRONIC - 105.5 too and check that the belt tension is within specified values.
| Subject | Value | |
|---|---|---|
| Timing belt/s | unità seem | |
| Timing belt tension | 51 - 57 |
- Remove the C-TRONIC - 105.5 tool.
- Remove the TDC reference tool.
| Description | Code | Function | |
|---|---|---|---|
| Pin | 1.860.863.000 | Crankshaft TDC reference |
- Remove the 8 mm diameter timing reference tool.
- Turn the engine through two revolutions clockwise without going back until the TDC reference tool fits into its seat on the flywheel.
| Description | Code | Function | |
|---|---|---|---|
| Pin | 1.860.863.000 | Crankshaft TDC reference |
- Check that the 8 mm diameter timing reference pin fits through the pulley into its seat on the cylinder head extension.
- If not, loosen the pulley bolts and turn the camshaft anticlockwise until the 8 mm diameter timing reference pin fits through the pulley into its seat on the cylinder head extension.
- Tighten the pulley retaining bolts.
- Repeat the check.
- Remove the TDC reference tool.
| Description | Code | Function | |
|---|---|---|---|
| Pin | 1.860.863.000 | Crankshaft TDC reference |
- Remove the 8 mm diameter timing reference tool.
- Tighten the bolts securing the pulley to the recommended torque.
| Value - daNm | Fastening | Component | Ø | |
|---|---|---|---|---|
| 2,0 | Bolt | TIMING DRIVEN PULLIES |
- Tighten the tensioner retaining bolt to the recommended torque.
| Value - daNm | Fastening | Component | Ø | |
|---|---|---|---|---|
| 2,3 | Bolt | MOBILE TIMING TENSIONER |
- Position the timing belt lower guard and tighten the retaining bolts.
- Position the timing belt side guard and tighten the retaining bolts.
- Position the timing belt upper guard and tighten the retaining bolts.
- Fit the flexible mounting in the housing in the engine compartment.
- Tighten the nuts securing the flexible mounting to the bodyshell.
| Value - daNm | Fastening | Component | Ø | |
|---|---|---|---|---|
| (body block) 5 | Nuts | FRONT FLEXIBLE MOUNTING BLOCKS, POWER UNIT | M10 |
- Tighten the nut and the two bolts fixing the flexible mounting to the timing side rigid power unit support to torque.
| Value - daNm | Fastening | Component | Ø | |
|---|---|---|---|---|
| (Rigid mount on engine) 5 | Bolt | FRONT FLEXIBLE MOUNTING BLOCKS, POWER UNIT | M10 |
| Value - daNm | Fastening | Component | Ø | |
|---|---|---|---|---|
| (Rigid mount on engine) 8 | Nut | FRONT FLEXIBLE MOUNTING BLOCKS, POWER UNIT | M12 |
- Fit the flywheel lock.
| Description | Code | Function | |
|---|---|---|---|
| Flywheel lock | 1.870.765.001 | Prevent flywheel rotation |
- Fit the auxiliary drivebelt pulley and tighten the retaining bolt to torque using the angular tightening tool.
| Value - daNm | Fastening | Component | Ø | |
|---|---|---|---|---|
| 4+51° | Bolt | CRANKSHAFT PULLEY |
| Description | Code | Function | |
|---|---|---|---|
| Torque wrench | 1.860.942.000 | Connecting rod cap bolt angular tightening |
- Remove the flywheel lock fitted previously.
| Description | Code | Function | |
|---|---|---|---|
| Counter-torque | 1.860.765.001 | Loosen/tighten toothed timing drive pulley bolt |
- Fit the rpm sensor in its housing on the gearbox bell housing and tighten the retaining bolt.
- Connect the electrical connection for the rpm sensor.
| Description | Connector | |
|---|---|---|
| Rpm sensor | K046 |
Op. 1092G10 SINGLE ENGINE BELT R R
- Remove the tool positioned previously under the engine oil sump for supporting the power unit
| Description | Code | Function | |
|---|---|---|---|
| Crossmember | 1.870.735.000 | Lower engine mounting beam |
- Fit the rigid inlet water pipe on the pump.
- Remove the reaction link from its seat again.
- Fit the intake manifold from the upper part of the engine compartment.
- Raise the vehicle.
- Tighten the lower nuts and upper bolts securing the intake manifold to the cylinder head to torque.
| Value - daNm | Fastening | Component | Ø | |
|---|---|---|---|---|
| 2,3 | Bolt | INLET MANIFOLD |
- Fit the exhaust manifold complete with turbocharger from the lower part of the vehicle from the compartment between the suspension beam and body.
- Tighten the bolt securing the turbocharger to the mounting bracket.
- Tighten the nuts securing the exhaust manifold to the cylinder head.
| Value - daNm | Fastening | Component | Ø | |
|---|---|---|---|---|
| 2,0 | Nut | EXHAUST MANIFOLD/S |
- Connect the EGR exhaust gas delivery pipe from the turbocharger and tighten the retaining bolts.
- Connect the rigid oil supply pipe to the turbocharger and tighten the connector.
- Connect the band for the turbocharger sump oil return pipe.
- Fit the lower reaction rod in the housing and tighten the bolt fixing the suspension crossmember to torque.
- Tighten the nut fixing the reaction rod to the gearbox to torque.
- Fit the press-fitted EGR pipe heat shield.
- Fit the rigid air intake pipe to the turbo from the upper part of the engine bay and do up the retaining band.
- Fit the rigid air outlet pipe from the turbocharger from the upper part of the engine bay and do up the lower band on the turbocharger.
Characteristic of working principle
- Lower the vehicle.
- Fit the bracket on the thermostat and tighten the fixing bolts.
- Fit the new pipe from the pressure pump to the fuel manifold.
Each time work is carried out on the pipe from the pressure pump to the fuel manifold it must be replaced with a new one to prevent fuel leaks from the connectors.
- Tighten the connectors on the pressure pump and on the return manifold to torque.
| Value - daNm | Fastening | Component | Ø | |
|---|---|---|---|---|
| 2 | Connector | PRESSURE PUMP LINE TO FUEL MANIFOLD |
- Fit the engine oil dipstick tube and tighten the retaining bolts.
- Fit the bracket located near the pressure pump mounting and tighten the bolts.
- Fit the flexible section of the lower engine coolant pipe.
- Fit the rubber hose from the cam cover to the engine oil vapour separator.
- Connect the two supply and return pipes to the thermostat from the engine oil oil heat exchanger.
- Connect the supplementary heater coolant pipe and the thermostat pipe to the EGR exhaust gas heat exchanger.
- Fit the rigid section of the water recirculation pipe to the cylinder head and tighten the retaining bolts.
- Connect the water recirculation hose from the thermostat.
- Connect the quick-release connector of the vacuum pump pipe.
- Fit the heater water supply pipe.
- Fit the fuel return manifold and connect the fuel recirculation pipe from the injectors.
- Tighten the retaining bolt and connect the quick release fittings of both fuel pipes from the pressure pump.
- Connect the three quick-release connectors on the fuel lines to the fuel return manifold.
- Position the injection wiring and connect the electrical connections.
| Description | Connector | |
|---|---|---|
| Injection pump third piston deactivation solenoid valve | L005 |
| Description | Connector | |
|---|---|---|
| Fuel pressure regulator | N077 |
| Description | Connector | |
|---|---|---|
| Fuel pressure sensor | K083 |
| Description | Connector | |
|---|---|---|
| Injector | N070A |
| Description | Connector | |
|---|---|---|
| Injector | N070B |
| Description | Connector | |
|---|---|---|
| Injector | N070C |
| Description | Connector | |
|---|---|---|
| Injector | N070D |
| Description | Connector | |
|---|---|---|
| Timing sensor | K047 |
| Description | Connector | |
|---|---|---|
| Engine oil pressure sensor | K028 |
| Description | Connector | |
|---|---|---|
| Alternator | A010A |
| Description | Connector | |
|---|---|---|
| Alternator | A010B |
| Description | Connector | |
|---|---|---|
| Rpm sensor | K046 |
| Description | Connector | |
|---|---|---|
| Engine coolant temperature sensor/sender unit | K036 |
| Description | Connector | |
|---|---|---|
| Starter motor | A020A |
| Description | Connector | |
|---|---|---|
| Starter motor | A020B |
- Tighten the nut securing the spark plug supply lead.
- Fit the engine oil vapour pipe and connect to the air intake pipe between the filter and the turbocharger.
- Connect the electrical connection for the engine oil vapour pipe.
| Description | Connector | |
|---|---|---|
| Oil vapour heating resistance | O007A |
- Secure the oil vapour pipe to the cam cover.
- Fit the air filter casing and connect the air flow meter retaining band to the air delivery pipe to the turbo.
- Tighten the nuts securing the filter casing to the bracket.
- Connect the electrical connection for the air flow meter.
| Description | Connector | |
|---|---|---|
| Air flow meter | K041 |
- Fit the filter element between the filter case and the cover. Secure with clips.
- Fit the support bracket located near the thermostat and tighten the nuts.
- Connect the vacuum pipes, vacuum pipe to the EGR and the vacuum pipe to the pneumatic valve on the throttle body to the solenoids.
- Connect the electrical connections of the exhaust gas recirculation regulation solenoid and the throttle body solenoid (1b).
| Description | Connector | |
|---|---|---|
| Throttle body solenoid valve | L062 |
| Description | Connector | |
|---|---|---|
| EGR solenoid valve | L030 |
- Fit the glow plug control unit into its seat on the bracket and tighten the retaining nut.
- Connect the electrical connection for the glow plug control unit.
| Description | Connector | |
|---|---|---|
| Heater plugs control unit | M015C |
- Fit the protective cover for the heater plugs control unit and tighten the fixing bolts.
- Fit the engine coolant reservoir and connect the engine coolant sleeves to this.
- Tighten the nuts securing the reservoir to the bodyshell.
- Connect the upper coolant pipe from the thermostat.
- Connect the lower radiator hose to the rigid section of the pipe.
- Fit the intake manifold turbocharger connection pipe.
Characteristic of working principle
Op. 4130B10 POWER STEERING FLUID RESEVOIR R R
Parts & tools for this job For 2002 Fiat Ducato
- PARTEngine gasket setSearch: Fiat Ducato 2002 engine gasket set
- TOOLTorque wrenchSearch: 3/8 inch torque wrench
- TOOLFeeler gauge setSearch: feeler gauge set
Links open Amazon search results in a new tab. As an Amazon Associate I earn from qualifying purchases.