
Single cylinder head, removed - overhaul
- Make
- Fiat
- Model
- Ducato Factory Service Manual
- Year
- 2002–2006
- Section
- Cylinder head/s › Single cylinder head, removed - overhaul
SINGLE CYLINDER HEAD, REMOVED - OVERHAUL
Removing
- Fit the tool to the cylinder head and secure in the vice.
| Description | Code | Function | |
|---|---|---|---|
| Support | 1.860.470.000 | Cylinder head in vice |
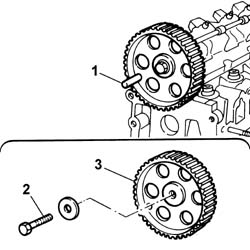
1. Check that the 10 mm diameter reference pin is correctly inserted.
2. Undo the gear retaining bolt.
3. Remove the gear.
- Remove the 10 mm diameter reference pin.
- Remove the spark plugs.
- Remove the press-fitted lubrication pipe and the sealing rings.
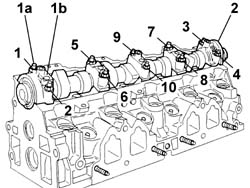
1. Unscrew nuts (1a) securing the camshaft caps in the order shown and remove caps (1b).
Mark the camshaft caps to ensure correct installation.
2. Remove the camshaft.
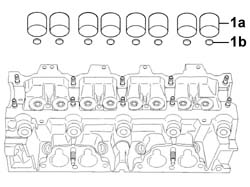
1. Remove tappets (1a) and calibrated valve clearance pads (1b).
Mark the tappets and pads to ensure correct installation.
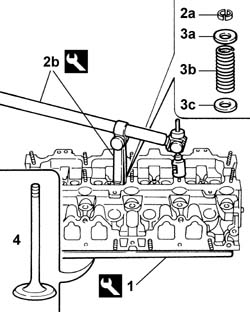
1. Fit the tool beneath the cylinder head.
| Description | Code | Function | |
|---|---|---|---|
| 1 | Valve retaining base | 1.860.804.000 | Valve retention |
2. Remove semicones (2a) from the valve using tools (2b).
| Description | Code | Function | |
|---|---|---|---|
| 2b | Tool | 1.860.644.000 | Removing/refitting valves |
| Description | Code | Function | |
|---|---|---|---|
| 2b | Tool | 1.860.644.030 | Removing/refitting valves |
3. Remove upper plate (3a), spring (3b) and lower plate (3c) in order.
- Repeat the operation for all valves.
- Remove the tool.
| Description | Code | Function | |
|---|---|---|---|
| Valve retaining base | 1.860.804.000 | Valve retention |
4. Remove all valves.
Mark each valve and its components to allow correct assembly.
1. Remove the valve stem sealing ring using the tool.
| Description | Code | Function | |
|---|---|---|---|
| 1 | Extractor | 1.860.792.000 | Valve guide oil seals |
- Repeat the operation for all valve stem sealing rings.
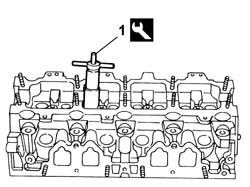
1. Remove the filter from the lubricant delivery channel to the cylinder head.
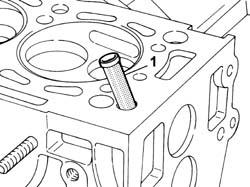
1. Remove the valve guide from its seat using the tool.
| Description | Code | Function | |
|---|---|---|---|
| 1 | Drift | 1.860.395.000 | Valve guide extraction |
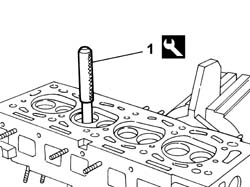
- Remove the cylinder head from the tool.
| Description | Code | Function | |
|---|---|---|---|
| Support | 1.860.470.000 | Cylinder head in vice |
Refitting
- Clean all ducts thoroughly.
1. Check the lower surface and ensure that flatness is within specified limits.
| Subject | Value | |
|---|---|---|
| 1 | CYLINDER HEAD | mm |
| Flatness | 0,05 |
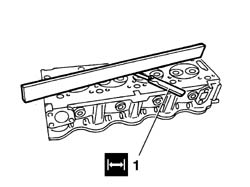
- Fit the camshaft and caps provisionally.
- Tighten the nuts to the recommended torque.
| Value - daNm | Fastening | Component | Ø | |
|---|---|---|---|---|
| 1,6 | Nut | CAMSHAFT CAPS |
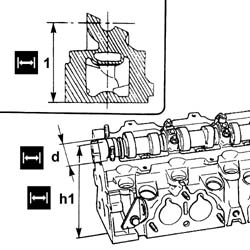
1. Check that cylinder head height is within recommended limits.
| Subject | Value | |
|---|---|---|
| 1 | CYLINDER HEAD | mm |
| Height | 140,95 - 141,05 |
Measure height h1, measure dimension d; the required height h = h1 - d/2.
- Remove the caps and camshaft.
- If cylinder head flatness and/or height are not within specified limits, grind the lower surface to reduce the height to the specified value.
| Subject | Value | |
|---|---|---|
| CYLINDER HEAD | mm | |
| Cylinder head height reduction | 0,20 |
If the grinding involves removing material in excess the specified amount, the cylinder head must be replaced.
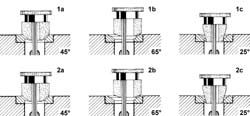
1. Grind the intake valve seats using a suitable tool.
| Subject | Value | |
|---|---|---|
| 1a | VALVE SEATS | |
| Contact band angle with intake valve | 45° |
| Subject | Value | |
|---|---|---|
| 1b | VALVE SEATS | |
| Intake port outlet angle | 65° |
| Subject | Value | |
|---|---|---|
| 1c | VALVE SEATS | |
| Intake port intake angle | 25° |
2. Grind the exhaust valve seats using a suitable tool.
| Subject | Value | |
|---|---|---|
| 2a | VALVE SEATS | |
| Contact band angle with intake valve | 45° |
| Subject | Value | |
|---|---|---|
| 2b | VALVE SEATS | |
| Exhaust port outlet angle | 65° |
| Subject | Value | |
|---|---|---|
| 2c | VALVE SEATS | |
| Exhaust port intake angle | 20° |
| Subject | Value | |
|---|---|---|
| VALVE SEATS | mm | |
| Intake valve contact band width | 1,70 | |
| Exhaust valve contact band width | 2,20 |
1. Check contact between valve and seat is correct after grinding.
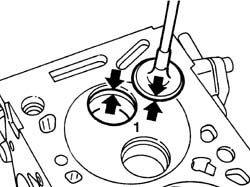
- If it is not possible to obtain centred, even contactg between valve and seat, replace the valve seat.
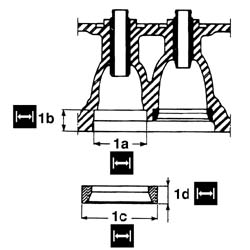
1. Whenever necessary, replace the valve seats using new oversize valve seats to restore the initial conditions.
| Subject | Value | |
|---|---|---|
| 1a | VALVE SEATS | mm |
| Intake valve seat housing diameter, 1st oversize | 42,3 | |
| Intake valve seat housing diameter, 2nd oversize | 42,5 |
| Subject | Value | |
|---|---|---|
| 1a | VALVE SEATS | mm |
| Exhaust valve seat housing diameter, 1st oversize | 36,3 | |
| Exhaust valve seat housing diameter, 2nd oversize | 36,5 |
| Subject | Value | |
|---|---|---|
| 1b | VALVE SEATS | mm |
| Intake valve seat housing height | 15,98 | |
| Exhaust valve seat housing height | 15,25 |
Measure the housing height from the lower cylinder head surface.
| Subject | Value | |
|---|---|---|
| 1c | VALVE SEATS | mm |
| Intake valve seat diameter, 1st oversize | 42,4 | |
| Intake valve seat diameter, 2nd oversize | 42,6 |
| Subject | Value | |
|---|---|---|
| 1c | VALVE SEATS | mm |
| Exhaust valve seat diameter, 1st oversize | 36,4 | |
| Exhaust valve seat diameter, 2nd oversize | 36,6 |
| Subject | Value | |
|---|---|---|
| 1d | VALVE SEATS | mm |
| Oversize intake valve seat height | 8,40 | |
| Oversize exhaust valve seat height | 7,35 |
- Ream the valve guide seats using a suitable tool.
| Subject | Value | |
|---|---|---|
| VALVE GUIDES | mm | |
| Valve guide seat diameter, 1st oversize | 13,195 - 13,227 | |
| Valve guide seat diameter, 2nd oversize | 13,495 - 13,527 |
1. Press-fit new valve guides (1a) from the top of the cylinder head using tool (1b).
| Description | Code | Function | |
|---|---|---|---|
| 1b | Fitting tool | 1.870.751.000 | Valve guide fitting |
It is advisable to heat the cylinder head to 80-100°C to aid fitting.
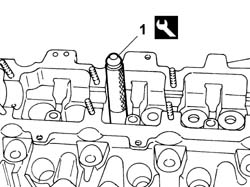
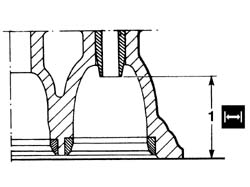
1. Check that valve guide position is within specified limits.
| Subject | Value | |
|---|---|---|
| 1 | VALVE GUIDES | mm |
| Gap between intake valve guide - lower cylinder head surface | 43,65 - 44,35 | |
| Gap between exhaust valve guide - lower cylinder head surface | 38,05 - 38,75 |
- Ream the valve guides using an appropriate tool
| Subject | Value | |
|---|---|---|
| VALVE GUIDES | mm | |
| Valve guide bore | 8,000 - 8,022 |
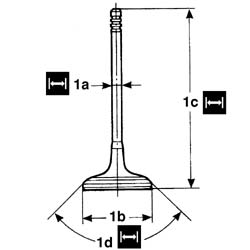
1. Check that the valve specifications are within specified limits; if not, replace the valves.
| Subject | Value | |
|---|---|---|
| 1a | INLET VALVES | mm |
| Stem diameter | 7.965 - 7,980 |
| Subject | Value | |
|---|---|---|
| 1b | INLET VALVES | mm |
| Head diameter | 41,4 - 41,8 |
| Subject | Value | |
|---|---|---|
| 1c | INLET VALVES | mm |
| Height | 108,8, mm |
| Subject | Value | |
|---|---|---|
| 1d | INLET VALVES | |
| Contact angle | 45° |
| Subject | Value | |
|---|---|---|
| 1a | EXHAUST VALVES | mm |
| Stem diameter | 7.955 - 7,970 |
| Subject | Value | |
|---|---|---|
| 1b | EXHAUST VALVES | mm |
| Head diameter | 34,3 - 34,7 |
| Subject | Value | |
|---|---|---|
| 1c | EXHAUST VALVES | mm |
| Height | 108,4 |
| Subject | Value | |
|---|---|---|
| 1d | EXHAUST VALVES | |
| Contact angle | 45°30' |
- Fit the valves and spark plugs provisionally as described later.
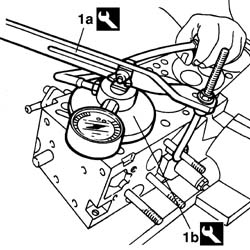
1. Carry out a valve leak test using tools (1a) and (1b).
| Description | Code | Function | |
|---|---|---|---|
| 1a | Lever | 1.860.490.000 | Valve leakage test |
| Description | Code | Function | |
|---|---|---|---|
| 1b | Sealing pad with pressure gauge | 1.895.868.000 | Valve leakage test |
- Using a torque wrench, check that the valve spring specifications meet specified limits; if not, replace the springs.
| Subject | Value | |
|---|---|---|
| EXTERNAL VALVE SPRING | ||
| Length | 54,5 mm | |
| Under a load of | 0 daN |
| Subject | Value | |
|---|---|---|
| EXTERNAL VALVE SPRING | ||
| Length | 42,5 mm | |
| Under a load of | 39 daN |
| Subject | Value | |
|---|---|---|
| EXTERNAL VALVE SPRING | ||
| Length | 31,0 mm | |
| Under a load of | 85 daN |
- Fit the tool to the cylinder head and secure in the vice.
| Description | Code | Function | |
|---|---|---|---|
| Support | 1.860.470.000 | Cylinder head in vice |
- Fit a new filter in the lubricant delivery channel to the cylinder head.
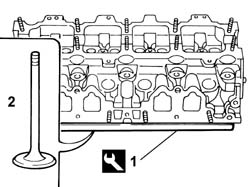
1. Fit all the valve in their valve guides.
2. Fit the tool beneath the cylinder head.
| Description | Code | Function | |
|---|---|---|---|
| 2 | Valve retaining base | 1.860.804.000 | Valve retention |
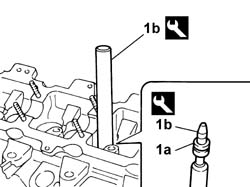
1. Fit the sealing ring (1a) into its seat using tool (1b).
| Description | Code | Function | |
|---|---|---|---|
| 1b | Fitting tool | 1.860.313.000 | Valve guide oil seal fitting. |
- Repeat the operation for all rings.
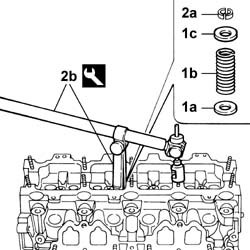
1. Fit the lower plate (1a), spring (1b) and upper plate (1c) in order, respecting the marks made upon disassembly.
2. Fit semicones (2a) and settle in their seats using tools (2b).
| Description | Code | Function | |
|---|---|---|---|
| 2b | Tool | 1.860.644.030 | Removing/refitting valves |
| Description | Code | Function | |
|---|---|---|---|
| 2b | Tool | 1.860.644.000 | Removing/refitting valves |
- Repeat the operation for all valves.
1. Fit the calibrated pads to adjust the clearance. Ensure they are fitted in the correct direction.
2. Fit the tappets in their housing.
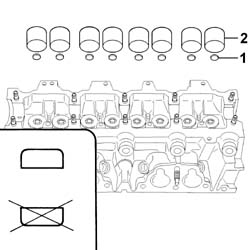
1. Fit the camshaft.
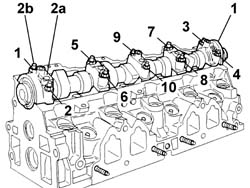
2. Fit the camshaft caps (2a) and tighten retaining nuts (2b) to the specified torque in the order shown.
| Value - daNm | Fastening | Component | Ø | |
|---|---|---|---|---|
| 2b | 1,6 | Nut | CAMSHAFT CAPS |
- Fit the timing gear provisionally.
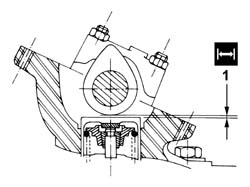
1. 1. Position each cam upright and check the clearance is within specified limits.
| Subject | Value | |
|---|---|---|
| VALVE TAPPETS | mm | |
| Inlet valve clearance check | 0,15 - 0,25 | |
| Exhaust valve clearance check | 0,35 - 0,45 |
- if not as specified, remove the camshaft caps, camshaft and tappets.
- Remove a calibrated pad and measure its thickness.
- Calculate the difference between the measured clearance and the specified clearance for each pad.
The difference may be positive (+ sign) or negative (- sign).
- Calculate the thickness of the pad to be fitted by adding the thickness of the current pad to the calculated difference (including the + or - sign).
- Repeat the procedure for all calibrated pads.
- Fit the tappets.
1. Fit the camshaft.
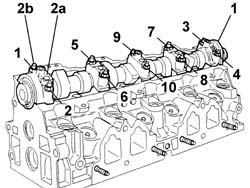
2. Fit the camshaft caps (2a) and tighten retaining nuts (2b) to the specified torque in the order shown.
| Value - daNm | Fastening | Component | Ø | |
|---|---|---|---|---|
| 2b | 1,6 | Nut | CAMSHAFT CAPS |
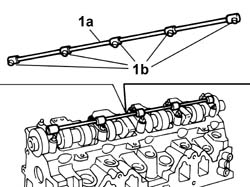
1. Press-fit the lubrication pipe (1a) and the sealing rings (1b).
Removing
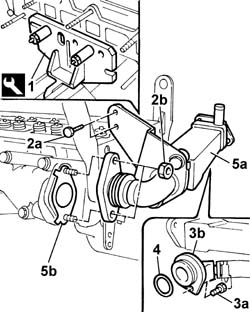
1. Position the cylinder head in the vice supporting it using a suitable tool.
| Description | Code | Function | |
|---|---|---|---|
| 1 | Support | 1.860.470.000 | Cylinder head in vice |
2. Undo the bolts (2a) and the nuts (2b).
3. Undo the bolts (3a) and remove the connector (3b) from the cylinder head.
4. Remove the seal.
5. Remove the heat exchanger for the EGR (5a) and the gaskets (5b).
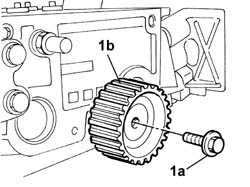
1. Undo the bolt (1a) and remove the fixed timing belt tensioner (1b).
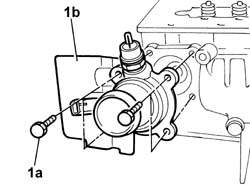
1. Undo the bolts (1a) and remove the thermostat (1b).
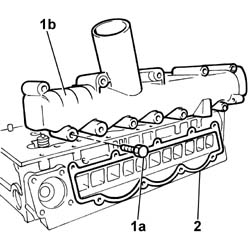
1. Undo the bolts (1a) and remove the intake manifold (1b).
2. Remove the seal.
1. Undo the bolts (1a) and remove the brackets (1b).
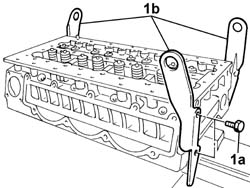
- Position the tool for supporting the valves in the lower part of the cylinder head.
| Description | Code | Function | |
|---|---|---|---|
| 1 | Valve retaining base | 1.860.804.000 | Valve retention |
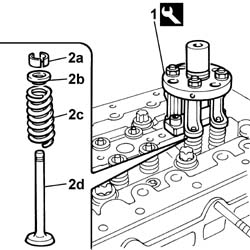
1. Compress the valve springs using the special tool.
| Description | Code | Function | |
|---|---|---|---|
| 1 | Tool | 99360260 | Valve spring compression |
2. Release the cotters (2a), caps (2b) and springs (2c), then, removing the tools, release the valves (2d) from the cylinder head.
Separate the exhaust valves and the inlet valves and mark them.
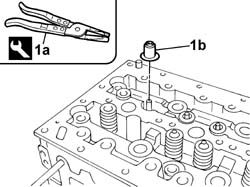
1. Remove the oil seals (1b) from the valve guides using pliers (1a).
| Description | Code | Function | |
|---|---|---|---|
| 1a | Extractor | 1.860.989.000 | Valve guide oil seal extraction |
See in Op. 1016E14
Refitting
- De-carbonize and clean the valve seats and ducts.
- Clean any residues of the old gasket from the lower cylinder head plane.
- Check that the planarity of the lower cylinder head plane corresponds to the recommended values.
| Subject | Value | |
|---|---|---|
| Cylinder head | mm | |
| Lower plane planarity | 0.1 |
- If the planarity of the lower cylinder head plane does not correspond to the recommended figures, regrind it without exceeding the minimum permitted height.
- Check that the valves do not show signs of grooves or seizing.
- Check that the diameter of the valve stems corresponds to the recommended figures; if not, replace the worn valves.
| Subject | Value | |
|---|---|---|
| INLET VALVES | mm | |
| Stem diameter | 5.985 - 6,000 |
| Subject | Value | |
|---|---|---|
| EXHAUST VALVES | mm | |
| Stem diameter | 5.975 - 5.990 |
See in Op. 1016E14
- Using a torque wrench, check that the spring specifications correspond to the recommended figures; if not, replace the worn components.
| Subject | Value | |
|---|---|---|
| VALVE SPRINGS | mm | |
| Length | 45 | |
| Under a load of | 23.1 - 25.5 |
| Subject | Value | |
|---|---|---|
| VALVE SPRINGS | mm | |
| Length | 35 | |
| Under a load of | 50.9 - 55.7 |
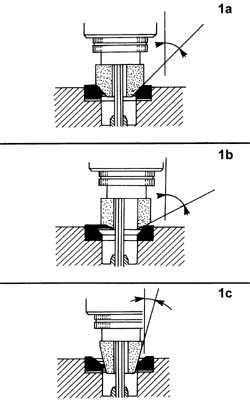
1. Grind the valve seats at (1a), (1b) and (1c) using a suitable tool.
| Subject | Value | |
|---|---|---|
| 1a | VALVE SEATS | |
| Contact band angle with inlet/exhaust valve | 44° 25' - 44° 35' |
- Check that the valve recess in relation to the cylinder head plane corresponds to the recommended figures using the tool fitted with a magnetic base.
| Description | Code | Function | |
|---|---|---|---|
| Dial gauge support | 1.870.404.000 | Valve recess in cylinder head plane measurement |
- If the valve recess in relation to the cylinder head plane does not correspond to the recommended figures, regrind the valve seats once again.
- Fit all the valves in the correct positions.
- Position the tool for supporting the valves in the lower part of the cylinder head.
| Description | Code | Function | |
|---|---|---|---|
| Valve retaining base | 1.860.804.000 | Valve retention |
- Fit the oil seals (1b) on the valve stems using the tool (1a).
| Description | Code | Function | |
|---|---|---|---|
| Fitting tool | 1.860.993.000 | Fitting oil seals on valve stems |
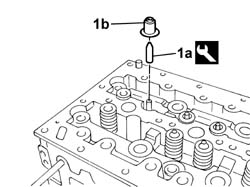
- Fit the valve springs and shims.
- Compress the valve springs and fit the cotters using the special tool.
| Description | Code | Function | |
|---|---|---|---|
| Tool | 99360260 | Valve spring compression |
- Remove the tools used for fitting the valves.
| Description | Code | Function | |
|---|---|---|---|
| Valve retaining base | 1.860.804.000 | Valve retention |
| Description | Code | Function | |
|---|---|---|---|
| Tool | 99360260 | Valve spring compression |
- Position the brackets and tighten the fixing bolts to the recommended torque.
| Value - daNm | Fastening | Component | Ø | |
|---|---|---|---|---|
| 2.5 | Bolt | HOISTS | M8 X 1.25 |
- Fit a new gasket, position the intake manifold and tighten the fixing bolts to the recommended torque.
| Value - daNm | Fastening | Component | Ø | |
|---|---|---|---|---|
| 2.5 | Bolt | INLET MANIFOLD | M8 X 1.25 |
- Position the thermostat and tighten the fixing bolts.
- Fit the fixed timing belt tensioner and tighten the retaining bolt to the recommended torque.
| Value - daNm | Fastening | Component | Ø | |
|---|---|---|---|---|
| 2.5 | Bolt | FIXED TENSIONER | M8 X 1.25 |
- Fit the new gaskets, position the EGR heat exchanger and tighten the fixing bolts and nuts.
- Connect the EGR heat exchanger connector to the cylinder head and tighten the fixing bolt.
- Remove the cylinder head from the vice.
- Remove the support tool.
| Description | Code | Function | |
|---|---|---|---|
| 1 | Support | 1.860.470.000 | Cylinder head in vice |
Removing
1. Fit the tool on the cylinder head and secure the tool on a vice.
| Description | Code | Function | |
|---|---|---|---|
| 1 | Support | 1.860.470.000 | Cylinder head in vice |
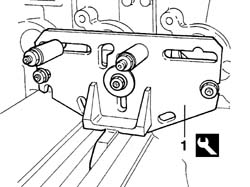
1. Undo bolts (1a) and remove pulley (1b) using tool (1c).
| Description | Code | Function | |
|---|---|---|---|
| 1c | Counter-torque | 1.860.776.000 | Timing pulley lock |
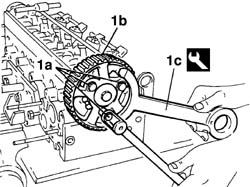
1. Undo central nut (1a) and remove flange (1b) using tool (1c).
| Description | Code | Function | |
|---|---|---|---|
| 1c | Counter-torque | 1.860.776.000 | Timing pulley lock |
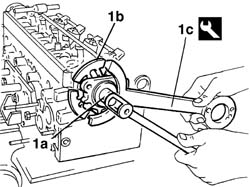
1. Undo the bolts and nut (1a) and remove the vacuum pump (1b).
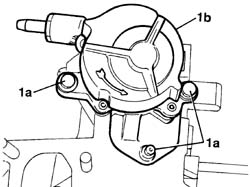
- Remove the fuel return pipe from the injector.
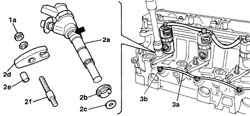
1. Undo nut (1a) securing the injector bracket.
2. Remove injector (2a), sealing ring (2b), washer (2c), bracket (2d) and support dowel (2e).
- Repeat the operation for all the injectors.
If the injector is difficult to remove, after removing bracket (2d), remove stud (2f) using a counternut, then use a wrench at the point indicated to shift the injector from its seat.
3. Remove spark plug supply lead (3a) and spark plugs (3b).
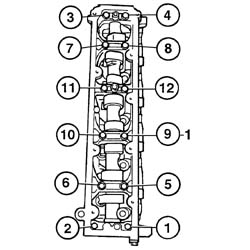
1. Undo the twelve bolts in the order indicated.
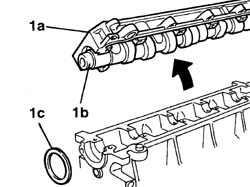
1. Remove the cylinder head extension (1a), camshaft (1b) and oil sealing ring (1c).
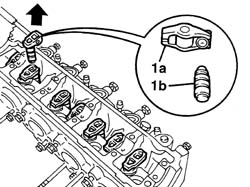
1. Remove rocker (1a) and tappet (1b).
- Repeat the operation for all rocker-tappet assemblies.
Mark each rocker-tappet pair to allow correct assembly.
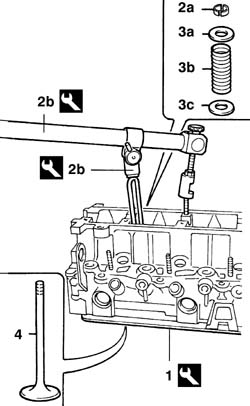
1. Fit the tool beneath the cylinder head.
| Description | Code | Function | |
|---|---|---|---|
| 1 | Valve retaining base | 1.860.804.000 | Valve retention |
2. Remove half-cones (2a) from the valve using tools (2b).
| Description | Code | Function | |
|---|---|---|---|
| 2b | Tool | 1.860.644.000 | Removing/refitting valves |
| Description | Code | Function | |
|---|---|---|---|
| 2b | Tool | 1.860.877.000 | Removing/refitting valves |
3. Remove upper plate (3a), spring (3b) and lower plate (3c) in order.
- Repeat the operation for all the valves.
- Remove the tool.
| Description | Code | Function | |
|---|---|---|---|
| Valve retaining base | 1.860.804.000 | Valve retention |
4. Remove all the valves.
Mark each valve and associated components to allow correct fitting.
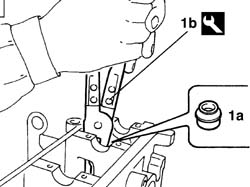
1. Remove valve stem sealing ring (1a) using tool (1b).
| Description | Code | Function | |
|---|---|---|---|
| 1b | Extractor | 1.860.989.000 | Valve guide oil seal extraction |
- Repeat the operation for all the valve stem sealing rings.
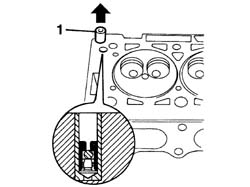
1. Remove the lubrication circuit check valve.
1. Remove the valve guides from their seats using the tool.
| Description | Code | Function | |
|---|---|---|---|
| 1 | Extractor | 1.860.939.000 | Valve guide extraction |
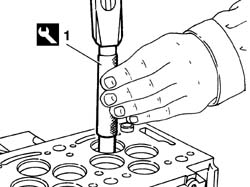
- Remove the cylinder head from the tool.
| Description | Code | Function | |
|---|---|---|---|
| Support | 1.860.470.000 | Cylinder head in vice |
Refitting
- Clean all the ports thoroughly.
1. Check the lower surface and check that flatness is within specified limits.
| Subject | Value | |
|---|---|---|
| 1 | CYLINDER HEAD | mm |
| Flatness | 0,05 |
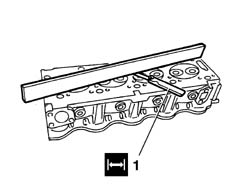
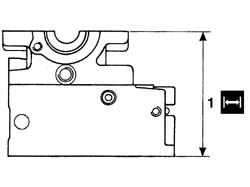
1. Check that the cylinder head height is within the recommended limits.
| Subject | Value | |
|---|---|---|
| 1 | CYLINDER HEAD | mm |
| Height | 132,95 - 133,05 |
- if cylinder head flatness and/or height are not within the specified limits, grind the lower surface without exceeding the minimum pemitted height.
| Subject | Value | |
|---|---|---|
| CYLINDER HEAD | mm | |
| Minimum permitted height | 132,55 - 132,65 |
If the height is lower than the minimum level, the cylinder head must be replaced.
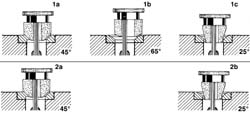
1. Grind the intake valve seats using a suitable tool.
| Subject | Value | |
|---|---|---|
| 1a | VALVE SEATS | |
| Contact band angle with intake valve | 45° |
| Subject | Value | |
|---|---|---|
| 1b | VALVE SEATS | |
| Intake port outlet angle | 65° |
| Subject | Value | |
|---|---|---|
| 1c | VALVE SEATS | |
| Intake port intake angle | 25° |
2. Grind the exhaust valve seats using a suitable tool.
| Subject | Value | |
|---|---|---|
| 2a | VALVE SEATS | |
| Contact band angle with intake valve | 45° |
| Subject | Value | |
|---|---|---|
| 2b | VALVE SEATS | |
| Exhaust port intake angle | 25° |
| Subject | Value | |
|---|---|---|
| VALVE SEATS | mm | |
| Intake valve contact band width | 1,00 |
| Subject | Value | |
|---|---|---|
| VALVE SEATS | mm | |
| Exhaust valve contact band width | 2,25 |
1. Check the correct contact between the valve and seat after grinding.
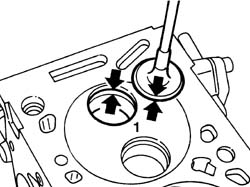
- If it is not possible to achieve centred, uniform contact between valve and seat, replace the valve seat.
- Ream the valve guide seats using a suitable tool.
| Subject | Value | |
|---|---|---|
| VALVE GUIDES | mm | |
| Oversize valve guide seat diameter | 12,398 - 12,521 |
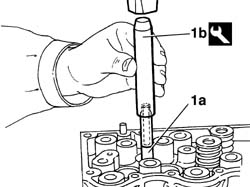
1. Press-fit new and oversize valve guides (1a) from the upper part of the cylinder head using tool (1b).
| Description | Code | Function | |
|---|---|---|---|
| 1b | Fitting tool | 1.870.768.000 | Valve guide fitting |
It is advisable to heat the cylinder head to 80-100°C to facilitate fitting.
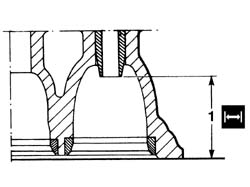
1. Check that valve guide position is within specified limits
| Subject | Value | |
|---|---|---|
| 1 | VALVE GUIDES | mm |
| Distance between valve guide - lower cylinder head surface | 34,50 - 35,50 |
- Ream the valve guides using a suitable tool.
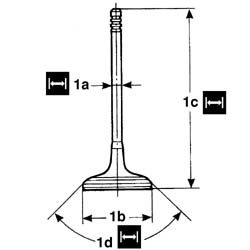
1. Check that the valve specifrications correspond to the recommended limits; if not, replace the valves.
| Subject | Value | |
|---|---|---|
| 1a | INLET VALVES | mm |
| Stem diameter | 5,971 - 5,985 |
| Subject | Value | |
|---|---|---|
| 1b | INLET VALVES | mm |
| Head diameter | 35,5 - 35,7 |
| Subject | Value | |
|---|---|---|
| 1c | INLET VALVES | mm |
| Height | 106,78 - 107,18 |
| Subject | Value | |
|---|---|---|
| 1d | INLET VALVES | mm |
| Contact angle | 45° - 45° 7'30" |
| Subject | Value | |
|---|---|---|
| 1a | EXHAUST VALVES | mm |
| Stem diameter | 5,961 - 5,975 |
| Subject | Value | |
|---|---|---|
| 1b | EXHAUST VALVES | mm |
| Head diameter | 33,7 - 33,9 |
| Subject | Value | |
|---|---|---|
| 1c | EXHAUST VALVES | mm |
| Height | 107,18 - 106,78 |
| Subject | Value | |
|---|---|---|
| 1d | EXHAUST VALVES | mm |
| Contact angle | 45° - 45°7'30" |
1. Check that valve protrusion (1a) in relation to the cylinder head surface meets specified limits using tool (1b).
| Description | Code | Function | |
|---|---|---|---|
| 1b | Dial gauge support | 1.870.404.000 | Injector projection from cylinder head plane measurement |
Make four diametrically opposed measurements and use the average reading.
| Subject | Value | |
|---|---|---|
| CYLINDER HEAD VALVES (ALL) | mm | |
| Protrusion from lower cylinder head surface | 0,20 |
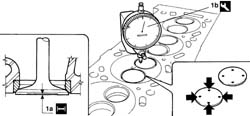
- Repeat the operation for each valve.
- Fit the valves, injectors and glow plugs provisionally as described below.
1. Test the valve seal using tool (1a) and (1b).
| Description | Code | Function | |
|---|---|---|---|
| 1a | Lever | 1.860.490.000 | Valve leakage test |
| Description | Code | Function | |
|---|---|---|---|
| 1b | Sealing pad with pressure gauge | 1.895.868.000 | Valve leakage test |
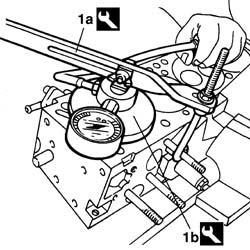
- Using a torque wrench, check that the spring specifications correspond to the recommended figures; if not, replace the worn springs.
| Subject | Value | |
|---|---|---|
| EXTERNAL VALVE SPRING | ||
| Length | 37,0 mm | |
| Under a load of | 24,700-27,300 daN |
| Subject | Value | |
|---|---|---|
| EXTERNAL VALVE SPRING | ||
| Length | 27,7 mm | |
| Under a load of | 43,225-47,775 daN |
- Fit the cylinder head extension together with the camshaft as described below.
- Tighten the ten retaining bolts to the specified torque as described below.
| Value - daNm | Fastening | Component | Ø | |
|---|---|---|---|---|
| 1,0 | Bolt | CYLINDER HEAD EXTENSION FASTENERS |
1. Check that the axial clearance is within specified limits.
| Subject | Value | |
|---|---|---|
| 1 | CAMSHAFT INTAKE AND EXHAUST | mm |
| End float | 0,08 - 0,38 |
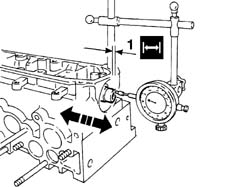
- Remove the bolts, cylinder head extension and camshaft.
- Fit the tool on the cylinder head and secure the tool on a vice.
| Description | Code | Function | |
|---|---|---|---|
| Support | 1.860.470.000 | Cylinder head in vice |
- Fit the lubrication circuit check valve.
1. Fit all the valves in the valve guide.
2. Fit the tool beneath the cylinder head.
| Description | Code | Function | |
|---|---|---|---|
| 2 | Valve retaining base | 1.860.804.000 | Valve retention |
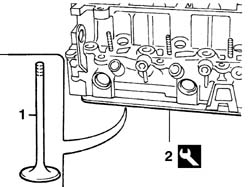
1. Fit sealing ring (1a) into its seat using tool (1b).
| Description | Code | Function | |
|---|---|---|---|
| 1b | Fitting tool | 1.860.993.000 | Fitting oil seals on valve stems |
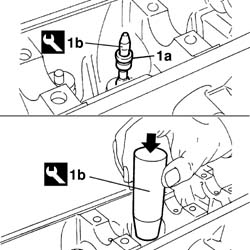
- Repeat the operation for all the rings.
1. Fit lower plate (1a), spring (1b) and upper plate (1c) in order, respecting the marks made upon disassembly.
2. Fit semicones (2a), taking care to settle in their seats using tools (2b).
| Description | Code | Function | |
|---|---|---|---|
| 2b | Tool | 1.860.644.000 | Removing/refitting valves |
| Description | Code | Function | |
|---|---|---|---|
| 2b | Tool | 1.860.877.000 | Removing/refitting valves |
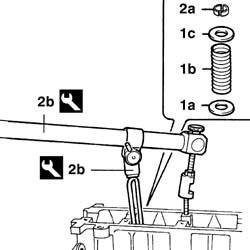
- Repeat the operation for all the valves.
- Fit the tappet and rockers, respecting the marks made upon disassembly.
- Repeat the operation for all rocker-tappet assemblies.
1. Apply silicone sealant to the cylinder head extension mating surfaces.
| Description | Qty. | Component | Type | Classification | |
|---|---|---|---|---|---|
| DOW CORNING, 7091 | CYLINDER HEAD EXTENSION | Silicone sealant |
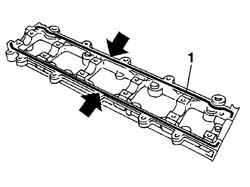
- Fit the cylinder head extension together with the camshaft.
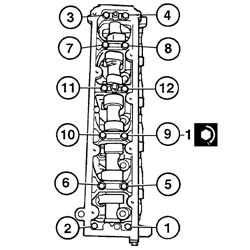
1. Tighten the twelve bolts (1a) to the specified torque in the order indicated.
| Value - daNm | Fastening | Component | Ø | |
|---|---|---|---|---|
| 1 | 1,0 | Bolt | CYLINDER HEAD EXTENSION FASTENERS |
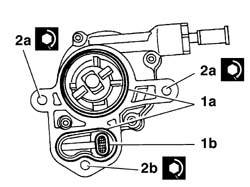
1. Lubricate and, if necessary, replace the seals (1a) and the oil filter (1b).
2. Fit the vacuum unit and tighten the bolts (2a) and the nut (2b) to the recommended torque.
| Value - daNm | Fastening | Component | Ø | |
|---|---|---|---|---|
| 2a | 4,3 | Bolt | BRAKING SYSTEM BRAKES |
| Value - daNm | Fastening | Component | Ø | |
|---|---|---|---|---|
| 2b | 4,3 | Nut | BRAKING SYSTEM BRAKES |
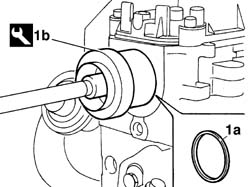
1. Fit the oil sealing ring (1a) using the tool (1b)
| Description | Code | Function | |
|---|---|---|---|
| 1b | Fitting tool | 1.860.990.000 | Camshaft front oil seal |
- Fit the camshaft pulley flange, centring the drive tooth.
- Tighten the central flange retaining nut to the specified torque using the tool.
| Description | Code | Function | |
|---|---|---|---|
| Counter-torque | 1.860.776.000 | Timing pulley lock |
| Value - daNm | Fastening | Component | Ø | |
|---|---|---|---|---|
| 4,3 | Nut | TIMING PULLEY FLANGE |
- Check spark plug continuity using a multimeter.
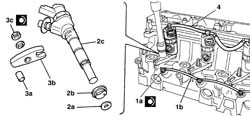
1. Fit spark plugs (1a), tighten to the specified torque and fit spark plug supply lead (1b).
| Value - daNm | Fastening | Component | Ø | |
|---|---|---|---|---|
| 1a | 2,3 | Spark plug | GLOW PLUGS |
2. Fit the shim (2a), sealing ring (2b) and injector (2c) in order
3. Fit support dowel (3a), bracket (3b) and tighten nut (3c) to the specified torque.
| Value - daNm | Fastening | Component | Ø | |
|---|---|---|---|---|
| 3c | 2,3 | Nut | INJECTORS(DIESEL) |
- Repeat the operation for all the injectors.
4. Fit the fuel return pipe.
- Proceed with the DISMANTLING.
- Place the head on a workbench.
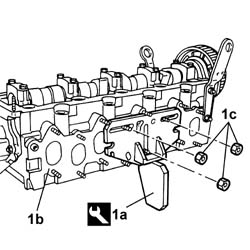
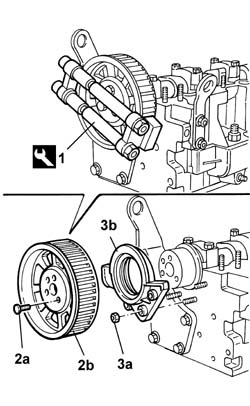
1. Fit the tool (1a) on the cylinder head (1b) and secure it using the nuts (1c), then place the tool (1a) in a vice.
| Description | Code | Function | |
|---|---|---|---|
| 1a | Counter-torque | 1.860.765.001 | Loosen/tighten auxiliary shaft toothed drive pulley bolt |
1. Fit the tool.
| Description | Code | Function | |
|---|---|---|---|
| 1 | Counter-torque | 1.860.765.001 | Loosen/tighten toothed timing drive pulley bolt |
2. Undo the fixing bolts (2a) and remove the driven timing pulley (2b).
3. Undo the fixing nuts (3a) and remove the front cover (3b).
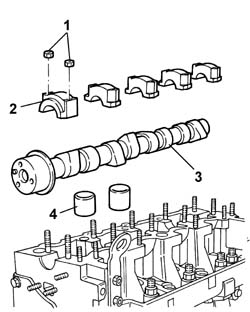
1. Undo the nuts fixing the camshaft caps.
2. Remove the camshaft caps.
3. Remove the camshaft.
4. Remove the tappets.
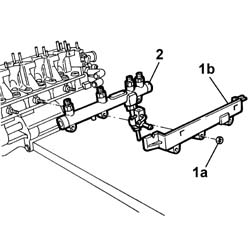
1. Undo the nuts (1a) and remove the fuel distribution manifold cover (1b).
2. Remove the fuel distribution manifold.
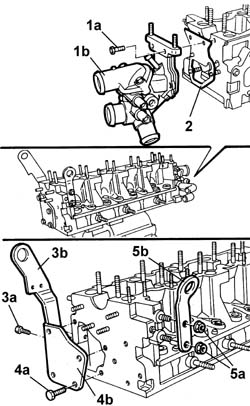
1. Undo the bolts (1a) and remove the thermostat unit (1b).
2. Remove the seal.
3. Undo the fixing bolts (3a) and remove the bracket (3b).
4. Undo the fixing bolts (4a) and remove the cover (4b).
5. Undo the fixing nuts (5a) and remove the bracket (5b).
- Remove the cylinder head from the vice.
- Position a suitable wooden stand on the cylinder head plane to support the valves and secure it using bolts.
- Refit the cylinder head in the vice.
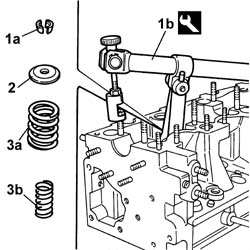
1. Remove the cotters (1a) using the tool (1b).
| Description | Code | Function | |
|---|---|---|---|
| 1b | Tool | 1.860.644.000 | Removing/refitting valves |
2. Remove the valve upper shim.
3. Remove the outer valve spring (3a) and the inner one (3b).
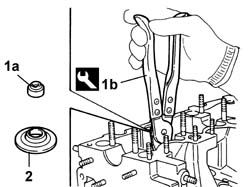
1. Remove the valve guide oil seal (1a) using the tool (1b).
| Description | Code | Function | |
|---|---|---|---|
| 1b | Extractor | 1.860.989.000 | Valve guide oil seal extraction |
2. Remove the lower shim.
- Carry out the same operations on the other valves.
- Remove the cylinder head from the vice.
- Remove the wooden stand and keep the valves.
- Remove the support tool from the cylinder head.
| Description | Code | Function | |
|---|---|---|---|
| Support | 1.860.470.000 | Cylinder head in vice |
See in Op. 1016E14
- Proceed with the REASSEMBLY
- Clean any residues of the old gasket from the lower cylinder head plane.
- Check that the planarity of the lower cylinder head plane corresponds to the recommended values.
| Subject | Value | |
|---|---|---|
| Cylinder head | mm | |
| Lower plane planarity | 0.1 |
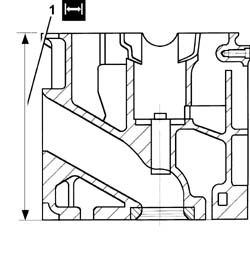
1. If the planarity of the lower cylinder head plane does not correspond to the recommended figures, regrind it without exceeding the minimum permitted height.
| Subject | Value | |
|---|---|---|
| 1 | Cylinder head | mm |
| Minimum permitted height | 149,5 - 149,7 |
- Check that the valves do not show signs of grooves or seizing.
- Check that the diameter of the valve stems corresponds to the recommended figures; if not, replace the worn valves.
| Subject | Value | |
|---|---|---|
| Cylinder head valves (all) | mm | |
| Stem diameter | 7,985 - 8,000 |
See in Op. 1016E14
- Check that the tappet outer diameter corresponds to the recommended figures; if not, replace the tappets with oversize ones.
| Subject | Value | |
|---|---|---|
| Cylinder head camshaft tappet cases | mm | |
| Outer diameter | 43,950 - 43,970 | |
| Outer diameter oversize | 44,150 - 44,170 |
This operation involves replacing the cylinder head with one with oversize tappet housings.
- Check that the diameter of the tappet housings corresponds to the recommended figures; if not, replace the cylinder head.
| Subject | Value | |
|---|---|---|
| Engine cylinder head | mm | |
| Tappet housing diameter | 44,000 - 44,025 | |
| Tappet housing diameter oversize | 44,200 - 44,225 |
- Using a torque wrench, check that the spring specifications correspond to the recommended figures; if not, replace the worn components.
| Subject | Value | |
|---|---|---|
| Inner valve spring | ||
| Length mm | 33,5 | |
| under a load of daN | 15,4 - 17,4 |
| Subject | Value | |
|---|---|---|
| Inner valve spring | ||
| Length mm | 23,5 | |
| under a load of daN | 28,5 - 38,5 |
| Subject | Value | |
|---|---|---|
| Inner valve spring | ||
| Length mm | 38,5 | |
| under a load of daN | 41,3 - 46,3 |
| Subject | Value | |
|---|---|---|
| Inner valve spring | ||
| Length mm | 28,5 | |
| under a load of daN | 73,4 - 81,4 |
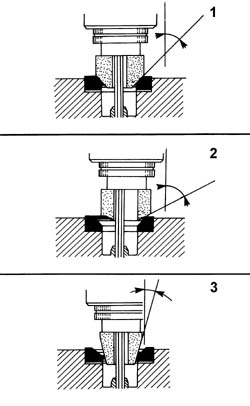
1. Reface the valve seats to the recommended figure using a suitable tool.
| Subject | Value | |
|---|---|---|
| 1 | Cylinder head valve seats (all) | |
| Contact band angle with inlet valve | 29° 55' - 30° 05' | |
| Contact band angle with exhaust valve | 44° 55' - 45° 05' |
| Subject | Value | |
|---|---|---|
| 2 | Cylinder head valve seats (all) | |
| Inlet/exhaust manifold outlet angle | 20° |
| Subject | Value | |
|---|---|---|
| 3 | Cylinder head valve seats (all) | |
| Inlet/exhaust manifold inlet angle | 75° |
- Temporarily fit the injectors.
1. Check that the injector projection in relation to the cylinder head plane (1a) corresponds to the recommended figures using the tool (1b) fitted with a dial gauge.
| Subject | Value | |
|---|---|---|
| Injectors (DIESEL) | mm | |
| Projection from cylinder head plane | 2,230 - 2,690 |
| Description | Code | Function | |
|---|---|---|---|
| 1b | Dial gauge support | 1.870.404.000 | Injector projection from cylinder head plane measurement |
2. If the projection of the injectors in relation to the cylinder head plane does not correspond to the recommended figures, fit an approriate oversize washer in the injector seat.
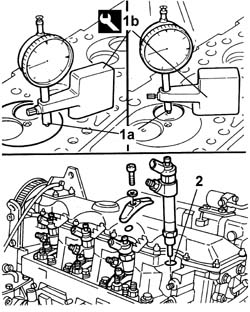
- Remove the injectors.
- Temporarily fit the valves.
1. Check that the valve recess in relation to the cylinder head plane (1a) corresponds to the recommended figures using the tool (1b) fitted with a dial gauge.
| Subject | Value | |
|---|---|---|
| 1a | Cylinder head valves (all) | |
| Valve recess in relation to cylinder head plane | mm | |
| inlet | 1,2 - 1,5 | |
| exhaust | 1,0 - 1,3 |
| Description | Code | Function | |
|---|---|---|---|
| 1b | Dial gauge support | 1.870.404.000 | Valve recess in cylinder head plane measurement |
- If the valve recess in relation to the cylinder head plane does not correspond to the recommended figures, regrind the valve seats once again.
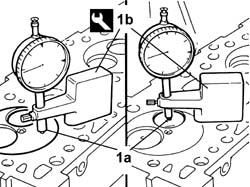
- Remove the valves.
- Check that the nominal camshaft cam lift corresponds to the recommended figures; if not, replace the worn camshaft.
| Subject | Value | |
|---|---|---|
| INTAKE AND EXHAUST CAMSHAFT | ||
| Nominal cam lift | mm | |
| inlet | 9,5 | |
| exhaust | 10,5 |
- Check that the diameter of the camshaft bearings corresponds to the recommended figures; if not, replace the worn camshaft with an oversize one.
| Subject | Value | |
|---|---|---|
| INTAKE AND EXHAUST CAMSHAFT | mm | |
| Journal diameter | 33,934 - 33,950 |
| Subject | Value | |
|---|---|---|
| INTAKE AND EXHAUST CAMSHAFT | mm | |
| Journal diameter oversize | 0,20 |
This operation involves regrinding the camshaft supports as described below.
- Fit the camshaft caps (1a) on the cylinder head and tighten the nuts (1b) to the recommended torque.
| Value - daNm | Fastening | Component | Ø | |
|---|---|---|---|---|
| 1,8 | Nut | CAMSHAFT SUPPORTS | M8 |
follow the progressive numbering for the camshaft caps (1 = timing pulley side) and position the caps so that the numbers stamped on them are legible from the injector side.
- Check that the camshaft support diameter corresponds to the recommended figures; if not, proceed with the regrinding using the recommended oversize.
| Subject | Value | |
|---|---|---|
| Camshaft caps | mm | |
| Support diameter | 33,985 - 34,015 |
| Subject | Value | |
|---|---|---|
| Camshaft caps | mm | |
| Support diameter oversize | 0,20 |
The camshaft supports should all be reground to the same oversize.
This operation involves replacing the camshaft with an oversize one.
- Fit the support tool on the cylinder head and secure it using the nuts.
| Description | Code | Function | |
|---|---|---|---|
| Support | 1.860.470.000 | Cylinder head in vice |
- Fit all the valves.
- Position a suitable wooden stand on the cylinder head plane to support the valves and secure it using bolts.
- Fit the cylinder head, complete with valves, in the vice.
- Fit the lower shim.
1. Fit the valve guide oil seal (1a) using the tool (1b).
| Description | Code | Function | |
|---|---|---|---|
| 1b | Fitting tool | 1.860.313.000 | Valve guide oil seal fitting. |
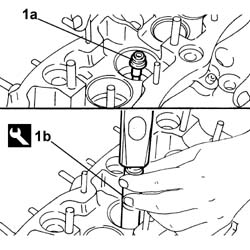
1. Fit the inner valve spring (1a) and the outer one (1b).
2. Fit the valve upper shim.
3. Fit the cotters (3a) using the tool (3b).
| Description | Code | Function | |
|---|---|---|---|
| 3b | Tool | 1.860.644.000 | Removing/refitting valves |
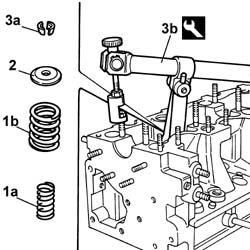
- Carry out the same operations on the other valves.
- Remove the cylinder head from the vice.
- Remove the wooden stand supporting the valves.
- Refit the cylinder head in the vice.
- Fit the tappets complete with valve clearance adjustment pads.
- Fit the camshaft.
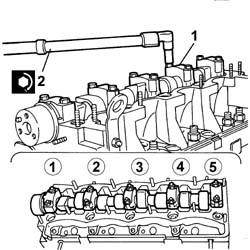
1. Fit the camshaft caps.
2. Tighten the camshaft cap bolts to the recommended torque.
| Value - daNm | Fastening | Component | Ø | |
|---|---|---|---|---|
| 1,8 | Nut | CAMSHAFT SUPPORTS | M8 |
follow the progressive numbering for the camshaft caps (1 = timing pulley side) and position the caps so that the numbers stamped on them are legible from the injector side.
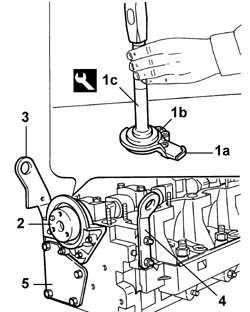
1. Fit the front oil seal on the camshaft cover (1a) using the tools (1b) and (1c).
| Description | Code | Function | |
|---|---|---|---|
| 1b | Fitting tool | 1.860.623.000 | Camshaft front oil seal fitting |
| Description | Code | Function | |
|---|---|---|---|
| 1c | Grip | 1.870.007.000 | Camshaft front oil seal fitting |
2. Fit the front cover applying sealant and tighten the fixing nuts to the recommended torque.
| Value - daNm | Fastening | Component | Ø | |
|---|---|---|---|---|
| 2 | 0.75 | Nut | INLET AND EXHAUST CAMSHAFT FRONT COVER | M6 |
3. Fit the bracket tightening the fixing nuts.
4. Fit the cover applying sealant and tightening the fixing bolts.
5. Fit the bracket tightening the fixing nuts.
- Fit the tool.
| Description | Code | Function | |
|---|---|---|---|
| Counter-torque | 1.860.765.001 | Loosen/tighten toothed timing drive pulley bolt |
- Fit the toothed driven pulley and tighten the fixing bolts to the recommended torque.
| Value - daNm | Fastening | Component | Ø | |
|---|---|---|---|---|
| 2,5 | Bolt | TIMING DUCT PULLEY | M8 |
- Remove the tool.
| Description | Code | Function | |
|---|---|---|---|
| Counter-torque | 1.860.765.001 | Loosen/tighten toothed timing drive pulley bolt |
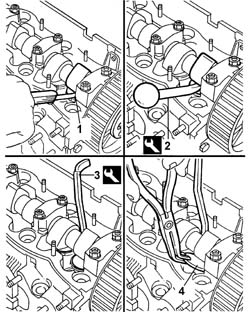
1. Check that the valve clearance, with the valves closed, corresponds to the recommended figures; if not, replace the valve clearance adjustment pads following the instructions given below.
| Subject | Value | |
|---|---|---|
| Cylinder head valves (all) | ||
| Inlet valves clearance in closed position | mm | |
| inlet | 0,45 - 0,55 | |
| exhaust | 0,45 - 0,55 |
2. Lower the tappet in question using the tool.
| Description | Code | Function | |
|---|---|---|---|
| 2 | Lever | 1.860.443.000 | Lower tappets |
3. Fit the tool.
| Description | Code | Function | |
|---|---|---|---|
| 3 | Lever | 1.860.724.001 | Keep tappets lowered |
- Remove the tool.
| Description | Code | Function | |
|---|---|---|---|
| Lever | 1.860.443.000 | Lower tappets |
4. Remove the valve clearanance adjustment plate and replace it with a one of a suitable thickness.
- Remove the tool.
| Description | Code | Function | |
|---|---|---|---|
| Lever | 1.860.724.001 | Keep tappets lowered |
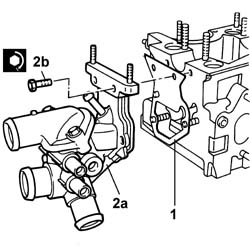
1. Remove the seal.
2. Fit the thermostat (2a) complete with pipes and tighten the bolts (2b) to the recommended torque.
| Value - daNm | Fastening | Component | Ø | |
|---|---|---|---|---|
| 2b | 1,8 | Bolt | THERMOSTAT | M8 |
- Fit the fuel distribution manifold complete with pipes and fuel pressure sensor and tighten the nuts.
- Remove the cylinder head from the vice.
- Remove the support tool from the cylinder head.
| Description | Code | Function | |
|---|---|---|---|
| Support | 1.860.470.000 | Cylinder head in vice |
Parts & tools for this job For 2002 Fiat Ducato
- PARTEngine gasket setSearch: Fiat Ducato 2002 engine gasket set
- TOOLTorque wrenchSearch: 3/8 inch torque wrench
- TOOLFeeler gauge setSearch: feeler gauge set
Links open Amazon search results in a new tab. As an Amazon Associate I earn from qualifying purchases.