
Engine - position on stand and remove
- Make
- Fiat
- Model
- Ducato Factory Service Manual
- Year
- 2002–2006
- Section
- Engine and power unit › Engine - position on stand and remove
ENGINE - POSITION ON STAND AND REMOVE
- Secure and support the engine using a hydraulic lift fitted with chains.
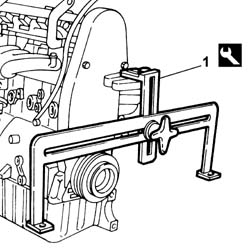
1. Fit the tool on the timing side engine mounting bracket.
| Description | Code | Function | |
|---|---|---|---|
| 1 | Brackets | 1.861.001.032 | Engine overhaul stand support |
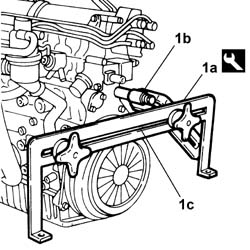
1. Fit the tool (1a) using suitable length bolts (1b) and (1c) in the flywheel side crankcase openings.
| Description | Code | Function | |
|---|---|---|---|
| 1a | Brackets | 1.861.001.034 | Engine overhaul stand support |
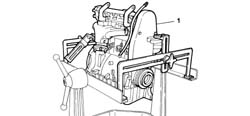
1. Fit the engine, complete with brackets, on the overhaul stand.
- Release the engine from the hoist.
- Secure and support the engine using a hydraulic lift fitted with chains.
- Undo the fastenings and remove the engine complete with supporting tools.
- Undo the fastenings and remove the engine supporting tools, then replace them.
| Description | Code | Function | |
|---|---|---|---|
| Brackets | 1.861.001.032 | Engine overhaul stand support |
| Description | Code | Function | |
|---|---|---|---|
| Brackets | 1.861.001.034 | Engine overhaul stand support |
- Secure and support the engine using a hydraulic hoist fitted with chains.
1. Undo the bolt and release the retaining collar.
2. Undo nut (2a) and remove the cold air intake pipe (2b) to the turbocharger.
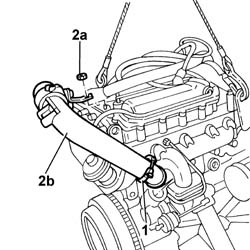
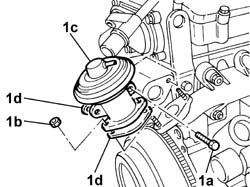
1. Undo bolts (1a), nuts (1b) and remove the EGR valve (1c) with gaskets (1d).
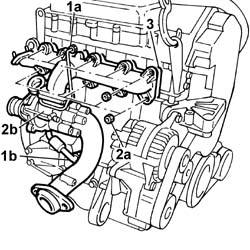
1. Unscrew the fittings and disconnect the oil input pipe to the turbocharger (1a) and the oil return pipe to the sump (1b).
2. Undo the nuts (2a) and remove the exhaust manifold complete with turbo unit (2b).
3. Remove the seal.
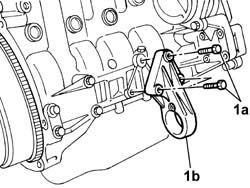
1. Undo bolts (1a) and remove the intermediate shaft mount (1b).
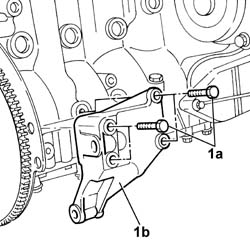
1. Undo bolts (1a) and remove the rear bracket joining the gearbox to the engine (1b).
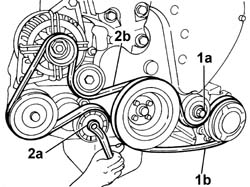
1. Loosen tensioner bolt (1a) and remove compressor drive belt (1b).
2. Use a wrench to adjust automatic tensioner (2a) and remove alternator and power steering pump drive belt (2b).
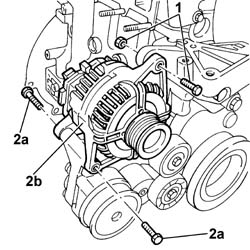
1. Undo the upper bolt.
2. Undo the bolts (2a) and remove the alternator (2b).
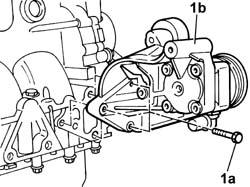
1. Undo the bolts (1a) and remove the power steering pump (1b) complete with mount and pulleys.
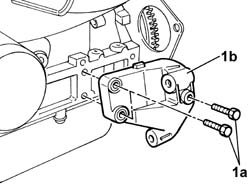
1. Undo bolts (1a) and remove the front bracket joining the gearbox to the engine (1b).
1. Undo the bolts (1a) and remove the air conditioner compressor (1b).
2. Undo bolts (2a) and remove the air conditioner compressor mount (1b).
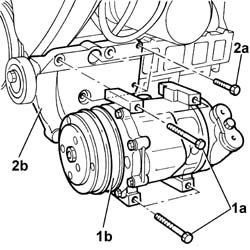
1. Fit the tool for supporting the engine, exhaust side.
| Description | Code | Function | |
|---|---|---|---|
| 1 | Brackets | 1.870.852.000 | Engine overhaul stand support |
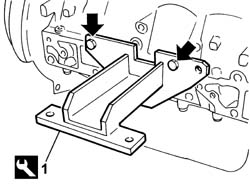
1. Prise off the fuel pipe anchorage bracket and fit the tool for supporting the engine on the intake side.
| Description | Code | Function | |
|---|---|---|---|
| 1 | Brackets | 1.870.852.000 | Engine overhaul stand support |
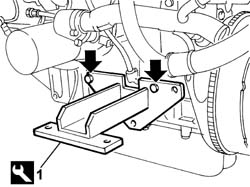
- Fit the engine on the overhaul stand.
- Release the engine from the hoist.
- Drain the engine oil from the plug on the oil sump.
- Secure and support the engine using a hydraulic hoist fitted with chains.
- Undo the fastenings and remove the engine from the overhaul stand complete with supporting tools.
- Undo the retaining bolts and remove the engine support tools.
| Description | Code | Function | |
|---|---|---|---|
| Brackets | 1.870.852.000 | Engine overhaul stand support |
- Fit the air conditioner compressor mount and tighten the retaining bolts to the specified torque.
| Value - daNm | Fastening | Component | Ø | |
|---|---|---|---|---|
| 2.5 | Bolt | COMPRESSOR MOUNT (AC) | M8 X 1.25 |
- Fit the air conditioner compressor and tighten the retaining bolts to the specified torque.
| Value - daNm | Fastening | Component | Ø | |
|---|---|---|---|---|
| 2.5 | Bolt | AIR CONDITIONER ASSEMBLY COMPRESSOR | M8 X 1.25 |
- Fit the front bracket joining the gearbox to the engine and tighten the retaining bolts.
- Fit the power assisted steering pump complete with support and pulleys and tighten the bolts to torque.
| Value - daNm | Fastening | Component | Ø | |
|---|---|---|---|---|
| 2.5 | Bolt | POWER STEERING PUMP | M8 X 1.5 |
- Fit the alternator and tighten the retaining bolt and screws to torque.
| Value - daNm | Fastening | Component | Ø | |
|---|---|---|---|---|
| (upper fastening) 4.9 | Bolt | ALTERNATOR ASSEMBLY | M10 X 1.5 |
| Value - daNm | Fastening | Component | Ø | |
|---|---|---|---|---|
| (lower fastening) 4.9 | Bolt | ALTERNATOR ASSEMBLY | M10 X 1.5 |
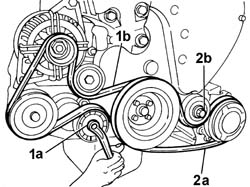
1. Fit the power steering pump and alternator drivebelt (1b) by using a wrench to adjust automatic belt tensioner (1a).
2. Fit the air conditioner compressor belt (2a) and adjust tensioner by means of tensioner (2b).
- Fit the rear bracket joining the gearbox to the engine and tighten the retaining bolts.
- Fit the intermediate shaft mount and tighten the retaining bolts to the specified torque.
| Value - daNm | Fastening | Component | Ø | |
|---|---|---|---|---|
| 5 | Bolt | FRONT DRIVE SHAFT BEARING MOUNT | M10 X 1.25 |
- Position a new gasket, fit the exhaust manifold complete with turbocharger and tighten the retaining bolts to the specified torque.
| Value - daNm | Fastening | Component | Ø | |
|---|---|---|---|---|
| 2.2 | Bolt | EXHAUST MANIFOLD/S | M8 X 1.25 |
- Tighten the connectors for the oil inlet pipe to the turbocharger and oil return pipe to the sump to the specfied torque.
| Value - daNm | Fastening | Component | Ø | |
|---|---|---|---|---|
| (Cylinder head) 0.9 | Connector | COOLANT HOSES TURBOCHARGER | 1/4" X 1.3 |
| Value - daNm | Fastening | Component | Ø | |
|---|---|---|---|---|
| (Cylinder block/crankcase) 1.7 | Connector | COOLANT HOSES TURBOCHARGER | 3/8" X 1.3 |
- Fit new gaskets, fit the EGR valve and tighten the retaning bolts and nuts
- Position the cold air intake pipe to the turbocharger complete with collar and tighten the retaining collar nut and bolt.
- Release the engine from the hoist.
- Secure and support the engine using a hydraulic hoist fitted with chains.
1. Loosen the fixing bolts.
2. Remove the compressor drive belt.
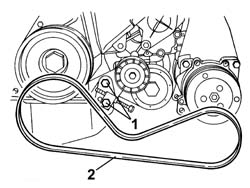
1. Loosen the fixing bolts.
2. Remove the alternator drive belt.
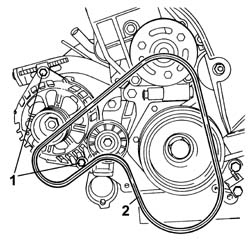
1. Undo the nuts (1a) and remove the intake pipe (1b).
2. Undo the nuts (2a) and remove the bracket (2b).
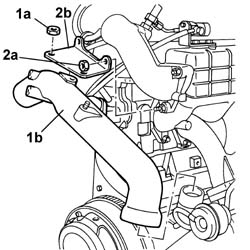
1. Undo the nuts fixing the exhaust manifold bracket to the cylinder block/crankcase.
2. Undo the engine oil pressure sender unit and release the fluid inlet pipe from the turbocharger.
3. Loosen the retaining bands and disconnect the sump fluid return pipe from the turbocharger.
4. Undo the nuts (4a) and remove the exhaust manifold (4b) complete with turbo unit.
- Remove the gasket.
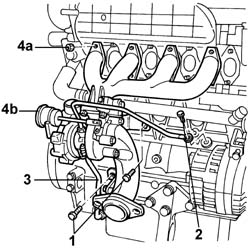
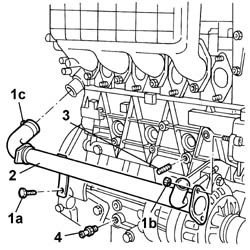
1. Undo the fixing bolts (1a), undo the fixing nuts (1a) and loosen the band (1c).
2. Remove the thermostat-water pump pipe.
3. Remove the crankcase plug.
4. Undo the turbocharger fluid return connector from the crankcase.
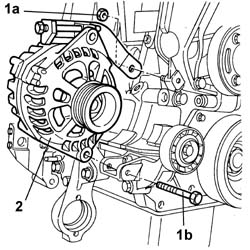
Make a note of the position and size of any shims fitted between the alternator and the mounting in order to ensure the correct alignment between the pullies when refitting.
1. Undo the lower alternator fixing bolt (1a) and undo the upper nut (1b).
2. Remove the alternator complete with belt tension adjustment device.
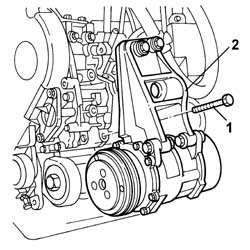
1. Undo the (four) bolts fixing the compressor support.
2. Remove the support complete with compressor and remove the fluid distick assembly.
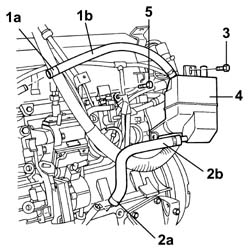
1. Loosen the band (1a) and disconnect the oil vapour recovery pipe from the cylinder head (1b).
2. Loosen the band (2a) and disconnect the condensation oil recovery pipe (2b) from the crankcase.
3. Undo the oil vapour separator fixing bolts.
4. Remove the engine oil vapour separator complete with pipes.
5. Undo the bolt fixing the coolant pipes to the heat exchanger.
6. Fold the coolant pipes to the heat exchanger downwards.
1. Fit the tool for supporting the engine, pressure pump side.
| Description | Code | Function | |
|---|---|---|---|
| 1 | Brackets | 1.861.001.033 | Engine overhaul stand support |
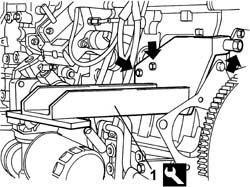
1. Fit the tool for supporting the engine, manifold side.
| Description | Code | Function | |
|---|---|---|---|
| 1 | Bracket | 1.861.001.251 | Engine overhaul stand support |
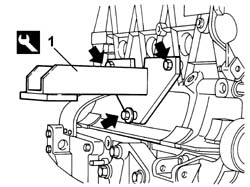
- Fit the engine on the overhaul stand.
- Release the engine from the hoist.
- Secure and support the engine using a hydraulic hoist fitted with chains.
- Undo the fastenings and remove the engine complete with supporting tools.
- Undo the fastenings and remove the engine supporting tools, then replace them.
- Position the heat exchanger coolant pipes and fasten them tightening the bolt.
- Fit the oil vapour separator and secure it using the bolts.
- Connect the oil vapour recovery pipe to the cylinder head and fasten it using the band.
- Connect the condensation oil vapour recovery pipe to the crankcase and fasten it using the band.
- Fit the support complete with compressor and secure it without tightening the bolts to torque.
- Loosen the two bolts fixing the auxiliary unit, then tighten all the bolts to torque.
| Value - daNm | Fastening | Component | Ø | |
|---|---|---|---|---|
| (engine crankcase side) 2.5 | Bolt | auxiliary unit | M8 |
| Value - daNm | Fastening | Component | Ø | |
|---|---|---|---|---|
| (engine crankcase side) 6.0 | Bolt | auxiliary unit | M12 |
- Fit the alternator complete with belt tension adjustment device and secure it without tightening the bolts.
- Fit the thermostat-pump pipe and fasten it using the bolts, nuts and band.
- Fit the intermediate propeller shaft support.
| Value - daNm | Fastening | Component | Ø | |
|---|---|---|---|---|
| (cylinder block/crankcase side) 2.1 | Nut | PROPELLER SHAFT INTERMEDIATE SUPPORT | M8 |
- Tighten the turbocharger fluid return connector to the crankcase.
- Fit the exhaust manifold gasket.
- Fit the exhaust manifold, complete with turbocharager and secure it tightening the nuts to the recommended torque.
| Value - daNm | Fastening | Component | Ø | |
|---|---|---|---|---|
| (Cylinder head side) 2.1 -2.6 | Nut | EXHAUST MANIFOLD/S | M8 |
- Connect the oil inlet pipe to the turbocharger and tighten the oil pressure sender unit.
- Connect the sump oil return pipe to the turbocharger and secure it using the band.
- Tighten the nuts fixing the exhaust manifold bracket to the cylinder block/crankcase.
- Fit the inlet pipe and secure it using the bracket.
- Fit the alternator drive belt.
- Fit the compressor drive belt.
- Secure and support the engine using a hydraulic hoist fitted with chains.
1. Loosen bolt (1a), then use a ¼" box wrench to adjust tensioner (1b) until a 4 mm diameter pin (1c) can be fitted into the reference hole.
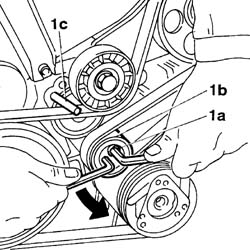
1. Leave tensioner (1b) and provisionally tighten bolt (1a), then remove accessory drivebelt (1c).
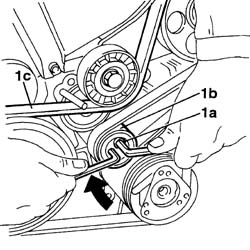
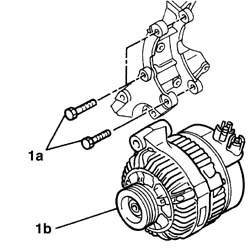
1. Undo bolts (1a) and remove alternator (1b).
Make a note of the position and size of any shims fitted between the alternator and the mounting in order to ensure the pulleys are correctly aligned when refitting.
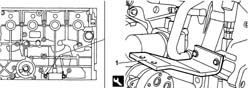
1. Fit the tool into the holes on the injection side engine block.
| Description | Code | Function | |
|---|---|---|---|
| 1 | Brackets | 1.861.001.040 | Engine overhaul stand support |
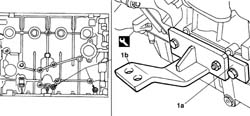
1. Fit plate (1a) into the holes on the exhaust side engine block, then fit tool (1b) to the plate.
| Description | Code | Function | |
|---|---|---|---|
| 1b | Brackets | 1.861.001.040 | Engine overhaul stand support |
- Fit the engine on the overhaul stand.
- Release the engine from the hoist.
- Secure and support the engine using a hydraulic hoist fitted with chains.
- Undo the fastenings and remove the engine complete with supporting tools.
- Undo the fastenings and remove the engine supporting tools, then replace them.
| Description | Code | Function | |
|---|---|---|---|
| Brackets | 1.861.001.040 | Engine overhaul stand support |
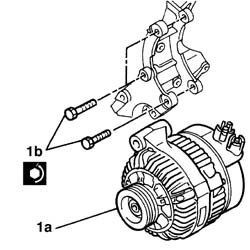
1. Fit alternator (1a) and tigten bolts (1b).
Make a note of the position and size of any washers fitted between the alternator and the mounting in order to ensure the pulleys are correctly aligned when refitting.
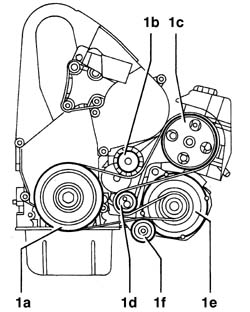
1. Version without air conditioner: fit the accessory drivebelt in the following order: (1a) crankshaft pulley, (1b) tensioner with wear gauge, (1c) power steering pump, (1d) tensioner with tension regulator, (1e) alternator, (1f) idler gear.
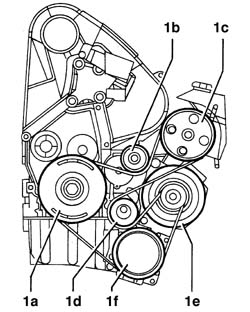
1. Version with air conditioning: fit the accessory drivebelt in the following order: (1a) crankshaft pulley, (1b) tensioner with wear gauge, (1c) power steering pump, (1d) tensioner with tension regulator, (1e) alternator, (1f) air conditioner compressor.
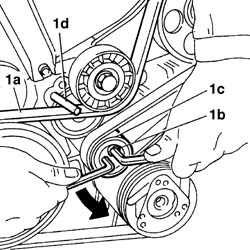
1. Fit accessory drivebelt (1a), loosen bolt (1b), then use a ¼" box wrench to adjust tensioner (1c) until a 4 mm diameter pin (1d) can be fitted into the reference hole
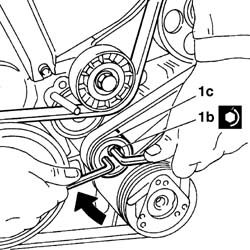
1. Leave tensioner (1a) and tighten bolt (1b) to the specified torque.
| Value - daNm | Fastening | Component | Ø | |
|---|---|---|---|---|
| 1b | 4,30 | Bolt | VARIOUS S D BELT CAM TENSIONER |
- Remove the 4 mm diameter pin.
Parts & tools for this job For 2002 Fiat Ducato
- PARTEngine gasket setSearch: Fiat Ducato 2002 engine gasket set
- TOOLTorque wrenchSearch: 3/8 inch torque wrench
- TOOLFeeler gauge setSearch: feeler gauge set
Links open Amazon search results in a new tab. As an Amazon Associate I earn from qualifying purchases.