
Engine removed, general overhaul
- Make
- Fiat
- Model
- Ducato Factory Service Manual
- Year
- 2002–2006
- Section
- Engine and power unit › Engine removed, general overhaul
ENGINE REMOVED, GENERAL OVERHAUL
Removing
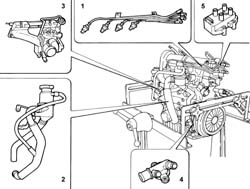
1. Remove the spark plug leads and bracket.
2. Remove the oil vapour separator complete with pipes.
3. Remove the intake manifold with throttle body and fuel manifold.
4. Remove the engine coolant intake manifold.
5. Remove the ignition coil.
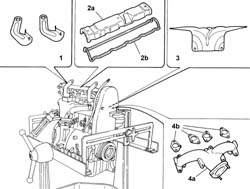
1. Remove the engine mounting brackets.
2. Remove cam cover (2a) and gasket (2b).
3. Remove the exhaust manifold heat shield.
4. Remove exhaust manifold (4a) and gaskets (4b).
- Remove the oil dipstick.
- Remove the oil filter.
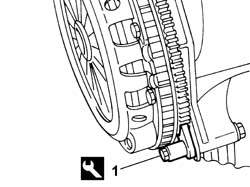
1. Fit the tool.
| Description | Code | Function | |
|---|---|---|---|
| 1 | Counter-torque | 1.860.161.001 | Tool for preventing crankshaft rotation |
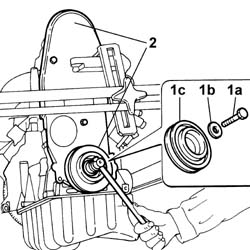
1. Undo bolt (1a) and remomve washer (1b) and accessory drivebelt pulley (1c).
2. Remove both toothed timing belt covers.
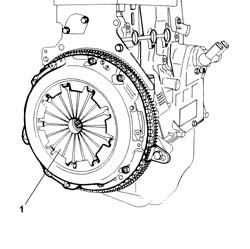
1. Unscrew the bolts and remove the clutch assembly.
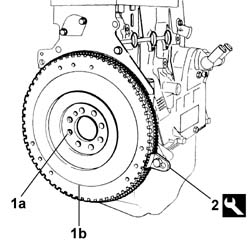
1. Undo retaining bolts (1a) and remove flywheel (1b).
2. Remove the tool.
| Description | Code | Function | |
|---|---|---|---|
| 2 | Counter-torque | 1.860.161.001 | Tool for preventing crankshaft rotation |
Suppport the flyhwheel because it is very heavy.
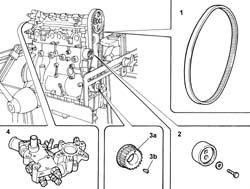
1. Loosen the tensioner roller retaining screw and remove the toothed belt.
2. Remove the tensioner roller.
3. Remove timing pinion (3a) and tab (2b).
4. Remove the coil mount with thermostat.
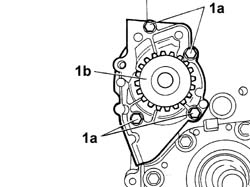
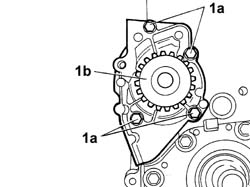
1. Undo bolts (1a) and remove coolant pump (1b).
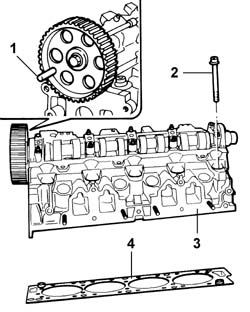
1. Turn the camshaft until the gear-cylinder head locating holes are aligned and introduce the 10 mm diameter reference pin.
2. Unscrew the ten cylinder head retaining bolts.
3. Remove the cylinder head.
4. Remove the cylinder head gasket.
- Remove the locating pins from the engine block.
- Rotate the crankcase through 180° on the overhaul stand.
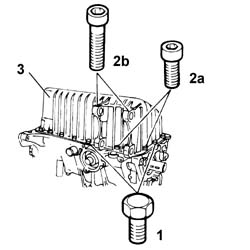
1. Loosen the hex-heated retaining bolts.
2. Unscrew the short (2a) and long (2b) hex-heated socket bolts.
3. Remove the oil sump.
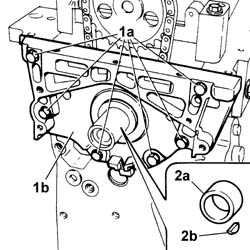
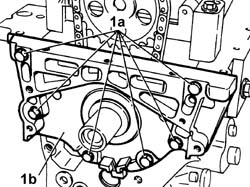
1. Undo the bolts (1a) and remove the engine block front cover (1b).
2. Remove spacer (2a) with key (2b).
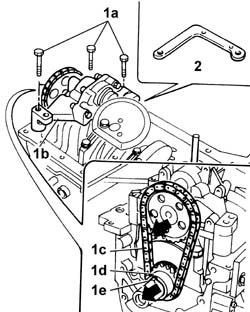
1. Undo bolts (1a) and remove oil pump (1b) complete with chain (1c), pinion (1d) and tab (1e).
2. Remove the spacer washer.
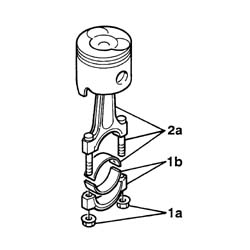
1. Undo the nuts (1a) and remove the connecting rod caps (1b) with bearing.
2. Remove the piston-connecting rod-bolt-bearing assembly (2a) by withdrawing from below.
- Repeat the same operation for all pistons.
Mark each connecting rod-cap pair to ensure effective assembly.
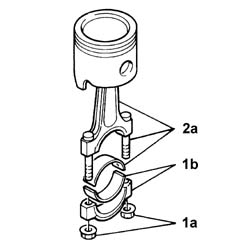
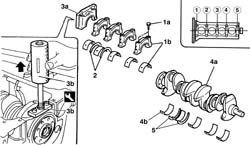
1. Undo bolts (1a) and remove the connecting rod caps (1b) with bearings, except for no.1.
The main bearing caps are marked with a number that increases from the flywheel end (no. 1) to the timing end (no. 5).
Cap no. 1 (flywheel side) also acts as a rear engine block cover.
2. Remove the lower thrust washers (2a).
3. Remove cap no. 1 (3a) using tools (3b), as described.
| Description | Code | Function | |
|---|---|---|---|
| 3b | Extractor | 1.860.854.000 | Removing rear bearing cap |
| Description | Code | Function | |
|---|---|---|---|
| 3b | Mallet | 1.846.011.000 | Removing rear bearing cap |
4. Remove crankshaft (4a) with bearings (4b)
5. Remove the upper thrust washers.
Mark the upper and lower bearings and the thrust washers to ensure correct refitting.
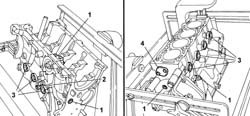
1. Undo the oil duct sealing plugs.
2. Remove the oil pressure sensor.
3. Remove the water/oil sealing plugs from the engine block using a mallet.
4. Remove the cover plate.
- Remove any damaged or broken studs.
- Undo the bolts and remove the crankcase from the mounting brackets, then place it on a special workbench.
Refitting
- Wash the dismantled components.
- Clean all parts very thoroughly before refitting.
- Clean the oil sump support surface thoroughly
1. Clean the coolant ducts between the cylinders thoroughly using a steel scourer.
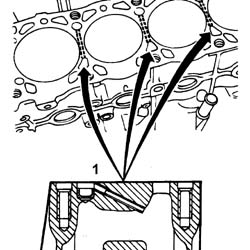
- Lubricate all the mechanical components with engine oil.
- Check that the cylinder head support surface does not have cracks or superficial grooves.
1. Check that the flatness of the cylinder head plane corresponds to the recommended values.
| Subject | Value | |
|---|---|---|
| 1 | CRANKCASE AND COMPONENTS | mm |
| Cylinder head support surface flatness | 0,03 |
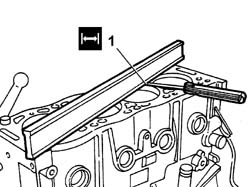
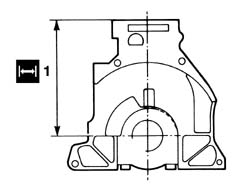
- Check that engine block height is within the recommended limits.
| Subject | Value | |
|---|---|---|
| 1 | CRANKCASE AND COMPONENTS | mm |
| Engine block height | 234,95 - 235,05 |
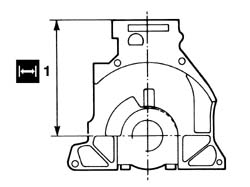
- If engine block flatness and/or height are not within specified limits, grind the cylinder head support surface.
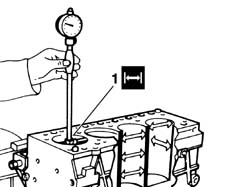
1. Measure the cylinder bore/liner diameter.
| Subject | Value | |
|---|---|---|
| 1 | CRANKCASE AND COMPONENTS | mm |
| Cylinder liner bore | 86,000 - 86,018 |
The measurements should be taken for each cylinder at three different heights for the bore/liner (1, 2, 3) and at two perpendicular planes (a, b).
- If the cylinder bore measurements are not within the recommended limits, ream the cylinder bores following the recommended oversizes.
| Subject | Value | |
|---|---|---|
| CRANKCASE AND COMPONENTS | mm | |
| 1st cylinder liner oversize | 0,25 |
| Subject | Value | |
|---|---|---|
| CRANKCASE AND COMPONENTS | mm | |
| 2nd cylinder liner oversize | 0,60 |
In the case of reaming, all the bores must have the same oversize.
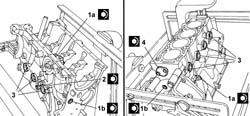
1. Fit oil duct plugs (1a) and (1b) and tighten to the specified torque.
| Value - daNm | Fastening | Component | Ø | |
|---|---|---|---|---|
| 1a | 2,5 | Plug | CRANKCASE AND COMPONENTS |
| Value - daNm | Fastening | Component | Ø | |
|---|---|---|---|---|
| 1b | 3,5 | Plug | CRANKCASE AND COMPONENTS |
| Value - daNm | Fastening | Component | Ø | |
|---|---|---|---|---|
| 1b | 2,5 | Plug | CRANKCASE AND COMPONENTS |
2. Fit the engine oil pressure sensor and tighten it to the recommended torque.
| Value - daNm | Fastening | Component | Ø | |
|---|---|---|---|---|
| 2 | 6,0 | Oil pressure sensor | CRANKCASE AND COMPONENTS |
3. Fit the water sealing plugs in the crankcase using suitable fitting tools.
4. Fit the cover plate on the engine block and tighten the bolts to the specified torque.
| Value - daNm | Fastening | Component | Ø | |
|---|---|---|---|---|
| 4 | 0,5 | Bolts | CRANKCASE AND COMPONENTS |
- Check that there are no deposits or blockages in the crankshaft lubrication ducts.
- Check the static balance of the crankshaft resting the main journals on suitable parallels.
1. Check that the diameter of the main journals is within specified limits.
| Subject | Value | |
|---|---|---|
| 1 | CRANKSHAFT | mm |
| Main journal diameter | 59,975 - 60,000 |
- If the diameter of the main journals is not correct, they should be reground to the recommended undersize.
| Subject | Value | |
|---|---|---|
| CRANKSHAFT | mm | |
| Main journal undersize | 0,300 |
The main journals should all be reground to the same undersize.
The undersize should be marked by a special stamp on the side of the no. 1 crank arm.
2. Check that the diameter of the crankpins is within specified limits.
| Subject | Value | |
|---|---|---|
| 2 | CRANKSHAFT | mm |
| Crankpin diameter | 49,984 - 50,000 |
- If the diameter of the crankpins is not correct, they should be reground to the recommended undersize.
| Subject | Value | |
|---|---|---|
| CRANKSHAFT | mm | |
| Crankpin undersize | 0,300 |
The crankpins should all be reground to the same undersize.
The undersize should be marked by a special stamp on the side of the no. 4 crank arm.
3. Check that the width of main bearing no. 2 is within specified limits.
| Subject | Value | |
|---|---|---|
| 3 | CRANKSHAFT | mm |
| Width of main bearing no. 2 | 25,70 - 25,75 |
- If the width of main bearing no. 2 is not correct, it should be reground to the recommended undersize.
| Subject | Value | |
|---|---|---|
| CRANKSHAFT | mm | |
| 1st oversize on width of main journal bearing no. 2 | 0,20 | |
| 2nd oversize on width of main journal bearing no. 2 | 0,30 | |
| 3rd oversize on width of main journal bearing no. 2 | 0,40 |
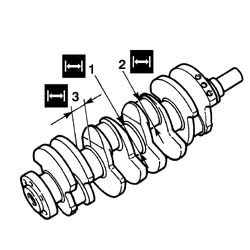
- If the crankshaft has been ground, fit new oversize bearings to restore the original clearance.
Because the crankshaft is heat-treated, it must be heat-treated again and then undergo a dimension check if it is ground.
- Check main bearing half condition by sight and replace if necessary. Do not attempt to adjust bearings.
The lower main bearings (mounting end) are divided into four thickness categories, whereas upper main bearings (engine block end) come on a single thickness category.
1. Check that the thickness of lower (1a) and upper (1b) half-bearings corresponds to specified limits; if not, replace them.
| Subject | Value | |
|---|---|---|
| 1a | Lower main bearing half thickness | mm |
| Category A | 1,844 | |
| Category B | 1,857 |
| Subject | Value | |
|---|---|---|
| 1a | Lower main bearing half thickness | mm |
| Category C | 1,866 | |
| Category D | 1,877 |
| Subject | Value | |
|---|---|---|
| 1b | MAIN BEARINGS | mm |
| Upper main bearing half thickness | 1,847 |
- If the crankshaft has been ground, fit new oversize bearings to restore the original clearance as described below.
| Subject | Value | |
|---|---|---|
| MAIN BEARINGS | ||
| Oversize lower main bearing half thickness | mm | |
| Category A | 1,994 | |
| Category B | 2,007 |
| Subject | Value | |
|---|---|---|
| MAIN BEARINGS | ||
| Oversize lower main bearing half thickness | mm | |
| Category C | 2,016 | |
| Category D | 2,027 |
| Subject | Value | |
|---|---|---|
| MAIN BEARINGS | mm | |
| Oversize upper main bearing half thickness | 1,997 |
2. Check that the thickness of the thrust half-rings corresponds to specified limits; if not, replace them.
| Subject | Value | |
|---|---|---|
| 2 | MAIN BEARINGS | mm |
| Thrust half-ring thickness | 1,850 |
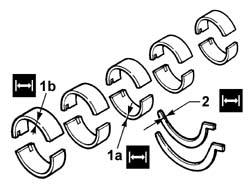
- Fit the upper main journal half-bearings in the cylinder block/crankcase.
If the bearings are reused, ensure the bearing halves are positioned correctly in their original seats.
The upper main bearing halves are grooved to help distribute the lubricant.
The lower main bearing halves lack grooves.
- Fit the crankshaft.
1. Fit the calibrated wire (plastigate) for measuring the bearing clearance.
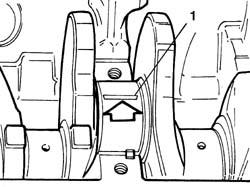
- Fit the main journal caps complete with half-bearings.
Fit cap no. 1 (flywheel end) without gaskets.
Fit cap no. 2 with thrust rings.
See the procedure on the following pages to fit main bearing caps nos 1 and 2.
Do not move the crankshaft during the checking operations.
1. Tighten the main bearing caps to the specified torque.
| Value - daNm | Fastening | Component | Ø | |
|---|---|---|---|---|
| 1 | 7,0 | Bolt | MAIN BEARINGS |
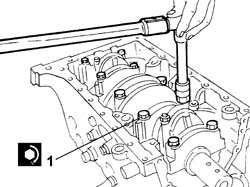
1. Remove the main bearing caps and the half-bearings and measure the journal clearance using the special graduated gauge.
| Subject | Value | |
|---|---|---|
| 1 | MAIN BEARINGS | mm |
| Radial clearance | 0,039 - 0,080 |
- Choose the bearing category lower than the measured clerance to obtain the specified operating clearance of 0.038 - 0.069 mm.
| Subject | Value | |
|---|---|---|
| MAIN BEARINGS | ||
| Lower main bearing halves | mm | |
| Category A | 0,039 - 0,052 | |
| Category B | 0,053 - 0,062 |
| Subject | Value | |
|---|---|---|
| MAIN BEARINGS | ||
| Lower main bearing halves | mm | |
| Category C | 0,063 - 0,074 | |
| Category D | 0,075 - 0,080 |
The lower bearing categories are identified by a colour: category A, blue, category B, black, category C, green, category D, red.
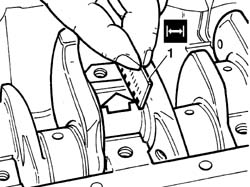
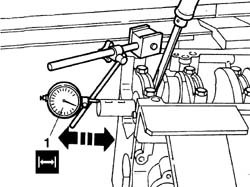
1. Refit the main bearing caps as described previously and check that the crankshaft end float is within specified limits using a magnetic base with dial gauge.
| Subject | Value | |
|---|---|---|
| 1 | CRANKSHAFT | mm |
| End float | 0,032 - 0,007 |
- If the end float is not within specified limits, grind the crankshaft and fit new oversize thrust washers to restore the initial clearance.
| Subject | Value | |
|---|---|---|
| MAIN BEARINGS | mm | |
| Thickness of thrust half-rings, 1st oversize | 1,95 | |
| Thickness of thrust half-rings, 2nd oversize | 2,00 | |
| Thickness of thrust half-rings, 3rd oversize | 2,05 |
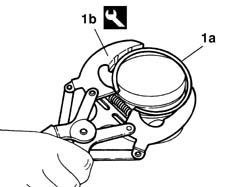
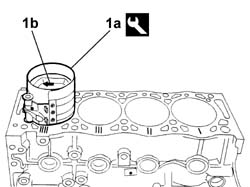
- Remove the rings (1a) from the pistons using tool (1b).
| Description | Code | Function | |
|---|---|---|---|
| 1b | Extractor/Fitting tool | 1.860.183.000 | Extracting/fitting piston circlips |
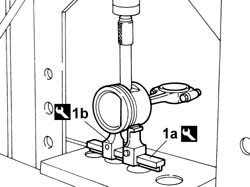
1. Remove the pin on a press using tools (1a) and (1b) and an appropriate pusher.
| Description | Code | Function | |
|---|---|---|---|
| 1a | Brackets | 1.840.005.108 | Extracting gudgeon pin from piston |
| Description | Code | Function | |
|---|---|---|---|
| 1b | Base | 1.840.005.311 | Extracting gudgeon pin from piston |
- Check the alignment of the connecting rods using suitable equipment; if it is not correct, replace the connecting rod.
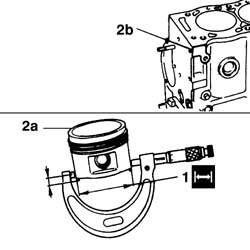
1. Check that the outer diameter of the pistons is within specified limits; if not, replace the piston complete with sealing rings and pin.
| Subject | Value | |
|---|---|---|
| 1 | ENGINE PISTON | mm |
| Outer diameter | 85,958 - 85,976 | |
| Distance to lower piston edge | 8 |
- If the cylinders have been reamed, fit pistons and new oversize rings to restore the original clearance.
| Subject | Value | |
|---|---|---|
| ENGINE PISTON | mm | |
| 1st oversize outer diameter | 86,208 - 86,226 | |
| 2nd oversize outer diameter | 86,558 - 86,576 |
2. Mark any oversize on the piston crown (2a) and the base on the engine block (2b).
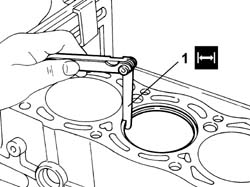
1. If the bore has to be reamed, fit the piston rings and the oil scraper ring in the cylinder bore and check that the gap between the end of each ring is within specified limits; if not, replace the piston rings.
| Subject | Value | |
|---|---|---|
| 1 | PISTON RING SET | mm |
| First ring gap | 0,20 - 0,40 | |
| Second ring gap | 0,15 - 0,35 |
The oil scraper ring is UFLEX type, i.e. without a groove.
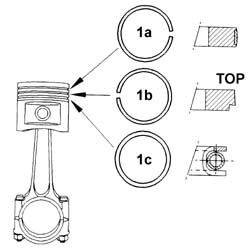
1. Fit sealing segments (1a) and (1b) and oil scaper ring (1c) on the pistons with the wording TOP facing uppermost.
The slits in the two sealing segments must be positioned 180° apart.
- Fit the piston rings using the tool.
| Description | Code | Function | |
|---|---|---|---|
| Extractor/Fitting tool | 1.860.183.000 | Extracting/fitting piston circlips |
1. Heat the connecting rods to the specified temperature using a thermostatically-controlled oven.
| Subject | Value | |
|---|---|---|
| 1 | CONNECTING ROD ASSEMBLY | °C |
| Heating | 230 - 250 |
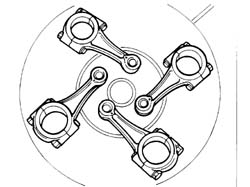
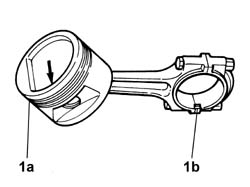
1. Position the piston in relation to the connecting rod so that arrow (1a) and bearing detent tooth (1b) are in the position shown.
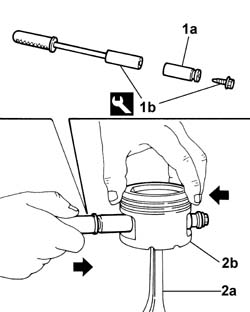
1. Fit piston pin ( 1a) to tool (1b) and lock using the threaded endpiece.
| Description | Code | Function | |
|---|---|---|---|
| 1b | Fitting tool | 1.860.275.000 | Fitting gudgeon pin |
2. Tighten connecting rod (2a) in a vice and position piston (2b) as specified.
- Quickly push the pin fully home against the piston wall.
- Repeat the same operation for all connecting rod - piston assemblies.
- Fit the upper main journal half-bearings in the cylinder block/crankcase.
- Fit the crankshaft.
Main bearing cap no. 1, flywheel side, also acts as an engine block cover and is equipped with special gaskets.
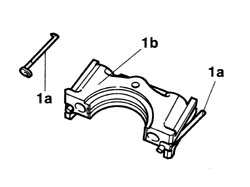
1. Fit both side gaskets (1a) into the cap seats (1b).
The gaskets are already supplied in the correct length: they should not therefore be shortened.
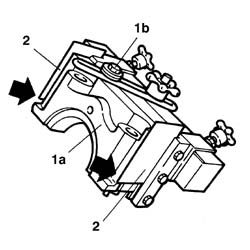
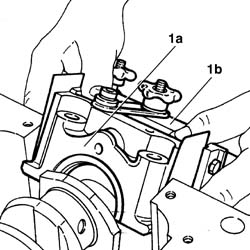
1. Position tool (1b) on cap (1a) complete with gaskets. Secure using a bolt;
2. Ensure that the steel tabs fit over the step on the cap sides;
| Description | Code | Function | |
|---|---|---|---|
| 1b | Fitting tool | 1.860.808.000 | Fitting rear bearing cap |
1. Arrange the sealant product on the cap-engine block mating surfaces and lubricate the engine block housing sides;
| Description | Qty. | Component | Type | Classification | |
|---|---|---|---|---|---|
| 1 | RECTI JOINT | MAIN BEARINGS | Silicone sealant |
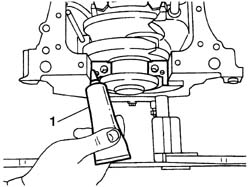
1. Fit cap (1a) initially tilted to about 45°, then straighten and carefully lower into the housing; tighten the bolts as described for the other main bearing caps and then withdraw tool (1b) horizontally.
Maximum permitted gasket protrusion is 1 mm: otherwise repeat the operation.
| Description | Code | Function | |
|---|---|---|---|
| 1b | Fitting tool | 1.860.808.000 | Fitting rear bearing cap |
1. Fit the upper half-rings: turn the grooved part of the half-ring toward the crankshaft.
2. Fit main bearing cap no. 2, fitted in turn with both lower half-rings positioned in the same way.
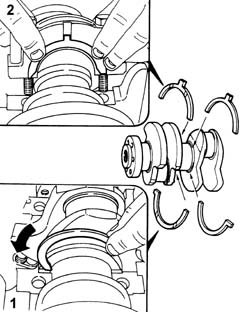
- Fit main bearing caps 3, 4 and 5 with bearing halves.
- Tighten the main bearing caps to the specified torque.
| Value - daNm | Fastening | Component | Ø | |
|---|---|---|---|---|
| 7,0 | Bolt | MAIN BEARINGS |
- Check connecting rod bearing half condition by sight and replace if necessary. Do not attempt to adjust bearings.
1. Check that the thickness of the connecting rod half-bearings is within specified limits; if not, replace them.
| Subject | Value | |
|---|---|---|
| 1 | BIG END BEARINGS | mm |
| Connecting rod bearing half thickness | 1,832 - 1,842 |
- If the crankshaft has been ground, fit new oversize bearings to restore the original clearance.
| Subject | Value | |
|---|---|---|
| BIG END BEARINGS | mm | |
| Oversize connecting rod bearing half thickness | 1,982 - 1,992 |
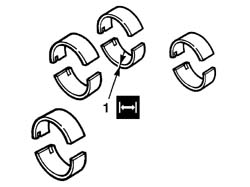
- Rotate the crankshaft until the cylinder concerned is at B.D.C.
1. Use tool (1a) to fit the piston-connecting rod assemblyl so that arrow (1b) stamped on the piston crown faces the timing side.
| Description | Code | Function | |
|---|---|---|---|
| 1a | Fitting tool | 1.860.700.000 | Fitting tool |
- Repeat the procedure for all connecting rod-piston assemblies.
- Fit the upper connecting rod half-bearings on the big end.
1. Fit the calibrated wire (plastigate) for measuring the bearing clearance.
Check the bearings, one at a time, without rotating the crankshaft.
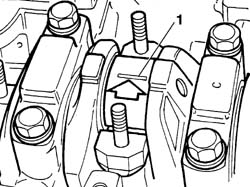
- Fit the connecting rod caps complete with lower half-bearings.
Fit the connecting rod caps so that the bearing half reference notches are on the same side.
- Tighten the connecting rod caps to the specified torque.
| Value - daNm | Fastening | Component | Ø | |
|---|---|---|---|---|
| 4,0 | Bolt | BIG END BEARINGS |
1. Remove the connecting rod cap and the half-bearing and measure the bearing clearance using the special gauge.
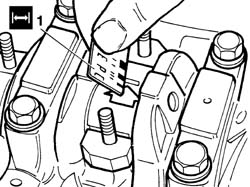
- Pretighten the connecting rod caps to the specified torque.
| Value - daNm | Fastening | Component | Ø | |
|---|---|---|---|---|
| 4,0 | Bolt | BIG END BEARINGS |
- Loosen all the connecting rod cap bolts.
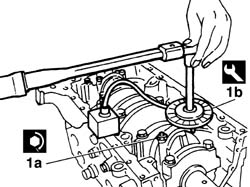
1. Tighten connecting rod caps (1a) to the specified torque using an Usag tool or similar commercial tool (1b) for angle tightening.
| Value - daNm | Fastening | Component | Ø | |
|---|---|---|---|---|
| 1a | 2,0 + 70° | Bolt | BIG END BEARINGS |
1. Remove cover (1a) from oil pump casing (1b) by unscrewing the retaining bolts.
2. Carefully take off the cover with oil pressure regulation valve spring.
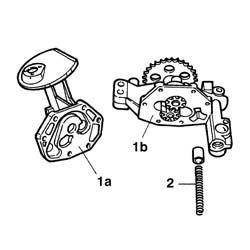
- Check component condition.
- Use a feeler gauge to check that the clearance between teeth and pump casing is not excessive.
- Re-assemble the pump, ensuring that the spring and pressure regulation valve are correctly positioned;
- Fit the spacer washer to the engine block.
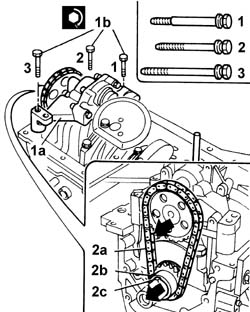
1. Fit oil pump (1a) and tighten bolts (1b) to the specified torque:
| Value - daNm | Fastening | Component | Ø | |
|---|---|---|---|---|
| 1b | 1,6 | Bolt | ENGINE OIL PUMP |
Ensure the bolts are positioned as shown in the figure.
2. Fit chain (2a), pinion (2b) and tab (2c).
- Apply sealanta to the engine block front cover contact surfaces.
| Description | Qty. | Component | Type | Classification | |
|---|---|---|---|---|---|
| Dow Corning 7091 | OIL SUMP | Silicone sealant |
- Fit the cover and tighten the bolts to the recommended torque.
| Value - daNm | Fastening | Component | Ø | |
|---|---|---|---|---|
| 15,0 | Bolt | FRONT COVER CRANKSHAFT |
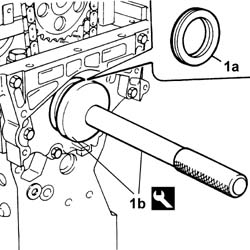
1. Fit sealing ring (1a) using tools (1b).
| Description | Code | Function | |
|---|---|---|---|
| 1b | Fitting tool | 1.860.672.000 | Fitting crankshaft front oil seal |
| Description | Code | Function | |
|---|---|---|---|
| 1b | Grip | 1.870.007.000 | Camshaft front oil seal fitting |
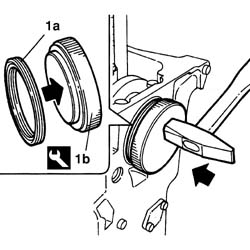
- Fit sealing ring (1a) using tools(1b).
| Description | Code | Function | |
|---|---|---|---|
| 1b | Fitting tool | 1.860.806.000 | Fitting crankshaft rear oil seal |
- Apply sealant to the engine block front cover contact surfaces.
| Description | Qty. | Component | Type | Classification | |
|---|---|---|---|---|---|
| Dow Corning 7091 | OIL SUMP | Silicone sealant |
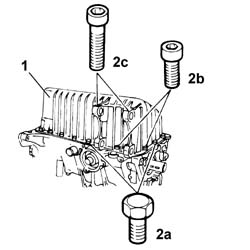
1. Fit the crankcase sump.
2. Tighten hex-headed bolts, short hex-headed socket bolts (2b) and long hex-headed socket bolts (2c) in the position shown.
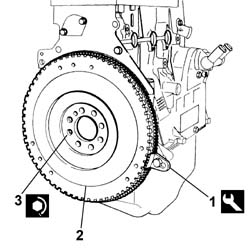
1. Fit the tool.
| Description | Code | Function | |
|---|---|---|---|
| 1 | Counter-torque | 1.860.161.001 | Tool for preventing crankshaft rotation |
2. Fit the flywheel and centre the reference dowl.
Suppport the flyhwheel because it is very heavy.
3. Tighten the retaining bolts to the recommended torque.
| Value - daNm | Fastening | Component | Ø | |
|---|---|---|---|---|
| 3 | 5 | Bolt | FLYWHEEL (MECH.) |
- Remove the tool.
| Description | Code | Function | |
|---|---|---|---|
| Counter-torque | 1.860.161.001 | Tool for preventing crankshaft rotation |
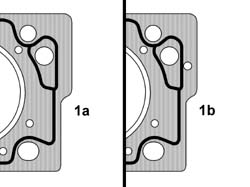
1. Select the cylinder head gasket to be used.
| Subject | Value | |
|---|---|---|
| 1a | CYLINDER HEAD GASKET | mm |
| Size | 1,30 | |
| Ground cylinder head |
| Subject | Value | |
|---|---|---|
| 1b | CYLINDER HEAD GASKET | mm |
| Size | 1,50 | |
| Ground cylinder head |
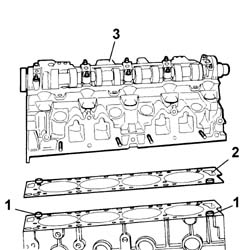
1. Position the cylinder head locating bushes on the cylinder block.
2. Position the cylinder head gasket on the cylinder block/crankcase.
3. Position the cylinder head.
1. Check that retaining bolt length does not exceed the specified value: otherwise replace.
| Subject | Value | |
|---|---|---|
| 1 | CYLINDER HEAD RETAINING ELEMENTS | mm |
| Retaining bolt length | 122,0 |
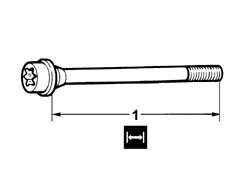
- Lubricate the bolt thread and contact surface.
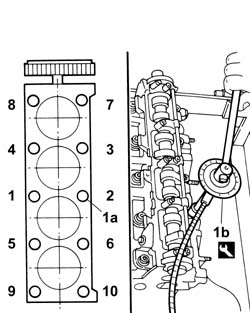
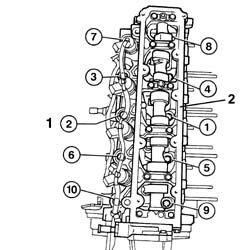
1. Tighten the cylinder head bolts (1a) to the recommended torque in the order indicated, using an Usag angular tightening tool (1b) or similar commercial tool.
| Value - daNm | Fastening | Component | Ø | |
|---|---|---|---|---|
| 1a | 3,5 + 7,0 + 160° | Bolt | CYLINDER HEAD |
Follow the order illustrated for each tightening sequence.
- Apply sealant to the engine coolant pump contact surfaces.
| Description | Qty. | Component | Type | Classification | |
|---|---|---|---|---|---|
| Dow Corning 7091 | OIL SUMP | Silicone sealant |
- Fit the coolant pump and tighten the bolts to the specified torque.
| Value - daNm | Fastening | Component | Ø | |
|---|---|---|---|---|
| 1,2 | Bolt | COOLANT PUMP |
- Apply sealant to the coil mount contact surfaces.
| Description | Qty. | Component | Type | Classification | |
|---|---|---|---|---|---|
| DOW CORNING 7091 | THERMOSTAT MOUNT | Silicone sealant |
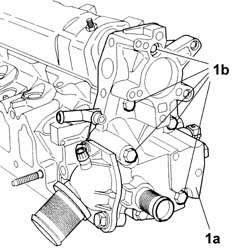
1. Fit coil mount (1a) complete with thermostat and coolant pump connection pipe and tighten retaining bolts (1b) to the specied torque.
| Value - daNm | Fastening | Component | Ø | |
|---|---|---|---|---|
| 1,6 | Bolt | THERMOSTAT MOUNT |
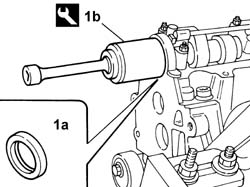
1. Fit sealing ring (1a) using tool (1b).
| Description | Code | Function | |
|---|---|---|---|
| 1b | Fitting tool | 1.860.807.000 | Camshaft front oil seal fitting |
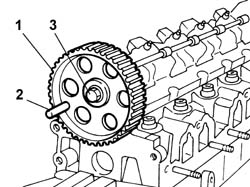
1. Fit the camshaft gear, taking care to engage the reference on the shaft with the groove on the pulley.
2. Turn the camshaft until the gear-cylinder head locating holes are aligned and introduce the 10 mm diameter reference pin.
3. Tighten the gear retaining bolt to the recommended torque.
| Value - daNm | Fastening | Component | Ø | |
|---|---|---|---|---|
| 3 | 4,5 | Bolt | TIMING DRIVEN PULLIES |
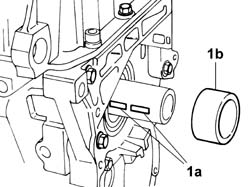
1. Fit both tabs (1a) and spacer (1b).
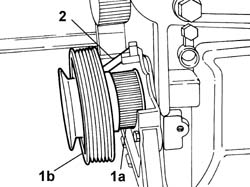
1. Fit timing pinion (1a), accessory drivebelt pulley (1b) and screw in the retaining bolt without tightening.
2. Turn the crankshaft until the pulley-engine block locating holes are aligned and introduce the 8 mm diameter reference pin.
The position assumed by the crankshaft corresponds to position when the pistons are half way along their travel.
- Fit the mobile tensioner at the lowest tension.
- Fit the timing belt over the gear, pinion, water pump and tensioner respectively.
Respect the belt fitting direction indicated by the stamped arrows (clockwise direction of rotation viewed from timing end).
- Remove 8 mm diameter pin from the accessory drivebelt pulley and the 10 mm diameter pin from the timing gear.
- Rotate the crankshaft throught two full revolutions in the direction of rotation without turning backwards.
- Check the timing adjustment is correct by repositioning the engine so that both reference pins can be introduced.
- Otherwise remove the timing belt and repeat the procedure.
- Remove the accessory drivebelt pulley.
1. Fit the square cross-section end into the mobile tensioner groove.
| Description | Code | Function | |
|---|---|---|---|
| 1 | Tool | 1.860.755.000 | Timing belt tensioning |
Modify the tool as shown in the figure.
2. Adjust mass position so that it is at the specified distance from the groove centreline.
| Subject | Value | |
|---|---|---|
| 2 | TOOTHED TIMING BELT | mm |
| Mass position | 30 |
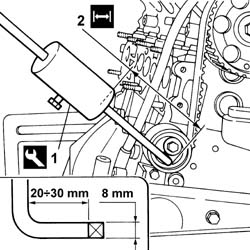
- Rotate the crankshaft throught two full revolutions in the direction of rotation without turning backwards.
- Tighten the tensioner bolt to the recommended torque.
| Value - daNm | Fastening | Component | Ø | |
|---|---|---|---|---|
| 2,1 | Bolt | MOBILE TIMING TENSIONER |
- Remove the tool.
| Description | Code | Function | |
|---|---|---|---|
| Tool | 1.860.755.000 | Timing belt tensioning |
- Fit the cylinder head gasket and cover and tighten the ten bolts to the specified torque.
| Value - daNm | Fastening | Component | Ø | |
|---|---|---|---|---|
| 1,0 | Bolt | CAM COVER |
- Fit the flywheel locking tool.
| Description | Code | Function | |
|---|---|---|---|
| Counter-torque | 1.860.161.001 | Tool for preventing crankshaft rotation |
1. Fit the lower and upper timing belt cover and tighten the retaining bolts.
2. Fit the accessory drivebelt pulley, washer and retaining bolt.
3. Tighten the retaining bolt to the specified torque.
| Value - daNm | Fastening | Component | Ø | |
|---|---|---|---|---|
| 3 | 4,0 + 51° | Bolt | CRANKSHAFT PULLEY |
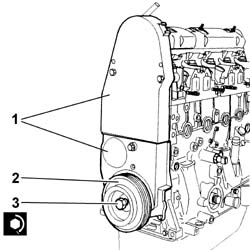
- Fit the clutch assembly and tighten the bolts to the recommended torque.
| Value - daNm | Fastening | Component | Ø | |
|---|---|---|---|---|
| 1,3 | Bolt | CLUTCH ASSEMBLY |
- Remove the tool.
| Description | Code | Function | |
|---|---|---|---|
| Counter-torque | 1.860.161.001 | Tool for preventing crankshaft rotation |
1. Fit the oil dipstick, applying sealant to the contact edge and tighten the bolt.
| Description | Qty. | Component | Type | Classification | |
|---|---|---|---|---|---|
| 1 | DOW CORNING 7091 | OIL LEVEL DIPSTICK TUBE SEAL | Silicone sealant |
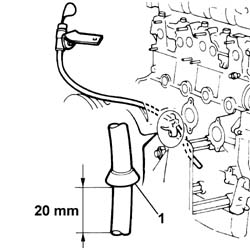
1. Fit a new oil filter.
2. Remove the oil vapour separator complete with pipes.
3. Fit the intake manifold complete with throttle body and fuel manifold with a set of new gaskets and tighten the retaining bolts to the specified torque.
| Value - daNm | Fastening | Component | Ø | |
|---|---|---|---|---|
| 1,9 | Bolt | INLET MANIFOLD |
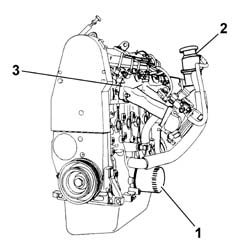
1. Fit the coolant manifold with a new gasket and tighten the bolts to the recommended torque.
| Value - daNm | Fastening | Component | Ø | |
|---|---|---|---|---|
| 2,0 | Bolt | ENGINE FLUID INTAKE FITTING |
2. Fit the exhaust manifold with a set of new gaskets and tighten the nuts to the recommended torque.
| Value - daNm | Fastening | Component | Ø | |
|---|---|---|---|---|
| 3,5 | Nut | EXHAUST MANIFOLD/S |
Always replace the exhaust manifold nuts.
3. Fit the exhaust manifold heat shield.
4. Fit the ignition coil.
5. Fit the engine mounting brackets.
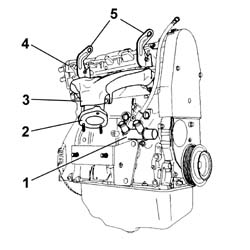
- Fit the spark plug leads and brackets.
See in Op. 1004D40
Removing
- Disconnect the electrical connections.
| Description | Connector | |
|---|---|---|
| Injector | N070A |
| Description | Connector | |
|---|---|---|
| Injector | N070B |
| Description | Connector | |
|---|---|---|
| Injector | N070C |
| Description | Connector | |
|---|---|---|
| Injector | N070D |
| Description | Connector | |
|---|---|---|
| Timing sensor | K047 |
| Description | Connector | |
|---|---|---|
| Heater plugs | A040A |
| Description | Connector | |
|---|---|---|
| Air conditioning compressor engagement electro-magnet | L020 |
| Description | Connector | |
|---|---|---|
| Injection pump third piston deactivation solenoid valve | L005 |
| Description | Connector | |
|---|---|---|
| Fuel pressure regulator | N077 |
| Description | Connector | |
|---|---|---|
| Engine coolant temperature sensor/sender unit | K036 |
| Description | Connector | |
|---|---|---|
| Heater plugs | A040B |
| Description | Connector | |
|---|---|---|
| Heater plugs | A040C |
| Description | Connector | |
|---|---|---|
| Heater plugs | A040D |
| Description | Connector | |
|---|---|---|
| Fuel pressure sensor | K083 |
| Description | Connector | |
|---|---|---|
| Engine oil pressure sensor | K028 |
1. Undo bolts (1a), release from the bands and remove duct (1b) with wiring.
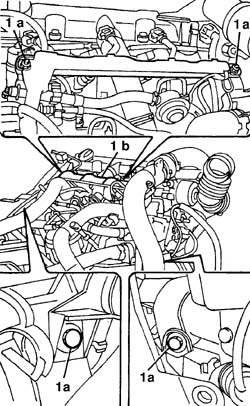
- Remove the pneumatic connection pipe from the EGR valve and wastegate.
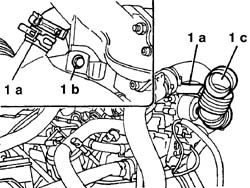
1. Remove oil vapour intake pipe (1a), undo bolt (1b), remove the turbocharger connection bands and remove intake sleeve (1d).
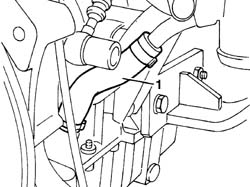
1. Remove the engine oil return pipe from the turbo.
1. Undo lower mount nut (1a) and the four flange nuts (1b) while supporting the turbocharger.
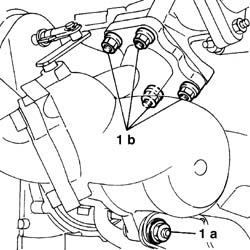
1. Lower turbocharger (1a), undo oil delivery connector (1b) and remove the turbocharger assembly.
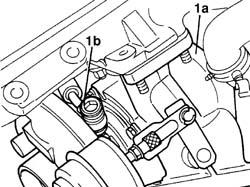
1. Undo the bolts securing the EGR pipe.
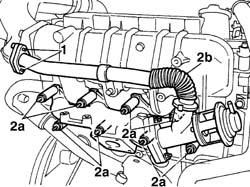
2. Undo bolts (2a) and remove exhaust manifold (2b) complete with EGR valve and pipe, spacers and gaskets.
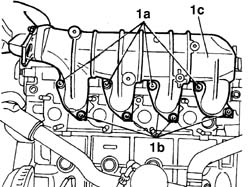
1. Undo bolts (1a) and nuts (1b) and remove intake manifold (1c) complete with plastic sleeve and gaskets.
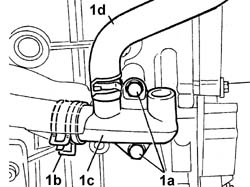
1. Unscrew bolts (1a), remove band (1b) connecting the thermostat pipe and remove the rigid coolant intake pipe to pump (1c) complete with flexible hose (1d).
1. Disconnect the heat exchanger pipe from the thermostat.
2. Disconnect the supplementary heater pipe from the thermostat.
3. Undo the oil dipstick tube retaining bolt.
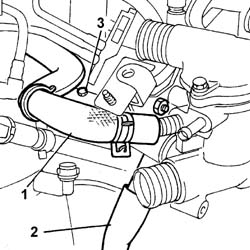
1. Undo bolts (1a) and nuts (1b) and remove thermostat (1c) complete with coolant connection pipe.
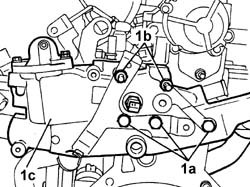
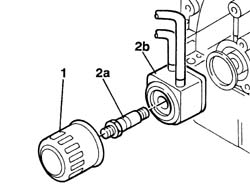
1. Remove the oil filter.
2. Undo bolt (2a) and remove oil-water exchanger (2b) complete with gasket.
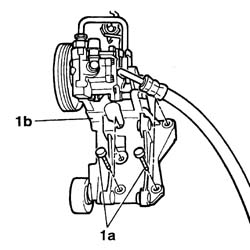
1. Undo bolts (1a) and remove power steering mount (1b) with pump and pipe.
1. Undo front bolt (1a) and rear bolt (1b) and remove compressor (1c), recovering the profiled shims and nuts.
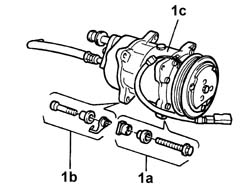
- Unscrew the retaining bolts and remove both cable and pipe brackets.
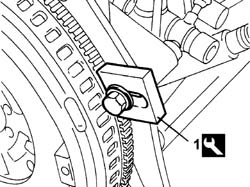
1. Fit the tool.
| Description | Code | Function | |
|---|---|---|---|
| 1 | Counter-torque | 1.860.846.000 | Flywheel lock |
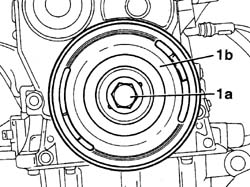
1. Unscrew bolt (1a) and remove auxiliary driveblet pulley (1b).
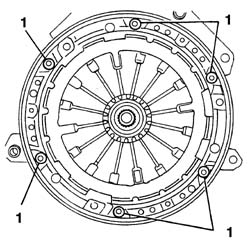
1. Unscrew the bolts and remove the clutch assembly.
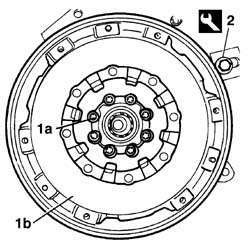
1. Undo the eight bolts (1a) and remove engine flywheel (1b).
Support the flywheel because it is very heavy.
2. Remove the tool.
| Description | Code | Function | |
|---|---|---|---|
| 2 | Counter-torque | 1.860.846.000 | Flywheel lock |
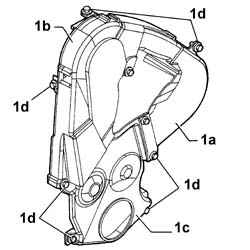
1. Remove timing belt front cover (1a), upper cover (1b) and lower cover (1c) in order by unscrewing retaining bolts (1d).
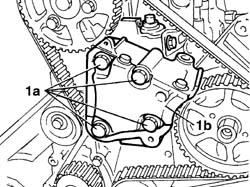
1. Undo bolts (1a) and remove the timing side engine support (1b).
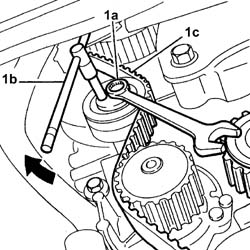
1. Loosen bolt (1a) and use a ¼" box wrench (1b) to loosen the belt, then tighten the bolt again and remove timing belt (1c).
- Disconnect the vapour recirculation pipe from the cylinder head cover.
1. Undo bolt (1a) and remove the fuel temperature sensor (1b).
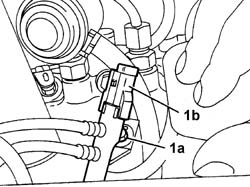
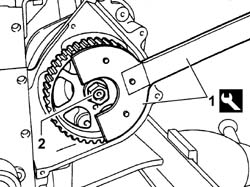
1. Fit the tools.
| Description | Code | Function | |
|---|---|---|---|
| 1 | Counter-torque | 1.860.831.000 | Timing pulley lock |
| Description | Code | Function | |
|---|---|---|---|
| 1 | Counter-torque | 1.860.831.001 | Timing pulley lock |
2. Undo the pulley bolt.
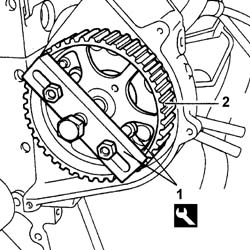
1. Fit the tools.
| Description | Code | Function | |
|---|---|---|---|
| 1 | Extractor | 1.860.954.001 | Pressure pump control pulley removal |
| Description | Code | Function | |
|---|---|---|---|
| 1 | Reaction pins | 1.860.954.002 | Pressure pump control pulley removal |
2. Remove the pulley.
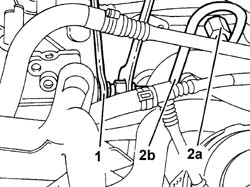
1. Use a wrench and counterwrench to loosen the pump side high pressure pipe connector.
2. Loosen the manifold side high pressure pipe connector (2a) and remove pipe (2b).
1. Undo the bolts (1a) and remove the rear bracket (1b).
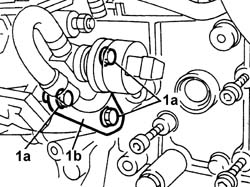
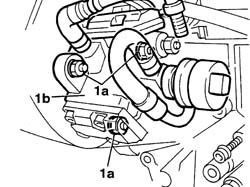
1. Undo nuts (1a) and remove high pressure pump (1b).
1. Use a wrench and counterwrench to loosen the injector side high pressure pipe connector.
2. Loosen the fuel manifold side high pressure pipe connector.
3. Remove the pipe.
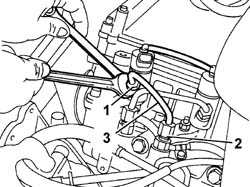
- Repeat the operations for all injectors.
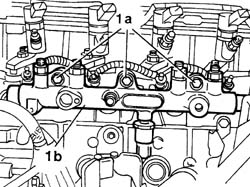
1. Undo bolts (1a) and remove manifold (1b).
1. Undo bolts (1a) and remove the high pressure pump mount (1b).
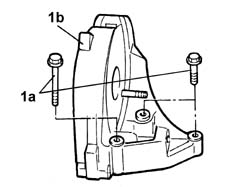
1. Undo bolts (1a) and remove the fuel filter mount (1b).
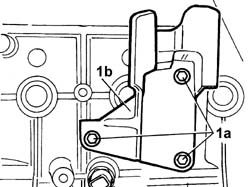
1. Undo bolt (1a) and remove the oil dipstick (1b).
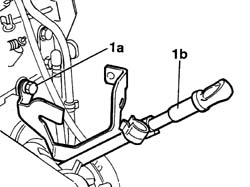
- Remove the coolant pipes from the engine block.
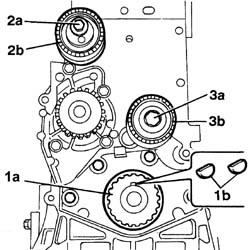
1. Remove the timing belt pulley (1a) and recover both tabs (1b).
2. Undo bolt (2a) and remove the timing belt mobile tensioner (2b).
3. Undo bolt (3a) and remove the fixed timing belt mobile tensioner (2b).
1. Undo the bolts (1a) and remove the coolant pump (1b).
1. Undo the retaining bolt and remove the engine timing sensor.
2. Undo the ten bolts (2a) and remove the cylinder head cover (2b).
- Undo the bolts in the order indicated.
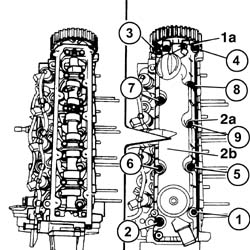
1. Undo the retaining bolts.
- Undo the bolts in the order indicated.
2. Remove the cylinder head.
- Remove the cylinder head gasket.
- Remove the locating pins.
- Rotate the crankcase through 180° on the overhaul stand.
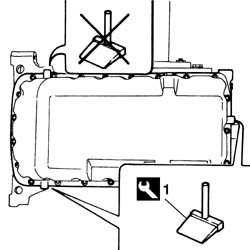
1. Unscrew the retaining bolts and remove the oil sump using the tool at the points indicated.
| Description | Code | Function | |
|---|---|---|---|
| Blade | 1.870.718.000 | Engine oil sump removal |
Do not use the tool at the point indicated due to the presence of a locating pin that could become damaged.
1. Undo bolts (1a) and remove the engine block front cover (1b).
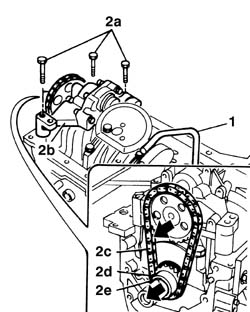
1. Undo bolt (1a) and remove the engine oil dipstick tube.
2. Undo bolts (2a) and remove oil pump (2b) complete with chain (2c), pinion (2d) and tab (2e).
1. Undo nuts (1a) and remove the connecting rod caps (1b) with bearing.
2. Remove the piston-connecting rod-bolt-bearing assembly by withdrawing from below.
- Repeat the operations for all pistons.
Mark each connecting rod-cap pair to allow correct assembly.
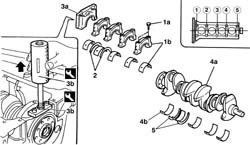
1. Undo bolts (1a) and remove the main bearing caps (1b) with bearings, except no. 1.
The main bearing caps are marked by an increasing number from the flywheel end (no. 1) to the timing end (no. 5).
Cap no. 1 (flywheel end) also acts as a rear engine block cover.
2. Remove the lower thrust rings.
3. Remove cap no. 1 (3a) using tools (3b) as shown.
| Description | Code | Function | |
|---|---|---|---|
| 3a | Extractor | 1.860.854.000 | Removing rear bearing cap |
| Description | Code | Function | |
|---|---|---|---|
| 3a | Mallet | 1.846.011.000 | Removing rear bearing cap |
4. Remove crankshaft (4a) complete with bearings (4b).
5. Remove the upper thrust rings.
Mark the upper and lower bearings and the thrust rings to allow correct refitting.
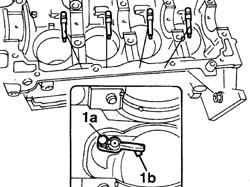
1. Undo the bolt (1a) and remove the oil sprays (1b).
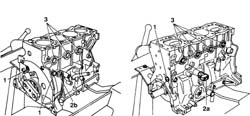
- Rotate the crankcase through 180° on the overhaul stand.
1. Unscrew the oil channel sealing plugs.
2. Remove oil pressure sensor (2a) and oil temperature sensor (2b).
3. Remove the water sealing plugs from the engine block using a drift.
- Remove any damaged or broken studs.
- Undo the bolts and remove the crankcase from the mounting brackets, then place it on a special workbench.
Refitting
- Wash the dismantled components.
- Clean all parts very thoroughly before installing.
- Clean the oil sump contact surface thoroughly.
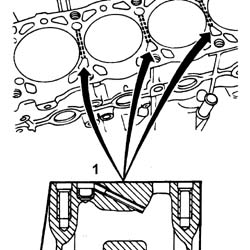
1. Clean the coolant channels between the cylinders thoroughly using a steel scourer.
- Lubricate all the mechanical components with engine oil.
- Check that the cylinder head support surface does not have cracks or superficial grooves.
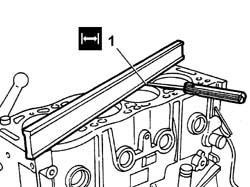
1. - Check that cylinder head support surface flatness is within specified limits.
| Subject | Value | |
|---|---|---|
| 1 | CRANKCASE AND COMPONENTS | mm |
| Cylinder head support surface flatness | 0,03 |
1. Check that crankcase height is within specified limits.
| Subject | Value | |
|---|---|---|
| 1 | CRANKCASE AND COMPONENTS | mm |
| Engine block height | 234,95 - 235,05 |
- If engine block flatness and/or height are not within specified limits, grind the cylinder head support surface without exceeding the minimum permitted height.
| Subject | Value | |
|---|---|---|
| CRANKCASE AND COMPONENTS | mm | |
| Minimum permitted crankcase height | 234,75 - 234,85 |
If the height is lower than the permitted minimum, replace the crankcase.
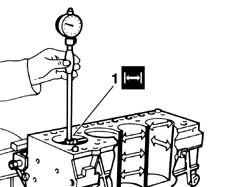
1. Measure the cylinder bore/liner diameter.
| Subject | Value | |
|---|---|---|
| 1 | CRANKCASE AND COMPONENTS | mm |
| Cylinder liner bore | 85,000 - 85,018 |
The measurements should be taken for each cylinder at three different heights for the bore/liner (1, 2, 3) and at two perpendicular planes (a, b).
- Check that the taper of the cylinder liners/bores is within the recommended limits.
| Subject | Value | |
|---|---|---|
| CRANKCASE AND COMPONENTS | mm | |
| Cylinder liner taper | < 0,009 |
- Check that the straightness of the cylinder liners/bores is within the recommended limits.
| Subject | Value | |
|---|---|---|
| CRANKCASE AND COMPONENTS | mm | |
| Cylinder liner straightness | < 0,0055 |
- If the cylinder bore measurements are not within the recommended limits, ream the cylinder bores following the recommended oversizes.
| Subject | Value | |
|---|---|---|
| CRANKCASE AND COMPONENTS | mm | |
| Cylinder liner oversize | 0,60 |
In the case of reaming, all the bores must have the same oversize.
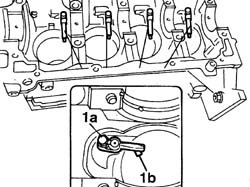
1. Fit oil sprays (1b), tighening bolt (1a) to the specified torque.
| Value - daNm | Fastening | Component | Ø | |
|---|---|---|---|---|
| 1a | 1,0 | Bolt | PISTON COOLING NOZZLES |
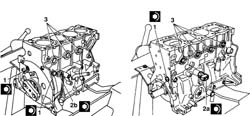
1. Fit the oil channel plugs, tightening to the specified torque.
| Value - daNm | Fastening | Component | Ø | |
|---|---|---|---|---|
| 1 | 4,0 | Plug | CRANKCASE AND COMPONENTS |
2. Fit oil pressure sensor (2a) and oil level sensor (2b) and tighten to the specified torque.
| Value - daNm | Fastening | Component | Ø | |
|---|---|---|---|---|
| 2a | 3,0 | Oil pressure sensor | CRANKCASE AND COMPONENTS |
| Value - daNm | Fastening | Component | Ø | |
|---|---|---|---|---|
| 2b | 2,7 | Oil level sensor | CRANKCASE AND COMPONENTS |
3. Fit the water sealing plugs in the crankcase using suitable fitting tools.
- Check that there are no deposits or blockages in the crankshaft lubrication ducts.
- Check the static balance of the crankshaft resting the main journals on suitable parallels.
1. Check that the diameter of the main journals is within specified limits.
| Subject | Value | |
|---|---|---|
| 1 | CRANKSHAFT | mm |
| Main journal diameter | 59,977 - 60,000 |
- If the diameter of the main journals is not correct, they should be reground to the recommended undersize.
| Subject | Value | |
|---|---|---|
| CRANKSHAFT | mm | |
| Main journal undersize | 0,300 |
The main journals should all be reground to the same undersize.
2. - Check that the diameter of the crankpins corresponds to the recommended figures.
| Subject | Value | |
|---|---|---|
| 2 | CRANKSHAFT | mm |
| Crankpin diameter | 49,980 - 50,000 |
- If the diameter of the crankpins is not correct, they should be reground to the recommended undersize.
| Subject | Value | |
|---|---|---|
| CRANKSHAFT | mm | |
| Main journal undersize | 0,300 |
The crankpins should all be reground to the same undersize.
3. Check that the width of main bearing no. 2 is within specified limits.
| Subject | Value | |
|---|---|---|
| 3 | CRANKSHAFT | mm |
| Width of main bearing no. 2 | 26,630 - 26,650 |
- If the width of main bearing no.2 is not correct, it should be reground to the recommended undersize.
| Subject | Value | |
|---|---|---|
| CRANKSHAFT | mm | |
| Oversize of main journal bearing no. 2 | 0,300 |
Because the crankshaft is heat-treated, the heat treatment should be repeated and the size re-checked if it is ground.
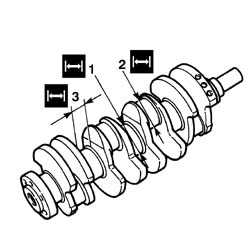
- Check the condition of the main bearing halves by sight and replace if necessary. Do not adjust bearings.
1. Check that the thickness of the half-bearings corresponds to the recommended figures; if not, replace them.
| Subject | Value | |
|---|---|---|
| 1 | MAIN BEARINGS | mm |
| Main bearing half thickness | 1,839 - 1,845 |
- If the crankshaft has been ground, fit new oversize bearings to restore the initial clearance.
| Subject | Value | |
|---|---|---|
| MAIN BEARINGS | mm | |
| Oversize main bearing half thickness | 1,989 - 1,995 |
2. Check that the thickness of the thrust half-rings corresponds to the recommended figures; if not, replace them.
| Subject | Value | |
|---|---|---|
| 2 | MAIN BEARINGS | mm |
| Thrust half-ring thickness | 2,580 - 2,630 |
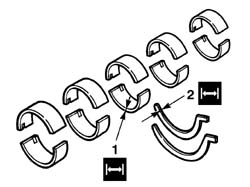
- Fit the upper main journal half-bearings in the cylinder block/crankcase.
If the bearings are used, take care to replace the half-bearings in their original seats.
The upper main bearing halves are grooved for oil distribution.
The lower main bearing halves are not grooved.
- Fit the crankshaft.
1. Fit the calibrated wire (plastigate) for measuring the bearing clearance.
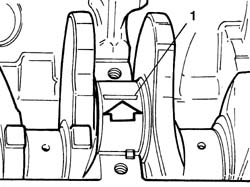
- Fit the main bearing caps complete with half-bearings.
Fit cap no. 1 (flywheel end) without gaskets.
Fit cap no. 2 complete with thrust rings.
See the procedure overleaf to fit main bearing caps no. 1 and 2.
Do not move the crankshaft during the checking operations.
1. Tighten main bearing caps (1a) to the specified torque. Use USAG tool (1b) or similar for angular tightening.
| Value - daNm | Fastening | Component | Ø | |
|---|---|---|---|---|
| 1a | 2,5 + 60° | Bolt | MAIN BEARINGS |
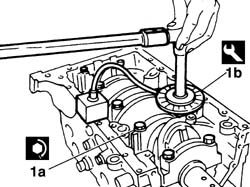
1. Remove the main bearing caps and the half-bearing and measure the journal backlash using the special graduated gauge.
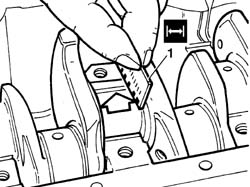
1. Fit the main bearing caps as described previously and check that crankshaft end float is within specified limits using a magnetic base with dial gauge.
| Subject | Value | |
|---|---|---|
| 1 | CRANKSHAFT | mm |
| End float | 0,032 - 0,008 |
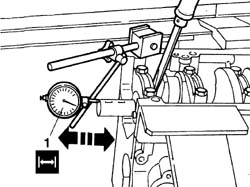
- If the end float is not within specified limits, grind the crankshaft and fit new oversize thrust rings to restore the initial clearance.
| Subject | Value | |
|---|---|---|
| MAIN BEARINGS | mm | |
| Oversize thrust half-ring thickness | 2,730 - 2,780 |
1. Remove rings (1a) from the pistons using a suitable tool (1b).
| Description | Code | Function | |
|---|---|---|---|
| 1b | Extractor/Fitting tool | 1.860.183.000 | Extracting/fitting piston circlips |
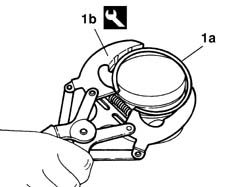
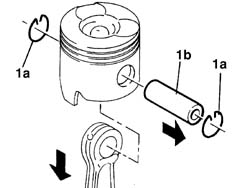
1. Remove piston rings (1a) from the grooves and withdraw pin (1b), separating the connecting rod from the piston.
- Check the alignment of the connecting rods using suitable equipment; if it is not correct, replace the connecting rod.
- Check that the small end bush bore is within the recommended limits; if not, replace the connecting rod.
| Subject | Value | |
|---|---|---|
| SMALL END BUSH | mm | |
| Inner diameter | 28,020 - 28,027 |
- Check that the piston pin seat bore is within the recommended limits; if not, replace the piston.
| Subject | Value | |
|---|---|---|
| PISTON SET | mm | |
| Piston pin seat bore | 28,010 - 28,015 |
1. Measure the piston outer diameter.
- If the cylinders have been reamed, fit new oversize pistons and rings to restore the initial clearance.
| Subject | Value | |
|---|---|---|
| ENGINE PISTON | mm | |
| Outer diameter oversize | 0,60 |
2. Mark any oversize on the piston crown (2a) and crankcase base (2b).
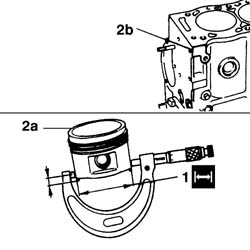
- If the bore has to be reamed, fit the piston rings and the oil scraper ring in the cylinder bore and check that the gap between the end of each ring corresponds to the recommended figures; if not, replace the piston rings.
| Subject | Value | |
|---|---|---|
| PISTON RING SET | mm | |
| First ring gap | 0,20 - 0,40 | |
| Second ring gap | 0,15 - 0,35 |
The oil scraper ring is UFLEX type and thus not notched.
1. Fit sealing segments (1a) and (1b) and oil scraper ring (1c) on the pistons with the wording TOP facing up.
Arrange the splits in both sealing segments 180° apart.
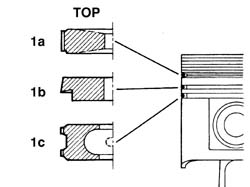
- Fit the piston rings using the tool
| Description | Code | Function | |
|---|---|---|---|
| Extractor/Fitting tool | 1.860.183.000 | Extracting/fitting piston circlips |
1. Join the connecting rods with the pistons so that the number stamped on the big end (1a) is facing opposite the reference (1b) on the piston.
- Fit the pins and secure them using the circlips.
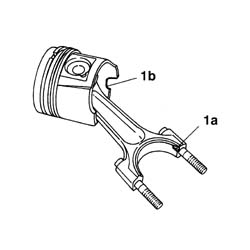
- Fit the upper main journal half-bearings in the cylinder block/crankcase.
- Fit the crankshaft.
Flywheel end main bearing cap no. 1 also acts as a crankcase cover and comes with a special gasket.
1. Fit both flexible side gaskets (1a) into the cap seats (1b).
The gaskets are supplied in the correct length: they should not therefore be shortened.
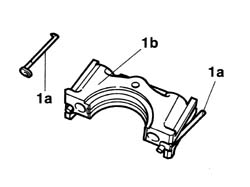
1. Position tool (1b) on cap (1a) complete with gaskets and secure using a bolt.
2. Ensure the steel tabs fit over the step in the side of the cap.
| Description | Code | Function | |
|---|---|---|---|
| 1b | Fitting tool | 1.860.808.000 | Fitting rear bearing cap |
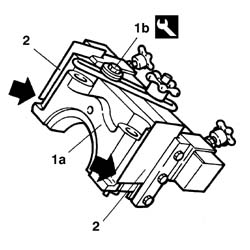
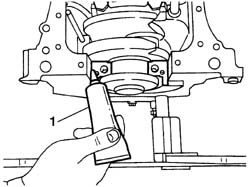
1. Spread sealant over the cap-crankcase mating surfaces and lubricate the sides of the crankcase housing.
| Description | Qty. | Component | Type | Classification | |
|---|---|---|---|---|---|
| 1 | RECTI JOINT | MAIN BEARINGS | Silicone sealant |
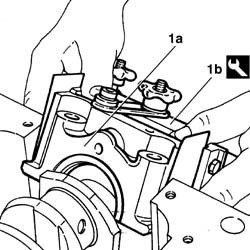
1. Insert cap (1a) at an initial angle of 45° and then straighten before lowering into the housing. Tighten the bolts as described for the other main bearing caps and then withdraw the tool horizontally (1b).
Maximum permitted tool protrusion is 1 mm: if is greater, repeat the operation.
| Description | Code | Function | |
|---|---|---|---|
| 1b | Fitting tool | 1.860.808.000 | Fitting rear bearing cap |
1. Fit the upper half-rings: the grooved side of the half-ring must be turned toward the crankshaft.
2. Fit main bearing cap no. 2 with both lower half-rings in place and position as before.
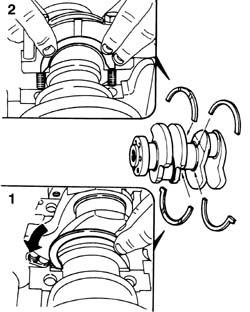
- Fit main bearing caps 3, 4 and 4 complete with bearing halves.
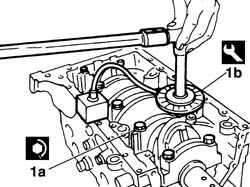
1. Tighten main bearing caps (1a) to the specified torque. Use USAG tool (1b) or similar for angular tightening.
| Value - daNm | Fastening | Component | Ø | |
|---|---|---|---|---|
| 1a | 2,5 + 60° | Bolt | MAIN BEARINGS |
- Check the condition of the connecting rod bearing halves by sight and replace if necessary. Do not adjust bearings.
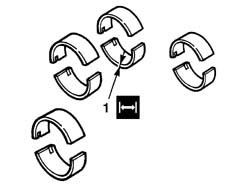
1. Check that the thickness of the connecting rod half-bearings corresponds to the recommended figures; if not, replace them.
| Subject | Value | |
|---|---|---|
| 1 | BIG END BEARINGS | mm |
| Connecting rod bearing half thickness | 1,827 - 1,838 |
- If the crankshaft has been ground, fit new oversize bearings to restore the initial clearance.
| Subject | Value | |
|---|---|---|
| BIG END BEARINGS | mm | |
| Oversize connecting rod bearing half thickness | 1,978 - 1,992 |
- Rotate the crankshaft until the cylinder concerned is at B.D.C.
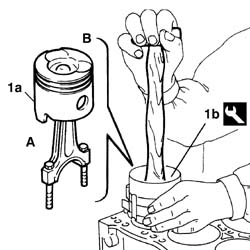
1. Fit the piston-connecting rod assembly (1a) using the tool (1b).
| Description | Code | Function | |
|---|---|---|---|
| 1b | Fitting tool | 1.860.700.000 | Piston ring fitting |
Fit the piston-connecting rod assemblies in the crankcase so that the groove on skirt (A) corresponds to the position of the oil sprays and valve millings (B) are turned toward the manifold side.
- Repeat the procedure for all connecting rod - piston sets.
- Fit the upper connecting rod half-bearings on the big end.
1. Fit the calibrated wire (plastigate) for measuring the bearing clearance.
Check the bearings, one at a time, without rotating the crankshaft.
- Fit the connecting rod caps complete with lower half-bearings.
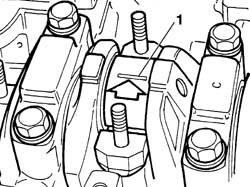
Fit the connecting rod caps so that the half-bearing reference notches are on the same side.
1. Tighten main bearing caps (1a) to the specified torque. Use USAG tool (1b) or similar for angular tightening.
| Value - daNm | Fastening | Component | Ø | |
|---|---|---|---|---|
| 1a | 2,1 + 74° | Bolt | BIG END BEARINGS |
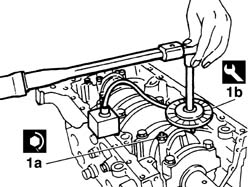
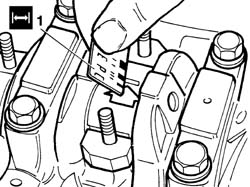
1. Remove the connecting rod cap and the half-bearing and measure the bearing clearance using the special gauge.
- Tighten the connecting rod caps finally as described previously.
1. Remove cover (1a) from oil pump case (1b) by unscrewing the retaining bolts.
2. Carefully take off the cover complete with oil pressure regulation valve spring.
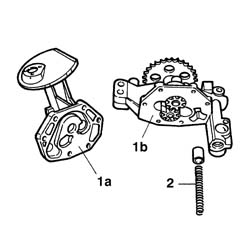
- Check the condition of the components.
- Use a feeler gauge to ensure the clearance between teeth and pump case is not excessive.
- Reassemble the pump and ensure the pressure regulation spring and valve are correctly positioned.
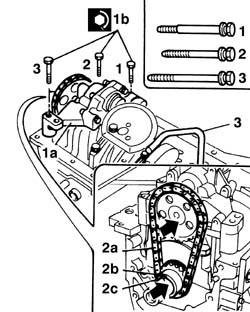
1. Fit oil pump (1a), tighening bolts (1b) to the specified torque.
| Value - daNm | Fastening | Component | Ø | |
|---|---|---|---|---|
| 1b | 1 | Bolt | ENGINE OIL PUMP |
Respect bolt position as shown in the figure.
2. Fit chain (2a), pinionn (2b) and tab (2c).
3. Fit the oil dipstick tube and tighten the bolt.
- Apply sealant to the crankcase front cover contact surfaces.
| Description | Qty. | Component | Type | Classification | |
|---|---|---|---|---|---|
| DOW CORNING 7091 | FRONT COVER CRANKSHAFT | Silicone sealant |
- Fit the cover and tighten the bolts to the recommended torque.
| Value - daNm | Fastening | Component | Ø | |
|---|---|---|---|---|
| 1,5 | Bolt | FRONT COVER CRANKSHAFT |
1. Fit sealing ring (1a) using tool (1b).
| Description | Code | Function | |
|---|---|---|---|
| 1b | Fitting tool | 1.860.855.000 | Fitting crankshaft front oil seal |
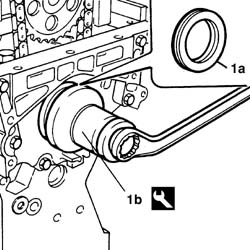
1. Fit sealing ring (1a) using tool (1b).
| Description | Code | Function | |
|---|---|---|---|
| 1b | Fitting tool | 1.860.806.000 | Fitting crankshaft rear oil seal |
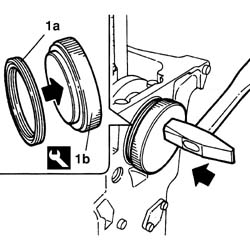
- Apply sealant to the oil sump contact surfaces.
| Description | Qty. | Component | Type | Classification | |
|---|---|---|---|---|---|
| Dow Corning 7091 | OIL SUMP | Silicone sealant |
- Fit the crankcase sump.
- Tighten the bolts securing the crankcase sump to the recommended torque.
| Value - daNm | Fastening | Component | Ø | |
|---|---|---|---|---|
| 1,6 | Bolt | OIL SUMP |
1. Fit the guide screws of tool (1a), locate engine flywheel (1b) on the screws, insert the guide cones and tighten the tool nuts (1a) until the flywheel-damper is centred.
| Description | Code | Function | |
|---|---|---|---|
| 1a | Fitting tool | 1.870.770.000 | Fitting engine flywheel |
2. Tighten the six bolts, remove the tool and tighten the remaining two bolts.
3. Fit the flywheel locking tool.
| Description | Code | Function | |
|---|---|---|---|
| 3 | Counter-torque | 1.860.846.000 | Flywheel lock |
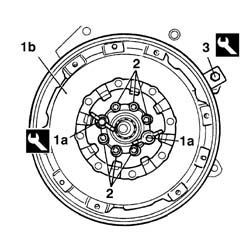
- Tighten all the bolts to the recommended torque.
| Value - daNm | Fastening | Component | Ø | |
|---|---|---|---|---|
| 4,8 | Bolt | FLYWHEEL (MECH.) |
- Remove the tool.
| Description | Code | Function | |
|---|---|---|---|
| Counter-torque | 1.860.846.000 | Flywheel lock |
- Measure the piston projection (1a) at two points 180° apart on the piston pin centre line using tool (1b) and take the average of the two values measured for each piston.
| Description | Code | Function | |
|---|---|---|---|
| 1b | Dial gauge support | 1.870.404.000 | Piston projection from cylinder head support plane check |
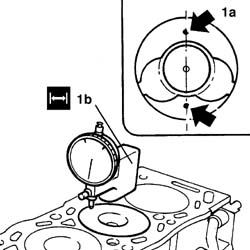
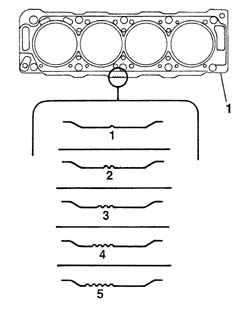
1. Select the correct size cylinder head gasket depending on the maximum value between of the averages of the protrusion for each individual piston.
the difference between the minimum and maximum values should not be more than 0.07 mm.
| Subject | Value | |
|---|---|---|
| 1 | CYLINDER HEAD GASKET | mm |
| Size | 1,30 | |
| Average protrusion | 0,470 - 0,605 |
| Subject | Value | |
|---|---|---|
| 1 | CYLINDER HEAD GASKET | mm |
| Size | 1,35 | |
| Average protrusion | 0,605 - 0,655 |
| Subject | Value | |
|---|---|---|
| 1 | CYLINDER HEAD GASKET | mm |
| Size | 1,40 | |
| Average protrusion | 0,655 - 0,705 |
| Subject | Value | |
|---|---|---|
| 1 | CYLINDER HEAD GASKET | mm |
| Size | 1,45 | |
| Average protrusion | 0,705 - 0,755 |
| Subject | Value | |
|---|---|---|
| 1 | CYLINDER HEAD GASKET | mm |
| Size | 1,50 | |
| Average protrusion | 0,755 - 0,830 |
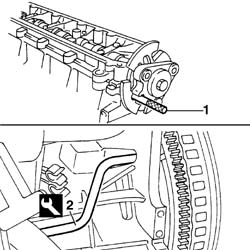
1. Turn the camshaft until the 8 mm timing reference pinn fits into the seat on the cylinder head.
2. Turn the crankshaft until the TDC reference tool fits into the seat on the flywheel.
The use of these references prevents interference between valves and pistons when the cylinder head is fitted.
| Description | Code | Function | |
|---|---|---|---|
| 2 | Pin | 1.860.863.000 | Crankshaft TDC reference |
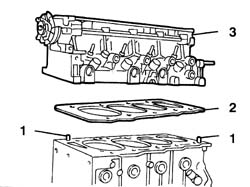
1. Position the cylinder head locating bushes on the engine block.
2. Position the cylinder head gasket on the cylinder block/crankcase.
- Position the cylinder head.
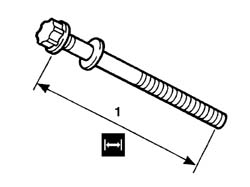
1. Check that retaining bolt length does not exceed the specified value: if so, replace it.
| Subject | Value | |
|---|---|---|
| 1 | CYLINDER HEAD RETAINING ELEMENTS | mm |
| Retaining bolt length | 133,4 |
- Lubricate the bolt thread and mating surface.
1. Tighten the cylinder head bolts to the specified torque in the order shown. Use an Usag tool or similar for angular tightening.
| Value - daNm | Fastening | Component | Ø | |
|---|---|---|---|---|
| 1 | 2,0 + 6,0 + 220° | Bolt | CYLINDER HEAD |
Follow the order shown in the figure for each tightening sequence.
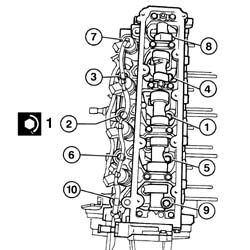
- Fit the engine timing sensor and tighten the retaining bolt.
- Fit the gasket and cam cover and tighten the ten bolts to torque.
| Value - daNm | Fastening | Component | Ø | |
|---|---|---|---|---|
| 1,0 | Bolt | CAM COVER |
- Apply sealant to the engine water pump contact surfaces.
| Description | Qty. | Component | Type | Classification | |
|---|---|---|---|---|---|
| Dow Corning 7091 | COOLANT PUMP | Silicone sealant |
- Fit the coolant pump and tighten the bolts to the recommended torque.
| Value - daNm | Fastening | Component | Ø | |
|---|---|---|---|---|
| 1,5 | Bolt | COOLANT PUMP |
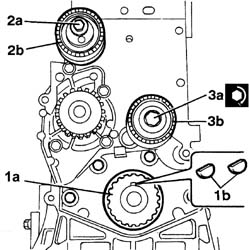
1. Fit the crankshaft drive gear by positioning both tabs (1b).
2. Fit the timing belt mobile tensioner (2a) and tighten the fixed tensioner bolt (2b).
3. Fit the timing belt idle gear (3a) and tighten bolt (3b) to the specified torque.
| Value - daNm | Fastening | Component | Ø | |
|---|---|---|---|---|
| 3b | 4.3 | Bolt | FIXED TENSIONER |
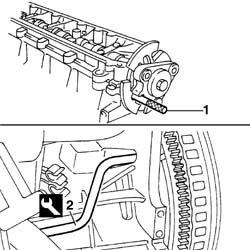
1. Remove the 8 mm diameter timing reference pin from its seat on the cylinder head.
2. Remove the TDC reference tool from its seat on the flywheel.
| Description | Code | Function | |
|---|---|---|---|
| 2 | Pin | 1.860.863.000 | Crankshaft TDC reference |
- Fit the camshaft pulley and screw in without tightening the bolts.
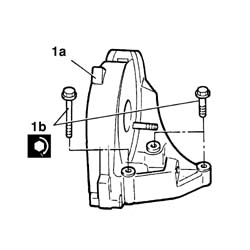
1. Fit the high pressure pump mount (1a) and tighten bolts (1b) to the specified torque. Observed the position indicated.
| Value - daNm | Fastening | Component | Ø | |
|---|---|---|---|---|
| 1b | 2 | Bolt | INJECTION PRESSURE PUMP MOUNT |
- Fit the fuel manifold and tighten the bolts to the recommended torque.
| Value - daNm | Fastening | Component | Ø | |
|---|---|---|---|---|
| 2,3 | Bolt | INJECTOR FUEL MANIFOLD (DIESEL) |
1. Fit the high pressure pipe.
2. Use a wrench and counterwrench to tighten the manifold side high pressure pipe connector to the specified torque.
| Value - daNm | Fastening | Component | Ø | |
|---|---|---|---|---|
| 2 | 2,0 | Connector | PIPE FUEL MANIFOLD TO INJECTORS |
3. Use a wrench and counterwrench to tighten the injector side pipe connector to the specified torque.
| Value - daNm | Fastening | Component | Ø | |
|---|---|---|---|---|
| 3 | 2,0 | Connector | PIPE FUEL MANIFOLD TO INJECTORS |
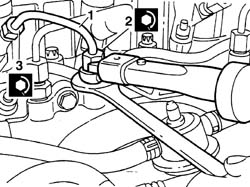
- Repeat the operations for all injectors.
- Fit the high pressure pump and tighten the nuts to the recommended torque.
| Value - daNm | Fastening | Component | Ø | |
|---|---|---|---|---|
| 2,3 | Bolt | PRESSURE PUMP |
- Fit the rear bracket and tighten the bolts to the recommended torque.
| Value - daNm | Fastening | Component | Ø | |
|---|---|---|---|---|
| 2,3 | Bolt | PRESSURE PUMP |
- Fit the high pressure pipe and use a wrench and counterwrench to tighten the pump side connector and manifold side connector to the specified torque.
| Value - daNm | Fastening | Component | Ø | |
|---|---|---|---|---|
| 2 | Connector | PRESSURE PUMP LINE TO FUEL MANIFOLD |
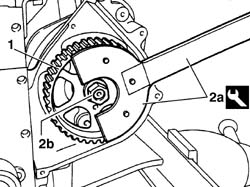
1. Fit the pressure pump pulley.
2. Use tool (2a) to tighten the retaining bolt (2b) to the specified torque.
| Description | Code | Function | |
|---|---|---|---|
| 2a | Counter-torque | 1.860.831.000 | Timing pulley lock |
| Description | Code | Function | |
|---|---|---|---|
| 2a | Counter-torque | 1.860.831.001 | Timing pulley lock |
| Value - daNm | Fastening | Component | Ø | |
|---|---|---|---|---|
| 2b | 2,0 | Bolt | PRESSURE PUMP CONTROL PULLEY |
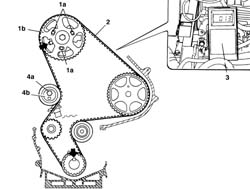
1. Loosen bolts (1a) securing camshaft pulley (1b).
2. Fit the timing belt over the pulleys in the following order.
- Check that the engine is at TDC and the camshaft reference is aligned.
3. Fit the tool C-TRONIC - 105.5 facing downward
4. Unscrew bolt (4a) securing tensioner (4b) and use a ¼" box wrench to tension the belt to the specified value.
| Subject | Value | |
|---|---|---|
| Timing belt/s | unità seem | |
| Timing belt tension | 108 |
- Lock the tensioner bolt and pulley retaining bolts.
- Turn the engine through 8 revolutions without going backwards.
- Turn the engine clockwise without going backward until the TDC reference tool enters its seat on the flywheel.
| Description | Code | Function | |
|---|---|---|---|
| Pin | 1.860.863.000 | Crankshaft TDC reference |
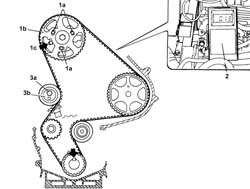
1. Loosen screw (1a) securing pulley (1b), then turn the camshaft until the 8 mm timing reference pin (1c) enters its seat on the cylinder head through the pulley.
2. Fit the tool C-TRONIC - 105.5 facing downward
3. Unscrew bolt (3a) securing tensioner (3b) and use a ¼" box wrench to tension the belt to the specified value.
| Subject | Value | |
|---|---|---|
| Timing belt/s | unità seem | |
| Timing belt tension | 54 |
- Lock the tensioner bolt and pulley retaining bolts.
- Remove the tool C-TRONIC - 105.5
- Refit the tool C-TRONIC - 105.5 and check that belt tension is within specified limits.
| Subject | Value | |
|---|---|---|
| Timing belt/s | unità seem | |
| Timing belt tension | 51 - 57 |
- Remove the tool C-TRONIC - 105.5
- Remove the TDC reference tool.
| Description | Code | Function | |
|---|---|---|---|
| Pin | 1.860.863.000 | Crankshaft TDC reference |
- Remove the 8 mm diameter timing reference pin.
- Turn the engine through two revolutions clockwise without going backward until the TDC reference tool enters its seat on the flywheel.
| Description | Code | Function | |
|---|---|---|---|
| Pin | 1.860.863.000 | Crankshaft TDC reference |
- Check that the 8 mm timing reference pin enters its seat on the cylinder heat extension through the pulley.
- If not, loosen the pulley retaining bolts and turn the camshaft anticlockwise until the 8 mm diameter timing reference pin enters its seat on the cylinder head extension through the pulley.
- Lock the pulley retaining bolts.
- Repeat the check.
- Remove the TDC reference tool.
| Description | Code | Function | |
|---|---|---|---|
| Pin | 1.860.863.000 | Crankshaft TDC reference |
- Remove the 8 mm diameter timing reference pin.
- Tighten the pulley retaining bolts to the recommended torque.
| Value - daNm | Fastening | Component | Ø | |
|---|---|---|---|---|
| 2,0 | Bolt | TIMING DRIVEN PULLIES |
- Tighten the tensioner bolt to the recommended torque.
| Value - daNm | Fastening | Component | Ø | |
|---|---|---|---|---|
| 2,3 | Bolt | MOBILE TIMING TENSIONER |
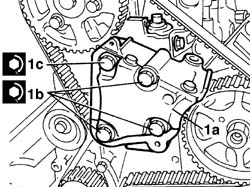
1. Fit engine mount (1a) and tighten bolts (1b) and (1c) to the specified torque.
| Value - daNm | Fastening | Component | Ø | |
|---|---|---|---|---|
| 1b | 2,0 | Bolt | RIGID ENGINE MOUNT, TIMING SIDE |
| Value - daNm | Fastening | Component | Ø | |
|---|---|---|---|---|
| 1c | 4,5 | Bolt | RIGID ENGINE MOUNT, TIMING SIDE |
- Fit the timing belt lower cover, upper cover and front cover in order and tighten the retaining bolts.
- Fit the flywheel locking tool.
| Description | Code | Function | |
|---|---|---|---|
| Counter-torque | 1.860.846.000 | Flywheel lock |
- Fit the accessory drivebelt pulley.
- Tighten the retaining bolt to the specified torque. Use USAG tool (1b) or similar for angular tightening.
| Value - daNm | Fastening | Component | Ø | |
|---|---|---|---|---|
| 4,0 + 51° | Bolt | CRANKSHAFT PULLEY |
- Fit the clutch assembly and tighten the bolts.
- Remove the tool.
| Description | Code | Function | |
|---|---|---|---|
| Counter-torque | 1.860.846.000 | Flywheel lock |
- Fit the oil vapour recirculation pipe from the engine block and cylinder head cover.
- Fit the oil dipstick and tighten the bolt.
- Fit the fuel temperature sensor and tighten the bolt.
- Fit the compressor, position the profiled shims and nuts correctly and tighten the retaining bolts.
- Fit the power steering pump mount complete with pump and pipes and tighten the retaining bolts.
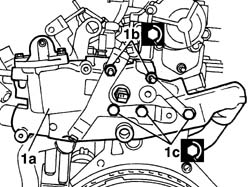
1. Fit thermostat (1a) with a new gasket complete with coolant pump connection pipe and tighten nuts (1b) and bolts (1c) to the specified torque.
| Value - daNm | Fastening | Component | Ø | |
|---|---|---|---|---|
| 1b | 2,0 | Nut | THERMOSTAT |
| Value - daNm | Fastening | Component | Ø | |
|---|---|---|---|---|
| 1c | 2,0 | Bolt | THERMOSTAT |
- Fit the oil-water exchanger with gasket and tighten the connector.
- Connect the coolant inlet and outlet pipes to the exchanger.
- Fit both wire and pipe brackets, tighten the retaining bolts and secure the pipes with the bands provided.
- Fit the coolant manifold with a new gasket and tighten the bolts to the recommended torque.
| Value - daNm | Fastening | Component | Ø | |
|---|---|---|---|---|
| 1,8 | Bolt | ENGINE FLUID INTAKE FITTING |
- Connect the pipes to the manifold using the bands provided.
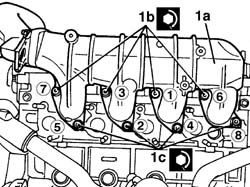
- Fit intake manifold (1a) complete with plastic sleeve with a set of new gaskets and tighten bolts (1b) and nuts (1c) to the specified torque in the order shown.
| Value - daNm | Fastening | Component | Ø | |
|---|---|---|---|---|
| 1b | 2,3 | Bolt | INLET MANIFOLD |
| Value - daNm | Fastening | Component | Ø | |
|---|---|---|---|---|
| 1c | 2,3 | Nut | INLET MANIFOLD |
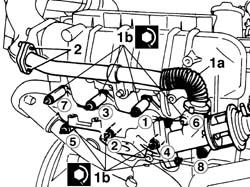
1. Fit exhaust manifold (1a) complete with EGR valve and pipe, spacers and a set of new gaskets and tighten nuts (1b) to the specified torque in the order shown.
| Value - daNm | Fastening | Component | Ø | |
|---|---|---|---|---|
| 1b | 2,0 | Nut | EXHAUST MANIFOLD/S |
2. Tighten the bolts securing the EGR pipe.
Always replace the exhaust manifold nuts.
- Position the turbocharger assembly, tighten the oil delivery fitting and place the turbocharger on its flange.
- Tighten the lower mounting nut.
- Tighten the four flange nuts.
- Fit the oil return pipe.
- Fit the intake sleeve and tighten the sleeve retaining bolt.
- Fit the oil vapour intake manifold and connect the hose to the turbocharger using the bands provided.
- Fit the pneumatic connection pipes to the EGR valve and wastegate.
- Fit the duct with wiring and tighten the bolts.
- Connect the electrical connections.
| Description | Connector | |
|---|---|---|
| Injector | N070A |
| Description | Connector | |
|---|---|---|
| Injector | N070B |
| Description | Connector | |
|---|---|---|
| Injector | N070C |
| Description | Connector | |
|---|---|---|
| Injector | N070D |
| Description | Connector | |
|---|---|---|
| Heater plugs | A040A |
| Description | Connector | |
|---|---|---|
| Air conditioning compressor engagement electro-magnet | L020 |
| Description | Connector | |
|---|---|---|
| Timing sensor | K047 |
| Description | Connector | |
|---|---|---|
| Injection pump third piston deactivation solenoid valve | L005 |
| Description | Connector | |
|---|---|---|
| Fuel pressure regulator | N077 |
| Description | Connector | |
|---|---|---|
| Engine coolant temperature sensor/sender unit | K036 |
| Description | Connector | |
|---|---|---|
| Heater plugs | A040B |
| Description | Connector | |
|---|---|---|
| Heater plugs | A040C |
| Description | Connector | |
|---|---|---|
| Heater plugs | A040D |
| Description | Connector | |
|---|---|---|
| Fuel pressure sensor | K083 |
| Description | Connector | |
|---|---|---|
| Engine oil pressure sensor | K028 |
- Do up all the wire retaining bands.
See in Op. 1004D40
Parts & tools for this job For 2002 Fiat Ducato
- PARTEngine gasket setSearch: Fiat Ducato 2002 engine gasket set
- TOOLTorque wrenchSearch: 3/8 inch torque wrench
- TOOLFeeler gauge setSearch: feeler gauge set
Links open Amazon search results in a new tab. As an Amazon Associate I earn from qualifying purchases.