
Turbocharger with catalytic converter - r.r.
- Make
- Fiat
- Model
- Grande Punto Factory Service Manual
- Year
- 2005–2012
- Section
- Engine supercharging system › Turbocharger with catalytic converter - r.r.
TURBOCHARGER WITH CATALYTIC CONVERTER - R.R.
Removing
- Position the vehicle on a lift.
- Disconnect the negative battery terminal.
Op. 1048A10 AIR FILTER ASSEMBLY - R.R.
Op. 1048A23 COLD AIR INTAKE FOR AIR FILTER - R.R
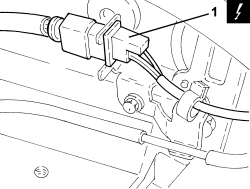
1. Disconnect the electrical connection for the Lambda sensor.
| Description | Connector | |
|---|---|---|
| 1 | Lambda sensor on catalyzer | See K017 LAMBDA SENSOR ON CATALYZER |
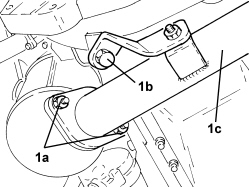
1. Undo the nuts (1a) and the bolt (1b) and disconnect the exhaust pipe (1c) from the catalytic converter.
- Disconnect the exhaust pipe from the front and intermediate flexible mountings and move it aside.
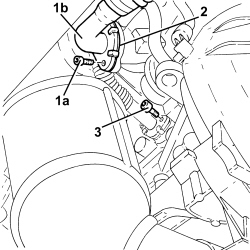
1. Undo the bolts (1a) and disconnect the air supply pipe between the turbocharger and the heat exchanger (1b), turbocharger side.
2. Remove the gasket.
3. Undo the bolts securing the engine oil return pipe from the turbocharger, crankcase side.
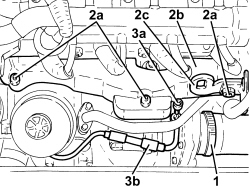
1. Loosen the band and disconnect the turbocharger air inlet hose, turbocharger side.
2. Undo the nuts (2a) and remove the exhaust manifold heat shield (2b) complete with engine lifting bracket (2c).
3. Undo the connector (3a) and disconnect the turbocharger engine oil supply pipe (3b), turbocharger side.
1. Undo the nuts fixing the turbocharger to the exhaust manifold.
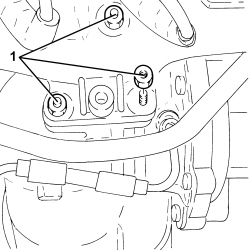
- Remove the turbocharger complete with catalytic converter, turbocharger engine oil return pipe and gasket.
- Position the catalytic converter in a vice fitted with protective jaws.
1. Undo the bolts (1a) and remove the turbocharger engine oil return pipe (1b) and gasket.
2. Open the safety flange tabs
3. Undo the bolts (3a) and separate the turbocharger (3b) from the catalytic converter (3c).
- Remove the gasket.
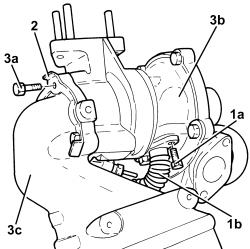
Refitting
- Place the gasket back in its housing.
- Assemble the turbocharger and the catalytic converter and tighten the bolts to the recommended torque.
| Component | Fastening | dia | Value (daNm) | Validity |
|---|---|---|---|---|
| Turbocharger to catalytic converter | Bolt | M8 | 2.7 ÷ 3.3 | 1.3 Multijet |
- Close the safety flange tabs
- Place a new engine oil return pipe from the turbocharger complete with a new gasket in its housing in the turbocharger and tighten the bolts to the recommended torque.
| Component | Fastening | dia | Value (daNm) | Validity |
|---|---|---|---|---|
| Engine oil supply pipe from turbocharger | Bolt | M6 | 0.8 ÷ 1.0 | 1.3 Multijet |
- Remove the catalytic converter from the vice.
- Place the turbocharger complete with catalytic converter, turbocharger engine oil return pipe and gasket in its housing.
- Tighten the nuts fixing the turbocharger to the exhaust manifold to the recommended torque.
| Component | Fastening | dia | Value (daNm) | Validity |
|---|---|---|---|---|
| Turbocharger to exhaust manifold | Nut | M8 | 2.2 ÷ 2.7 | 1.3 Multijet |
- Connect the engine oil supply pipe to turbocharger, turbocharger side and tighten the connector to the specified torque.
Replace the copper washer on the connector.
| Component | Fastening | dia | Value (daNm) | Validity |
|---|---|---|---|---|
| Engine oil supply pipe to turbocharger | Connector | M10 | 1.3 ÷ 1.6 | 1.3 Multijet |
- Refit the exhaust manifold heat shield with the engine lifting bracket and secure with the nuts.
- Connect the turbocharger air inlet hose, turbocharger side, and tighten the band.
- Position a new gasket between the crankcase and the engine oil return pipe to the turbocharger.
- Tighten the bolts securing the engine oil return pipe from the turbocharger, crankcase side, to the specified torque.
| Component | Fastening | dia | Value (daNm) | Validity |
|---|---|---|---|---|
| Engine oil supply pipe from turbocharger | Bolt | M6 | 0.8 ÷ 1.0 | 1.3 Multijet |
- Connect the air supply pipe between the turbocharger and heat exchanger complete with gasket, turbocharger side, and tighten the bolts.
- Connect the exhaust pipe to the front and intermediate flexible mountings.
- Connect the exhaust pipe to the catalytic converter and tighten the nuts and the bolt to the recommended torque.
| Component | Fastening | dia | Value (daNm) | Validity |
|---|---|---|---|---|
| Exhaust pipe to catalyzer | Nut | 1.3 Multijet |
| Component | Fastening | dia | Value (daNm) | Validity |
|---|---|---|---|---|
| Exhaust pipe to mounting bracket collar | Bolt | M8 | 2.2 ÷ 2.7 | 1.2 8v 1.4 8v 1.4 16v 1.3 Multijet |
- Connect the electrical connection for the Lambda sensor.
Op. 1048A23 COLD AIR INTAKE FOR AIR FILTER - R.R
Op. 1048A10 AIR FILTER ASSEMBLY - R.R.
- Connect the negative battery terminal.
- Remove the vehicle from the lift.
Removing
- Position the vehicle on a lift.
Op. 1048A10 AIR FILTER ASSEMBLY - R.R.
Op. 1048A23 COLD AIR INTAKE FOR AIR FILTER - R.R
Op. 1084B40 ENGINE OIL DELIVERY PIPE TO TURBOCHARGER - R + R
Op. 1072C44 EXHAUST MANIFOLD HEAT SHIELD - R+R
Op. 1084B42 ENGINE OIL RETURN PIPE FROM TURBO - R + R
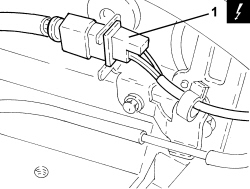
1. Disconnect the electrical connection for the Lambda sensor.
| Description | Connector | |
|---|---|---|
| 1 | Lambda sensor on catalyzer | See K017 LAMBDA SENSOR ON CATALYZER |
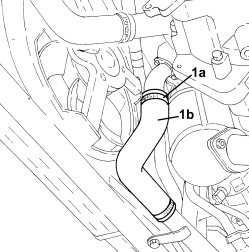
1. Loosen the band (1a) and disconnect the air supply hose (1b) between the turbocharger.
1. Undo the nuts (1a) and disconnect the exhaust pipe (1c) from the catalytic converter.
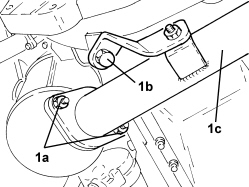
- Disconnect the exhaust pipe from the front and intermediate flexible pads and move aside.
1. Undo the nuts fixing the turbocharger to the exhaust manifold and remove.
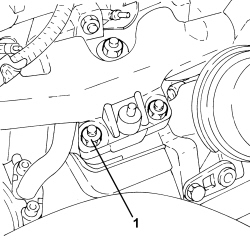
- Position the catalytic converter in a vice fitted with protective jaws.
1. Undo and remove the lambda sensor on the catalytic converter.
2. Undo the fastenings and remove the heat shield.
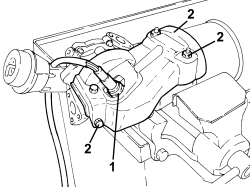
1. Open the safety flange tabs
2. Undo bolts (2a) and separate fans (2b) from catalytic converter (2c).
- Remove the gasket.
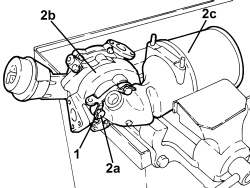
Refitting
- Place the gasket back in its housing.
- Install the turbocharger to the catalytic converter and tighten the bolts to the specified torque.
| Component | Fastening | dia | Value (daNm) | Validity |
|---|---|---|---|---|
| Turbocharger to catalytic converter | Bolt | M8 | 2.7 ÷ 3.3 | 1.3 Multijet |
- Close the safety flange tabs
- Place the heat shield back in its housing and tighten it it using the fastenings.
- Position the Lambda sensor in its housing and tighten it to the recommended torque.
| Component | Fastening | dia | Value (daNm) | Validity |
|---|---|---|---|---|
| Lambda sensor | M18 | 4.1 ÷ 5.0 | 1.2 8v 1.4 8v 1.4 16v 1.3 Multijet 90 CV |
- Remove the catalytic converter from the vice.
- Place the turbocharger back in its housing.
- Tighten the nuts fixing the turbocharger to the exhaust manifold to the recommended torque.
| Component | Fastening | dia | Value (daNm) | Validity |
|---|---|---|---|---|
| Turbocharger to exhaust manifold | Nut | M8 | 2.2 ÷ 2.7 | 1.3 Multijet |
- Connect the exhaust pipe to the front and intermediate flexible pads.
- Connect the exhaust pipe to the catalytic converter and tighten the nuts and bolt to the specified torque.
| Component | Fastening | dia | Value (daNm) | Validity |
|---|---|---|---|---|
| Exhaust pipe to catalyzer | Nut | 1.3 Multijet |
| Component | Fastening | dia | Value (daNm) | Validity |
|---|---|---|---|---|
| Exhaust pipe to mounting bracket collar | Bolt | M8 | 2.2 ÷ 2.7 | 1.2 8v 1.4 8v 1.4 16v 1.3 Multijet |
- Connect the turbocharger air inlet hose.
- Connect the electrical connection for the Lambda sensor.
Op. 1084B42 ENGINE OIL RETURN PIPE FROM TURBO - R + R
Op. 1072C44 EXHAUST MANIFOLD HEAT SHIELD - R+R
Op. 1084B40 ENGINE OIL DELIVERY PIPE TO TURBOCHARGER - R + R
Op. 1048A23 COLD AIR INTAKE FOR AIR FILTER - R.R
Op. 1048A10 AIR FILTER ASSEMBLY - R.R.
- Remove the vehicle from the lift.
Parts & tools for this job For 2005 Fiat Grande Punto
- PARTExhaust gasketSearch: Fiat Grande Punto 2005 exhaust gasket
- TOOLPenetrating oilSearch: penetrating oil
- TOOLOBD2 scannerSearch: OBD2 scanner
Links open Amazon search results in a new tab. As an Amazon Associate I earn from qualifying purchases.