
Centre exhaust pipe - r.r.
- Make
- Fiat
- Model
- Grande Punto Factory Service Manual
- Year
- 2005–2012
- Section
- Exhaust pipes and silencers › Centre exhaust pipe - r.r.
CENTRE EXHAUST PIPE - R.R.
Removing
- Position the vehicle on a lift.
- Using suitable measuring equipment, measure the cutting area for the subsequent removal of the rear silencer.
1. With reference to the flat surface of the catalytic converter flange, measure a distance of 2,258.9 mm and trace the measurement on the exhaust pipe for the subsequent cutting.
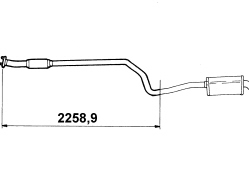
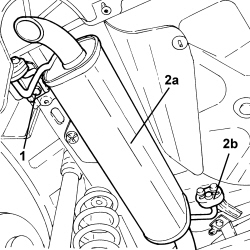
1. Undo the bolt fixing the rear exhaust silencer mounting bracket.
2. Disconnect the exhaust silencer (2a) from the flexible mounting (2b).
- Secure the rear exhaust silencer and centre exhaust pipe to the bodyshell.
1. Cut the exhaust pipe by the reference mark made previously.
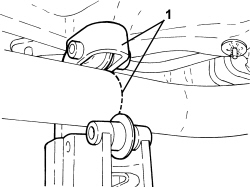
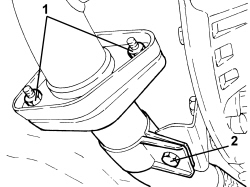
1. Undo the nuts fixing the centre exhaust pipe to the catalytic converter flange.
2. Undo the bolt fixing the collar to the bracket.
- Disconnect the centre exhaust pipe from the flexible mounting and remove it.
Refitting
- Using a file, remove the bevel from the cut end of the rear exhaust silencer.
- Place the new centre exhaust pipe in its housing and secure it to the flexible mounting.
- Join the centre exhaust pipe to the rear exhaust silencer using the metal band supplied by the Parts Dept.
- Tighten the metal band nut.
- Tighten the bolt securing the collar to the bracket to the recommended torque.
| Component | Fastening | dia | Value (daNm) | Validity |
|---|---|---|---|---|
| Exhaust pipe to mounting bracket collar | Bolt | M8 | 2.2 ÷ 2.7 | 1.2 8v 1.4 8v 1.4 16v 1.3 Multijet |
- Tighten the nuts fixing the centre exhaust pipe to the catalytic converter flange to the recommended torque.
| Component | Fastening | dia | Value (daNm) | Validity |
|---|---|---|---|---|
| Flange connecting catalyzer to exhaust pipe | Nut | M8 | 2.5 | 1.2 8v 1.4 8v 1.4 16v 1.3 Multijet |
- Connect the rear exhaust silencer to the flexible mountings.
- Tighten the bolt fixing the rear exhaust silencer mounting bracket.
- Remove the vehicle from the lift.
Removing
- Position the vehicle on a lift.
- Using suitable measuring equipment, measure the cutting area for the subsequent removal of the rear silencer.
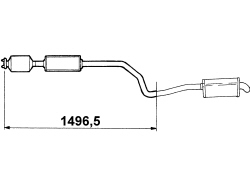
1. For versions without DPF, with reference to the flat surface of the catalytic converter flange, measure a distance of 1496.5 mm and trace the measurement on the exhaust pipe for the subsequent cutting.
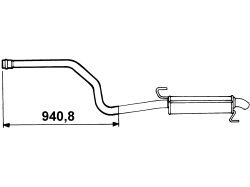
1. For versions with DPF, with reference to the end section, DPF side, of the centre exhaust pipe, measure a distance of 940.8 mm and trace the measurement on the exhaust pipe for the subsequent cutting.
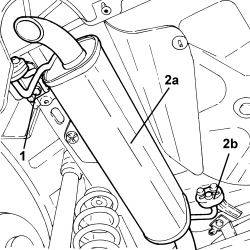
1. Undo the bolt fixing the rear silencer mounting bracket.
2. Disconnect the exhaust silencer (2a) from the flexible mounting (2b).
- Secure the rear exhaust silencer and centre exhaust pipe to the bodyshell.
1. Cut the exhaust pipe by the reference mark made previously.
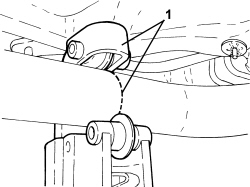
1. For versions without DPF, undo the nuts (1a) and remove the catalytic converter (1b) and gasket.
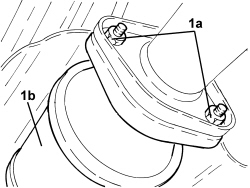
- For versions withd DPF, loosen the collar and remove the centre exhaust pipe from the DPF.
Refitting
- Using a file, remove the bevel from the cut end of the rear exhaust silencer.
- Place the new centre exhaust pipe back in its housing.
- Join the centre exhaust pipe to the rear exhaust silencer using the metal band supplied by the Parts Dept.
- Tighten the metal band nut.
- For versions without DPF, tighten the nuts fixing the centre exhaust pipe to the catalytic converter flange.
- For versions with DPF, connect the new centre exhaust pipe to the DPF and secure it using the collar.
- Connect the rear exhaust silencer to the flexible mountings.
- Tighten the bolt fixing the rear exhaust silencer mounting bracket.
- Remove the vehicle from the lift.
Removing
- Position the vehicle on a lift.
- Using suitable measuring equipment, measure the cutting area for the subsequent removal of the rear silencer.
1. With reference to the flat surface of the catalytic converter flange, measure a distance of 2,274.7 mm and trace the measurement on the exhaust pipe for the subsequent cutting.
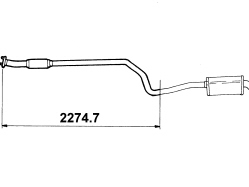
1. Undo the bolt fixing the rear exhaust silencer mounting bracket.
2. Disconnect the exhaust silencer (2a) from the flexible mounting (2b).
- Secure the rear exhaust silencer and centre exhaust pipe to the bodyshell.
1. Cut the exhaust pipe by the reference mark made previously.
1. Undo the nuts fixing the centre exhaust pipe to the catalytic converter flange.
2. Undo the bolt fixing the collar to the bracket.
- Disconnect the centre exhaust pipe from the flexible mounting and remove it.
Refitting
- Using a file, remove the bevel from the cut end of the rear exhaust silencer.
- Place the new centre exhaust pipe in its housing and secure it to the flexible mounting.
- Join the centre exhaust pipe to the rear exhaust silencer using the metal band supplied by the Parts Dept.
- Tighten the metal band nut.
- Tighten the bolt securing the collar to the bracket to the recommended torque.
| Component | Fastening | dia | Value (daNm) | Validity |
|---|---|---|---|---|
| Exhaust pipe to mounting bracket collar | Bolt | M8 | 2.2 ÷ 2.7 | 1.2 8v 1.4 8v 1.4 16v 1.3 Multijet |
- Tighten the nuts fixing the centre exhaust pipe to the catalytic converter flange to the recommended torque.
| Component | Fastening | dia | Value (daNm) | Validity |
|---|---|---|---|---|
| Flange connecting catalyzer to exhaust pipe | Nut | M8 | 2.5 | 1.2 8v 1.4 8v 1.4 16v 1.3 Multijet |
- Connect the rear exhaust silencer to the flexible mountings.
- Tighten the bolt fixing the rear exhaust silencer mounting bracket.
- Remove the vehicle from the lift.
Removing
- For versions with DPF
- Position the vehicle on a lift.
- Using suitable measuring equipment, measure the cutting area for the subsequent removal of the exhaust silencer.
1. With reference to the flat surface of the DPF flange, measure a distance of 940.8 mm and trace the measurement on the exhaust pipe for the subsequent cutting.
1. Undo the bolt fixing the rear exhaust silencer mounting bracket.
2. Disconnect the exhaust silencer (2a) from the flexible mounting (2b).
- Disconnect the front flexible mounting and secure the exhaust silencer to the bodyshell.
1. Cut the exhaust pipe by the reference mark made previously.
- Remove the rear exhaust silencer.
1. Loosen the collar (1a) and remove the centre pipe (1b) from the DPF.
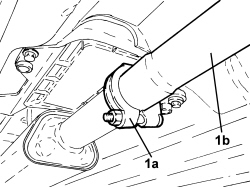
Refitting
- Using a file, remove the bevel from the cut end of the rear exhaust silencer.
- Place the new centre exhaust pipe back in its housing.
Take care over the centering pin at the end of the DPF for connection with the new centre exhaust pipe.
- Connect the front flexible mounting and join the centre exhaust pipe to the rear exhaust silencer using the metal band supplied by the Parts Dept.
- Tighten the metal band nut.
- Connect the new centre exhaust pipe to the DPF and secure it using the collar.
- Connect the rear exhaust silencer to the flexible mountings.
- Tighten the bolt fixing the rear exhaust silencer mounting bracket.
- Remove the vehicle from the lift.
Parts & tools for this job For 2005 Fiat Grande Punto
- PARTExhaust gasketSearch: Fiat Grande Punto 2005 exhaust gasket
- TOOLPenetrating oilSearch: penetrating oil
- TOOLOBD2 scannerSearch: OBD2 scanner
Links open Amazon search results in a new tab. As an Amazon Associate I earn from qualifying purchases.