
Tyre inflation pressure sensor (one)
- Make
- Fiat
- Model
- Grande Punto Factory Service Manual
- Year
- 2005–2012
- Section
- Hubs and wheels › Tyre inflation pressure sensor (one)
TYRE INFLATION PRESSURE SENSOR (ONE)
Removing
- Remove the relevant wheel.
- Remove the valve plug and deflate the tyre.
1. Break the tyre bead with the valve pointing to 6 o''clock and work from 1 o''clock to 5 o''clock.
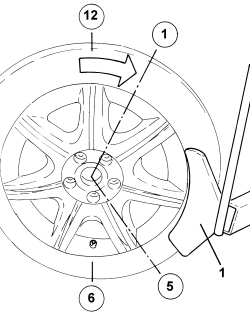
- Continue to break the tyre bead working clockwise around the wheel so that the sensor never enters the tool operating area.
- Repeat the above on the inner side of the wheel.
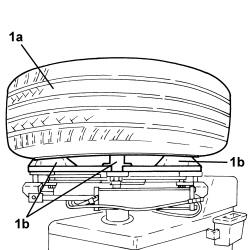
1. Fit the wheel (1a) on the tool chuck (1b), taking care not to attach the rim in the sector where the sensor is located.
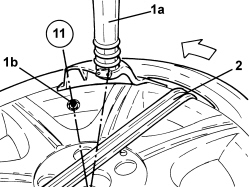
1. Lower the hydraulic arm (1a) to the edge of the rim with the sensor (1b) at 11 o''clock in relation to the hydraulic arm
2. Prise the tyre out of the rim with an appropriate lever.
- Turn the wheel anticlockwise to prise the tyre bead out of the rim.
1. Lift the tyre (1a) from the rim, lower the hydraulic arm (1b) on the inner edge with the sensor (1c) at 11 o''clock in relation to the hydraulic arm.
2. Prise the tyre out of the rim with an appropriate lever, turning the wheel anticlockwise.
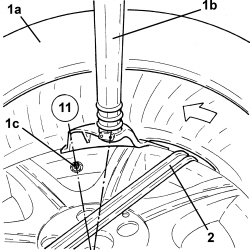
- Remove the tyre from the rim.
1. Unscrew the nut (1a) securing the sensor (1b) to the rim and remove it.
Always replace the nut whenever the wheel is refitted.
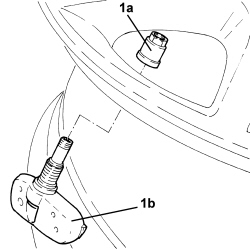
When the valve is removed from the rim, it is advisable to replace it because the rubber seal may not fit perfectly in the valve opening later on.
Refitting
- Fit the sensor in its seat, checking that the side pins rest on the rim.
A situation in which only one foot is resting on the rim and the lower part of the sensor is in contact with the rim is acceptable.
Tighten the nut to a torque of 0.34 - 0.46 daNm using an 11 mm hexagonal spanner.
Whilst fitting, make sure that the rubber seal is resting properly on the valve opening and that the valve is correctly aligned with the actual opening, adjusting the angle of the valve in relation to the sensor.
Check that the bolt behind the valve is properly inserted in its housing (the square section of the bolt should be inserted in the housing in the sensor).
During the first stage the fixing bolt behind the valve should be tightened.
Use a manual torque wrench fitted with a special torque setting device. Do not use electric or power screwers.
Tighten until a crack is heard, then continue to tighten until the torque of 0.34 - 0.46 daNm is reached.
1. Fit the rim on the tool chuck and ensure the hydraulic arm (1a) is in contact with the edge of rim (1b) as shown in the figure.
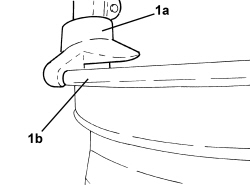
- Lubricate the entire rim surface and the inner and outer tyre bead area.
- Fit the inner edge of the tyre on the rim using the hydraulic arm.
The initial sensor position must be at 5 o''clock in relation to the hydraulic arm.
- Turn the chuck clockwise and press on the tyre by hand until it is fully fitted.
- During tyre installation, the sensor must stay in the area from 5 o''clock to 7 o''clock.
- Do the same to fit the outer edge.
- Inflate the tyre to the specified pressure.
- Tighten the plug to the valve and remove the wheel from the tool.
Parts & tools for this job For 2005 Fiat Grande Punto
- TOOLOBD2 scannerSearch: OBD2 scanner
- TOOLDigital multimeterSearch: automotive digital multimeter
- TOOLBack-probe test leadsSearch: back probe test leads
Links open Amazon search results in a new tab. As an Amazon Associate I earn from qualifying purchases.