
Fuel filler pipe assembly - r&r
- Make
- Lancia
- Model
- Thesis Factory Service Manual
- Year
- 2002–2009
- Section
- Fuel tank and pipes › Fuel filler pipe assembly - r&r
FUEL FILLER PIPE ASSEMBLY - R&R
Removing
- Position the vehicle on a lift.
- Raise the vehicle.
See in Op. 4450B08 Right REAR WHEEL (one) - R.R.
See in Op. 7055B43 REAR WHEEL ARCH LINER (one), left or right - R.R.
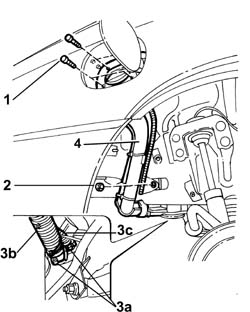
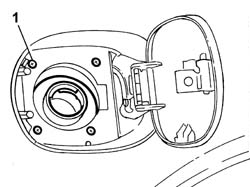
1. Undo the bolts fixing the fuel filler to the bodyshell.
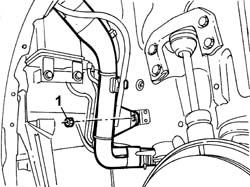
2. Undo the nut fixing the filler pipe to the bodyshell.
- Break the plastic bands and release the electrical wiring secured to the filler pipe.
3. Open the bands (3a) and disconnect the flexible section of the fuel filler pipe (3b) and the reflux pipe (3c) from the tank.
4. Remove the fuel filler pipe assembly.
Refitting
- Position the fuel filler pipe.
- Connect the flexible section of the fuel filler pipe and the reflux pipe using new bands.
- Tighten the nut fixing the filler pipe to the bodyshell.
- Tighten the bolts fixing the fuel filler to the bodyshell.
- Renew the fastening for the electrical wiring on the filler pipe using new plastic bands.
See in Op. 7055B43 REAR WHEEL ARCH LINER (one), left or right - R.R.
See in Op. 4450B08 Right REAR WHEEL (one) - R.R.
- Lower the vehicle.
- Remove the vehicle from the lift.
Removing
- Position the vehicle on a lift.
- Open the boot, remove the cover on the left hand side and disconnect the negative battery lead.
See in Op. 4450B08 Right REAR WHEEL (one) - R.R.
See in Op. 7055B45 Right rear wheel arch liner - R.R.
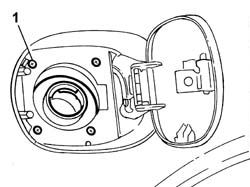
- Open the flap and undo the fuel filler pipe cap.
1. Undo the bolts fixing the fuel filler pipe to the bodyshell.
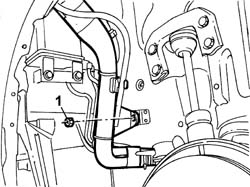
1. Undo the nut fixing the fuel filler pipe to the bodyshell.
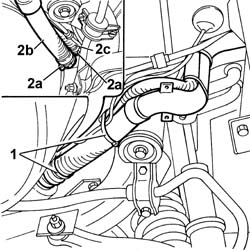
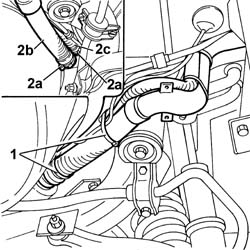
1. Disconnect the pipe retaining bands.
2. Disconnect the bands (2a) on the tank and remove the fuel filler pipe (2b) and the fuel recovery pipe (2c).
Refitting
- Position the fuel filler pipe and the fuel recovery pipe.
- Secure the pipes to the tank using the retaining bands.
- Fit the nut fixing the fuel filler pipe to the bodyshell.
- Fit the bolts fixing the fuel filler pipe to the bodyshell.
- Secure the fuel pipes to the fuel vapour recovery system pipes using bands.
- Tighten the cap and close the fuel filler pipe access flap.
See in Op. 7055B45 Right rear wheel arch liner - R.R.
See in Op. 4450B08 Right REAR WHEEL (one) - R.R.
- Connect the negative battery lead.
- Remove the vehicle from the lift.
Removing
- Position the vehicle on a lift.
- Open the boot, remove the cover on the left hand side and disconnect the negative battery lead.
See in Op. 4450B08 Right REAR WHEEL (one) - R.R.
See in Op. 7055B45 Right rear wheel arch liner - R.R.
- Open the flap and undo the fuel filler pipe cap.
1. Undo the bolts fixing the fuel filler pipe to the bodyshell.
1. Undo the nut fixing the fuel filler pipe to the bodyshell.
1. Disconnect the pipe retaining bands.
2. Disconnect the bands (2a) on the tank and remove the fuel filler pipe (2b) and the fuel recovery pipe (2c).
Refitting
- Position the fuel filler pipe and the fuel recovery pipe.
- Secure the pipes to the tank using the retaining bands.
- Fit the nut fixing the fuel filler pipe to the bodyshell.
- Fit the bolts fixing the fuel filler pipe to the bodyshell.
- Secure the fuel pipes to the fuel vapour recovery system pipes using bands.
- Tighten the cap and close the fuel filler pipe access flap.
See in Op. 7055B45 Right rear wheel arch liner - R.R.
See in Op. 4450B08 Right REAR WHEEL (one) - R.R.
- Connect the negative battery lead.
- Remove the vehicle from the lift.
Removing
- Position the vehicle on a lift.
- Raise the vehicle.
See in Op. 4450B08 Right REAR WHEEL (one) - R.R.
See in Op. 7055B43 REAR WHEEL ARCH LINER (one), left or right - R.R.
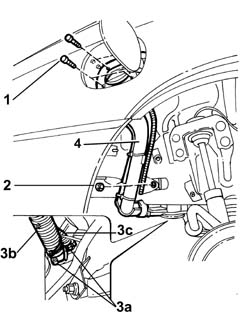
1. Undo the bolts fixing the fuel filler pipe to the bodyshell.
2. Undo the nut fixing the filler pipe to the bodyshell.
- Break the plastic bands and release the electrical wiring secured to the filler pipe.
3. Open the bands (3a) and disconnect the flexible section of the fuel filler pipe (3b) and the reflux pipe (3c) from the tank.
4. Remove the fuel filler pipe assembly.
Refitting
- Position the fuel filler pipe.
- Connect the flexible section of the fuel filler pipe and the reflux pipe using new bands.
- Tighten the nut fixing the filler pipe to the bodyshell.
- Tighten the bolts fixing the fuel filler pipe to the bodyshell.
- Renew the fastening for the electrical wiring on the filler pipe using new plastic bands.
See in Op. 7055B43 REAR WHEEL ARCH LINER (one), left or right - R.R.
See in Op. 4450B08 Right REAR WHEEL (one) - R.R.
- Lower the vehicle.
- Remove the vehicle from the lift.
Parts & tools for this job For 2002 Lancia Thesis
- PARTEngine gasket setSearch: Lancia Thesis 2002 engine gasket set
- TOOLTorque wrenchSearch: 3/8 inch torque wrench
- TOOLFeeler gauge setSearch: feeler gauge set
Links open Amazon search results in a new tab. As an Amazon Associate I earn from qualifying purchases.